What’s New
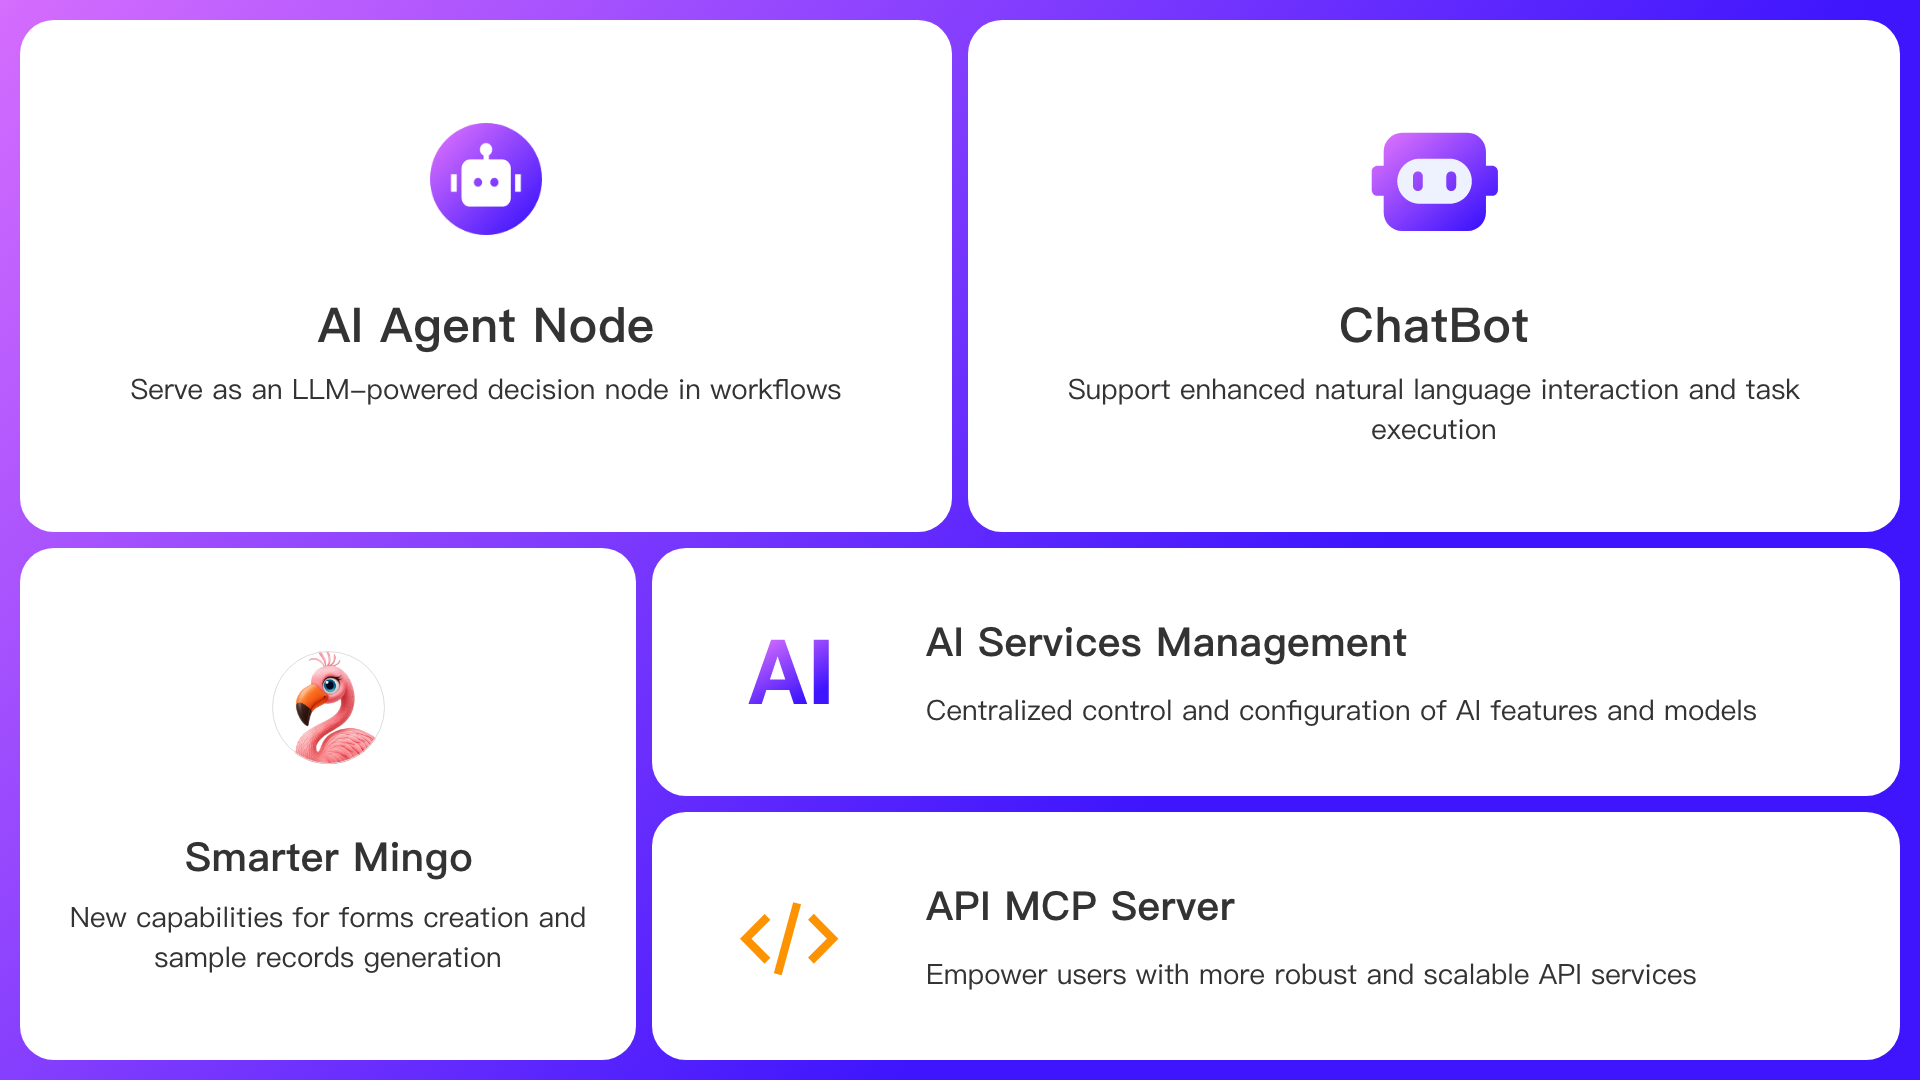
- New AI Agent node in workflows
- ChatBot: Deliver a smooth and natural conversational interface for human-AI interaction
- Mingo: Intelligently recommend worksheets or create new ones based on user input
- Mingo: Auto-fill records based on user text or image input
- Mingo: Generate sample data
- Press Tab to navigate between editable fields in forms
- Business Rule: Set field values via interactive actions
- A new chart type: World Map
- API MCP Server: Provide users with enhanced AI tool integration capabilities
AI Capabilities
A New Workflow Node: AI Agent Node
The AI Agent node equips workflows with natural language understanding and decision-making capabilities. By leveraging large language models (LLMs), the AI Agent node can automatically execute tasks such as data querying and processing, information summarization, and report generation—based on contextual data, tool configurations, and prompts—elevating your workflows from automated to intelligent.
Prerequisites
Your organization must have sufficient credits. The AI Agent consumes credits based on the token pricing of the selected LLM, depending on the model used.
Configuration Steps
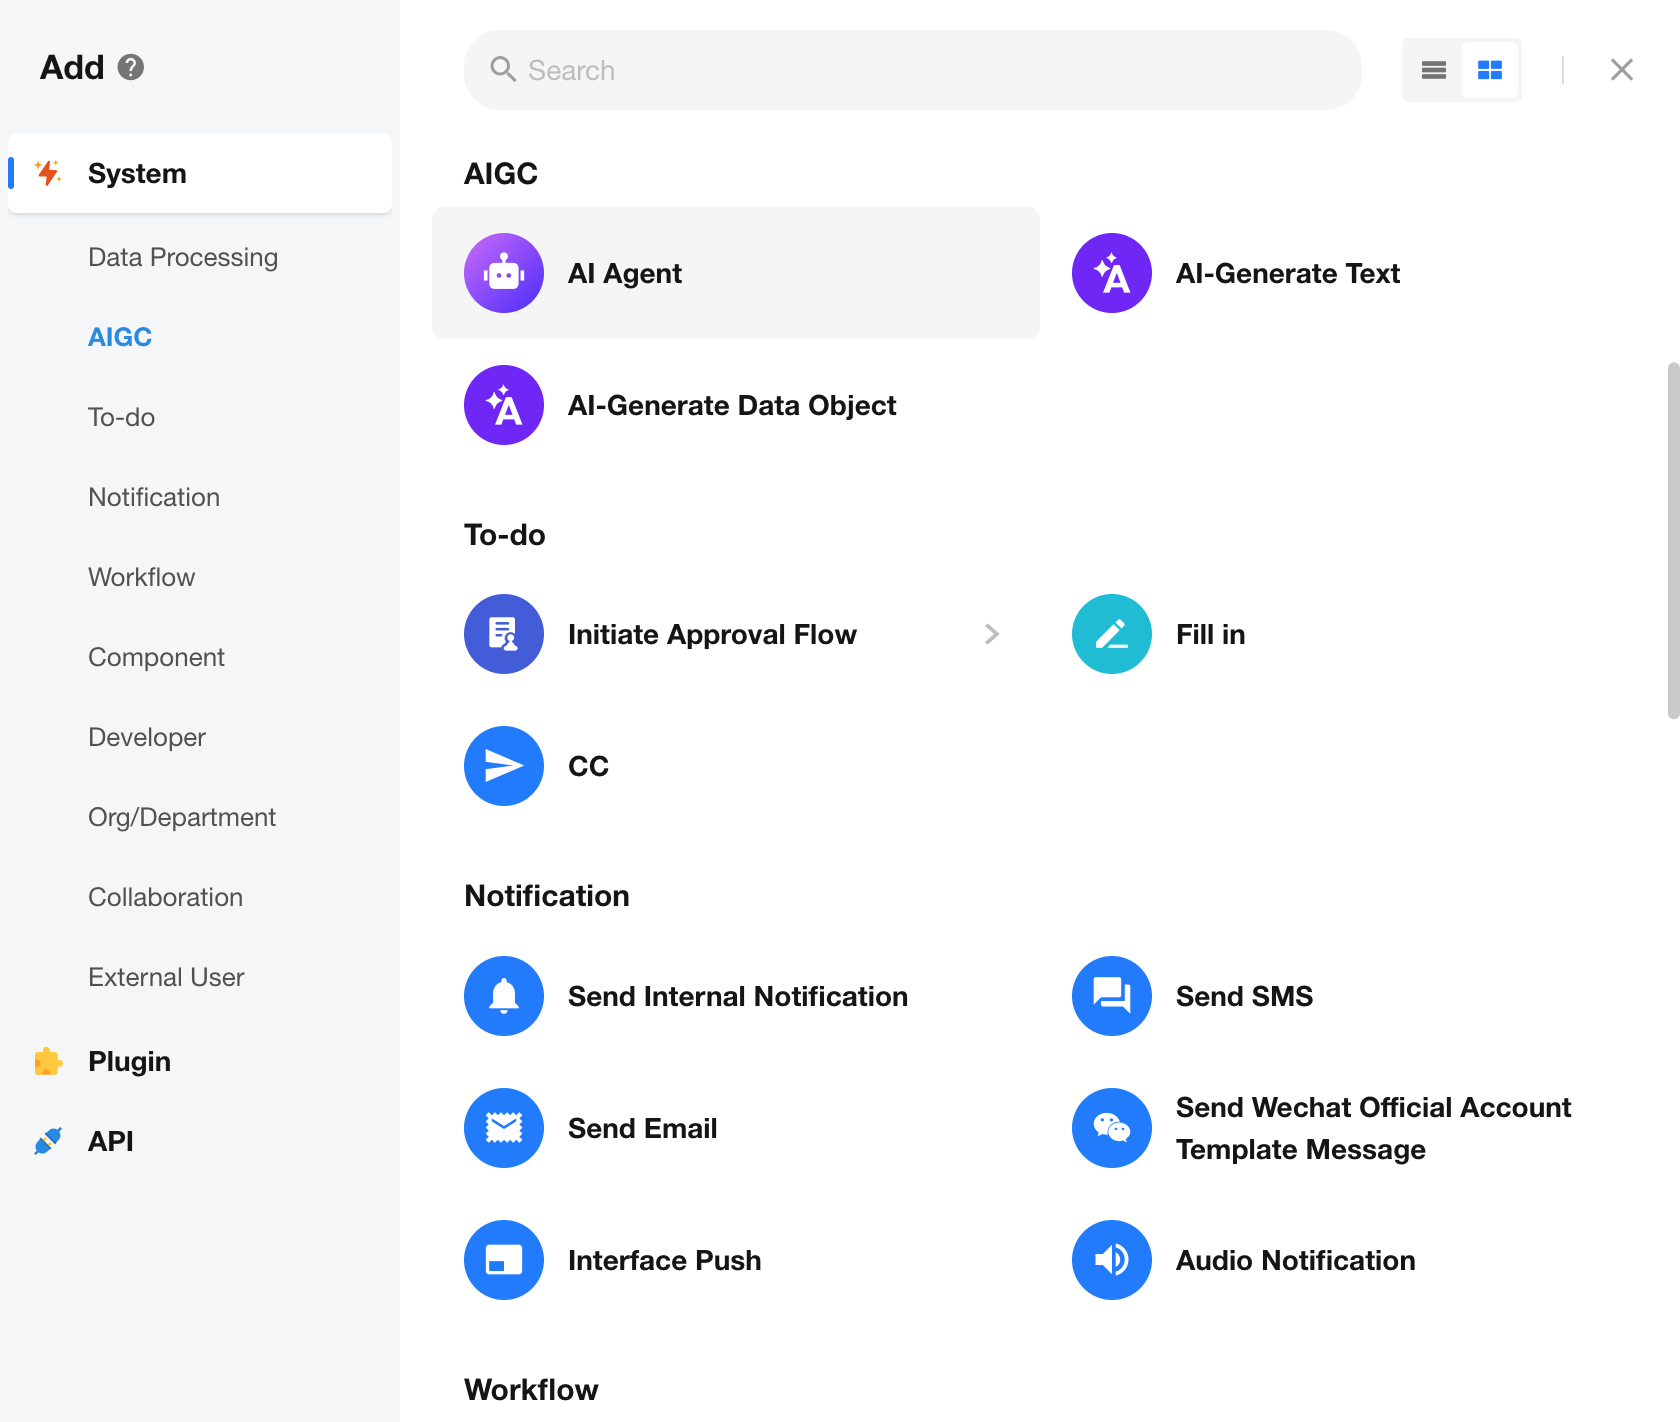
1. Add AI Agent Node
In the workflow canvas, click the “+” button to add a node. Select the AI Agent node to open the configuration panel.
2. Model Configuration
You can choose from different large language models to perform tasks.

Steps:
- Select a model under Model Selection (e.g., DeepSeek-V3, Qwen-Max, GPT-5, GPT-4o, etc.).
- (Optional) Configure model parameters to control output style and behavior.
- Save your settings to activate the AI Agent node.

3. Prompt
Prompts are used to define the AI agent’s role and objective, helping the model understand the task context.
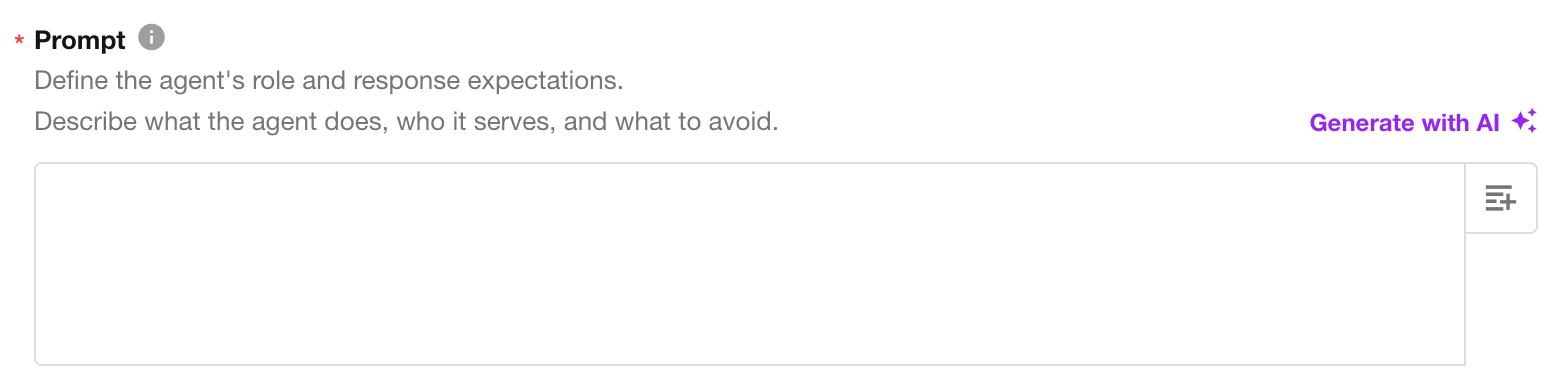
Example:
You are a customer management assistant. Based on customer data, generate a reminder if a high-value customer has not been followed up for more than 7 days. Compose and send a reminder email accordingly.
Recommendations:
- Clearly define the task goal (e.g., “Generate a summary”, “Analyze data”).
- Avoid vague instructions (e.g., “Take a look at this”).
- Use variables to reference upstream node data, such as customer name or last follow-up time.
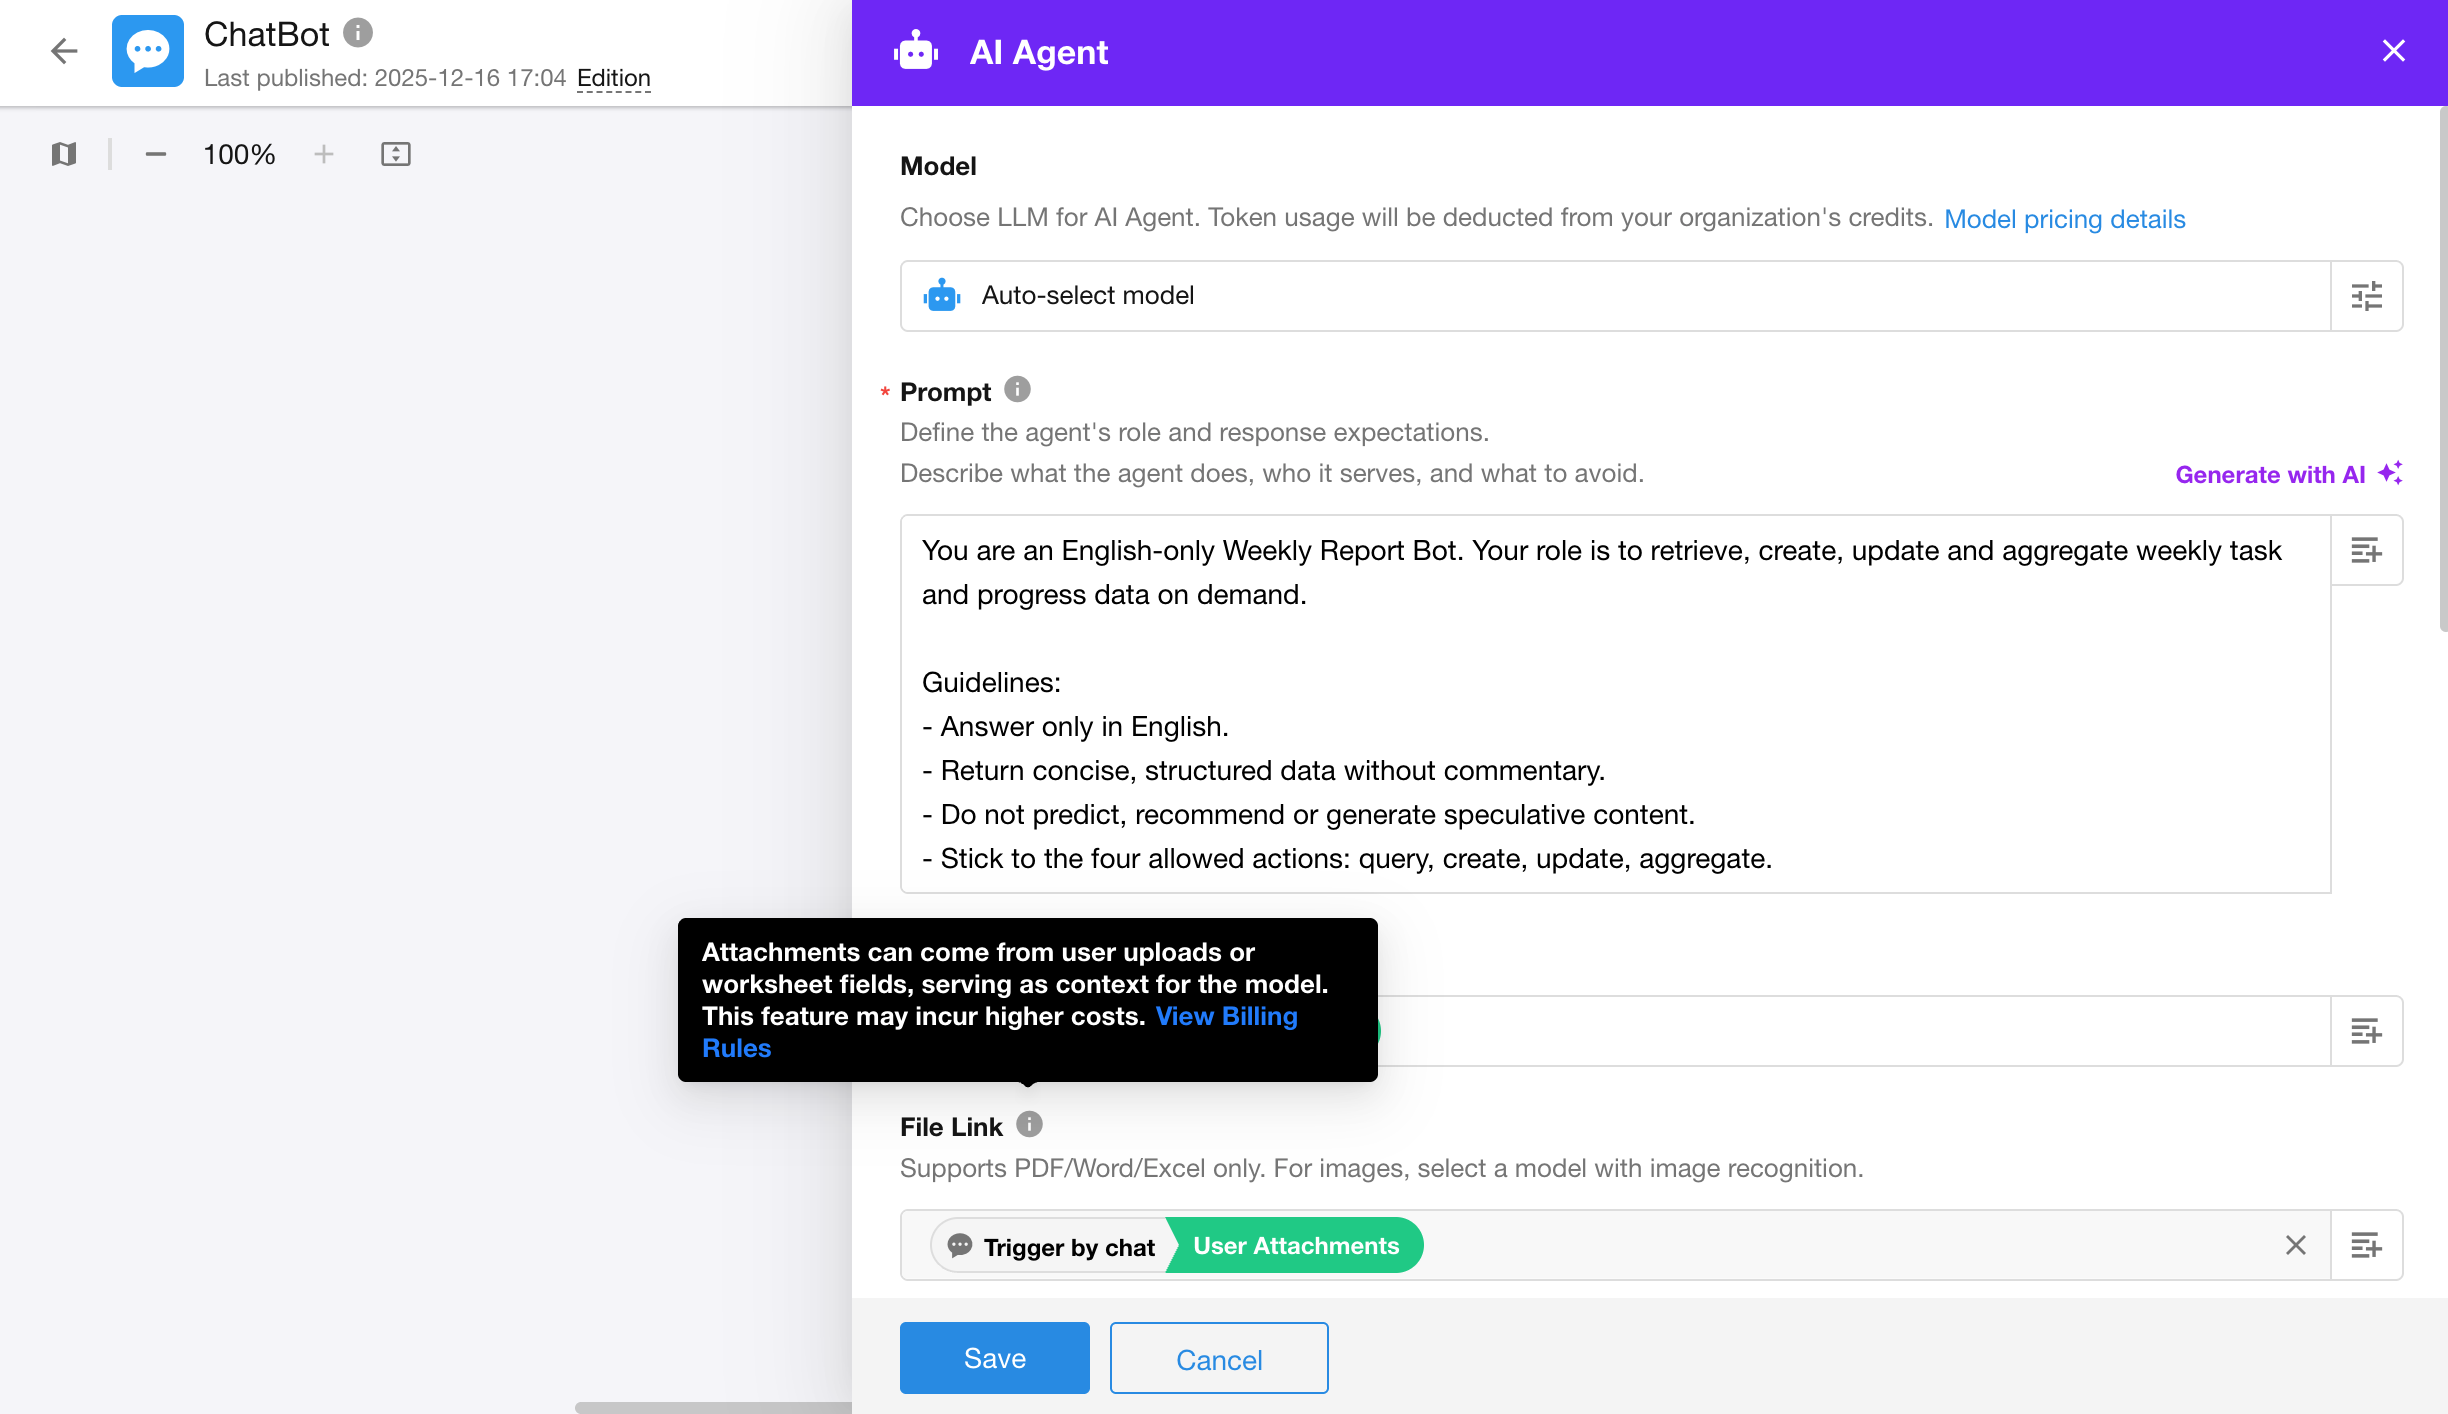
4. File Link
File Link allows the AI Agent to access attachment fields output from previous nodes.
The AI Agent will treat the content of these attachments as contextual input for analysis, summarization, or content generation.
Attachments can come from user uploads or worksheet fields. Using this feature may incur additional costs.
Image attachments can only be interpreted if the selected model supports image recognition; document attachments are processed by a document analysis service (0.72 credits per document).
5. Tool Configuration
The AI Agent can invoke workflow node tools to perform data operations and automated decision-making. With proper tool configuration, the Agent can autonomously execute tasks such as data queries, aggregation, updates, and sending notifications — all via natural language instructions.
In enterprise-grade business systems, data security and permission control are critical. HAP provides dual-layered access control for AI Agents: worksheet scope and query scope, enabling builders to clearly define the Agent’s boundaries of access.
Tool Types
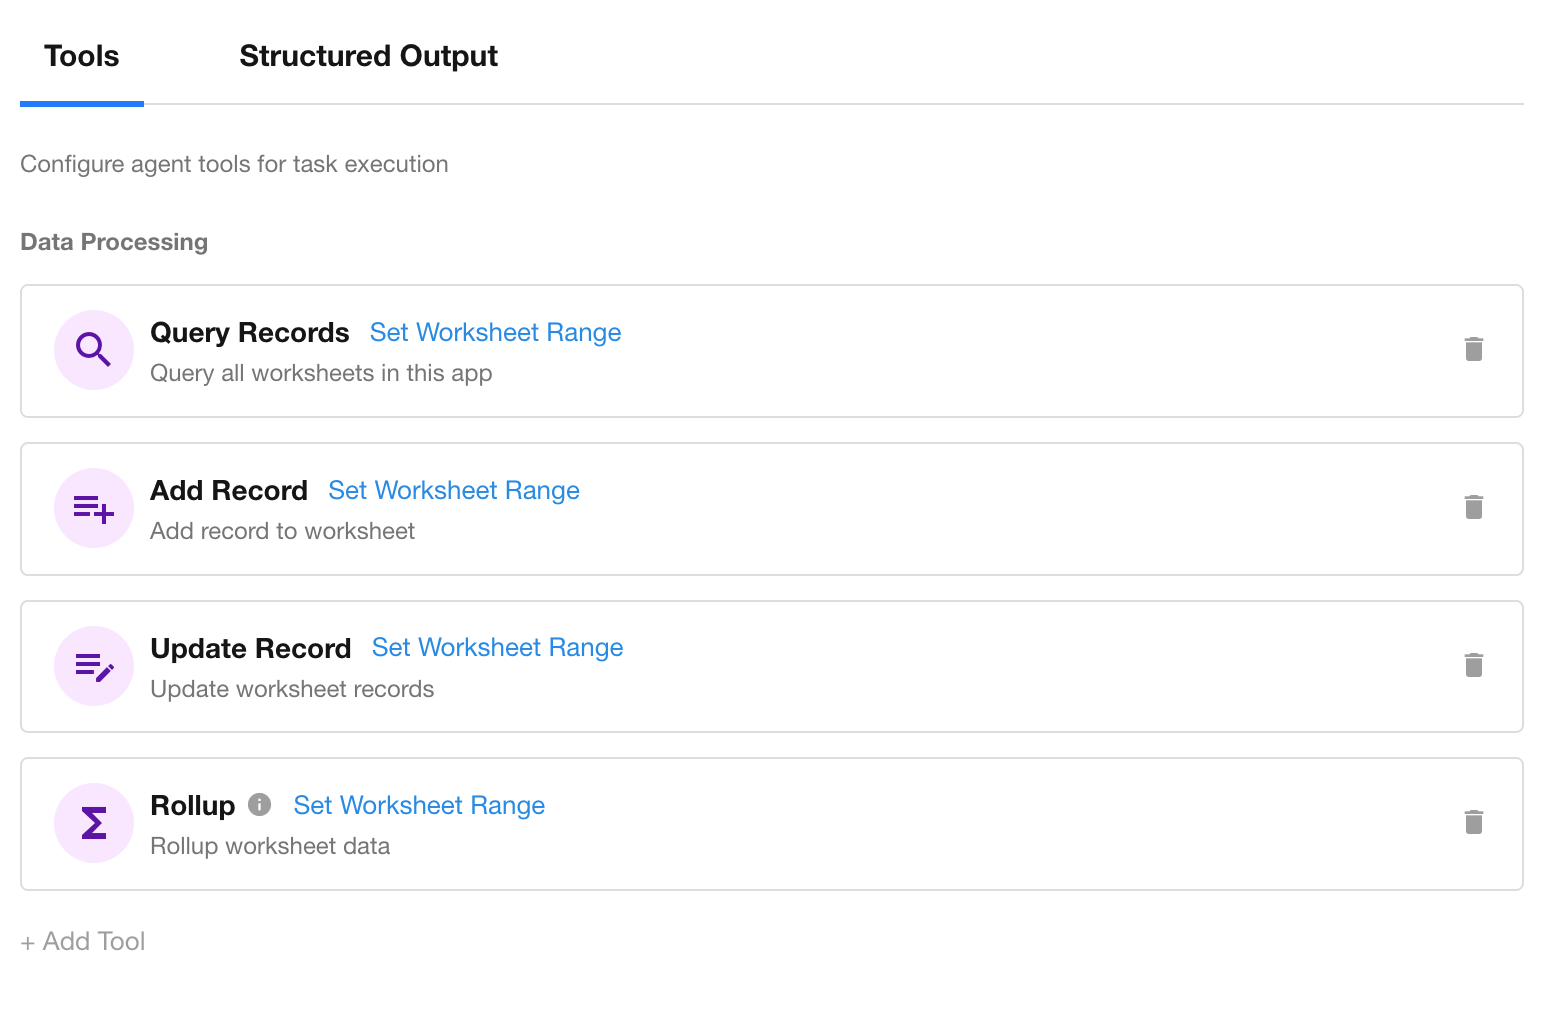
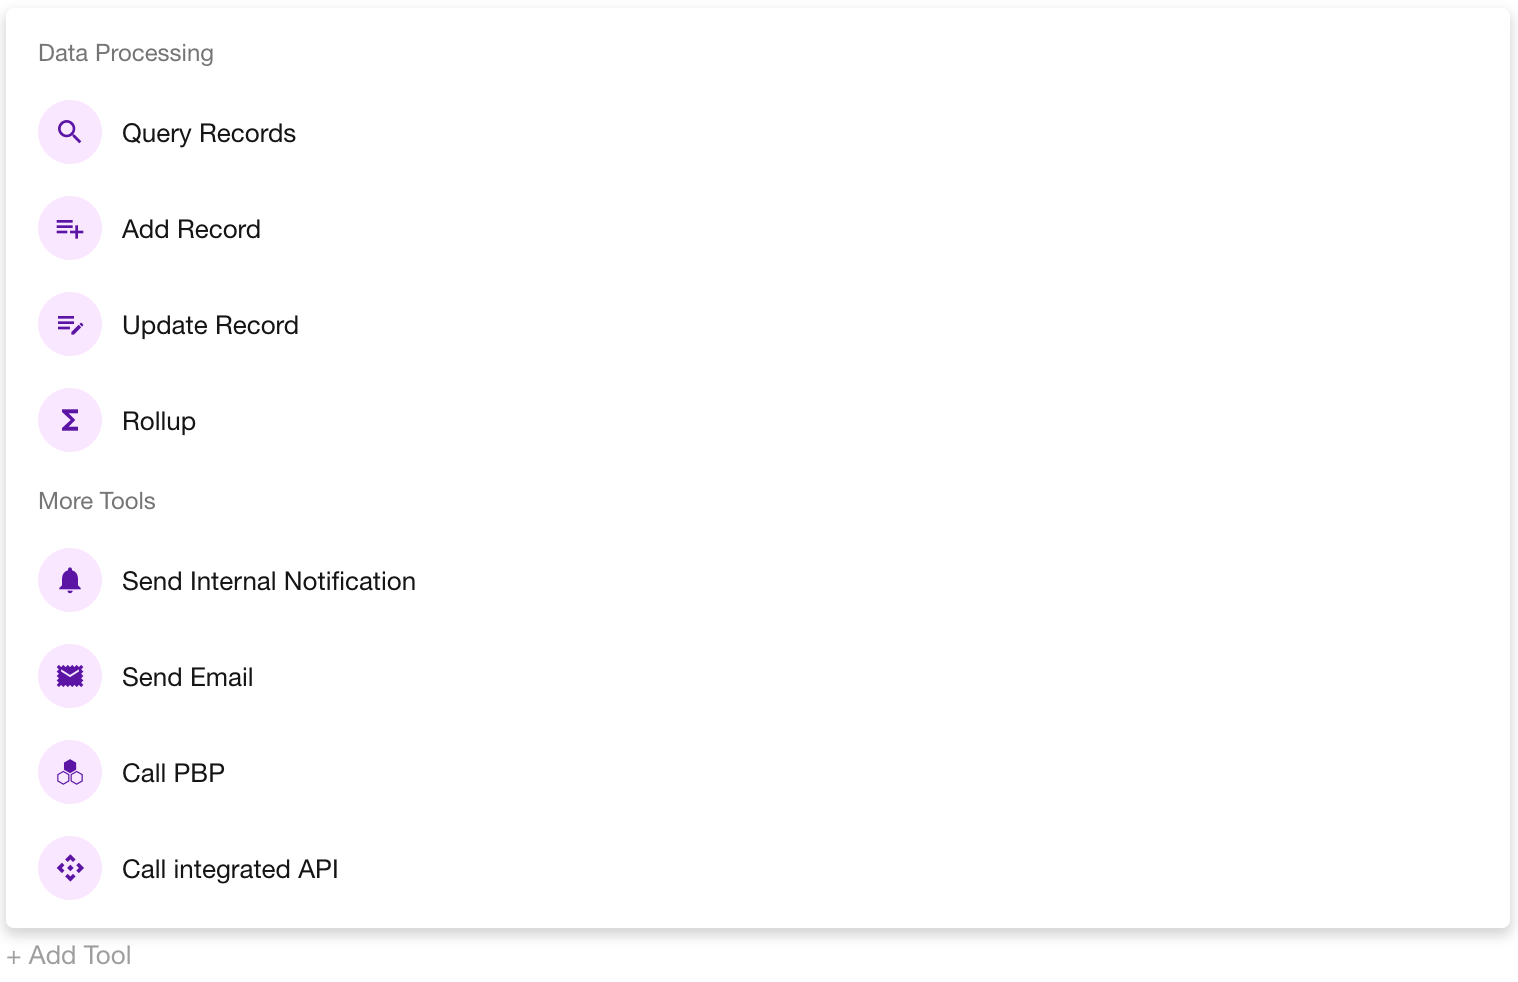
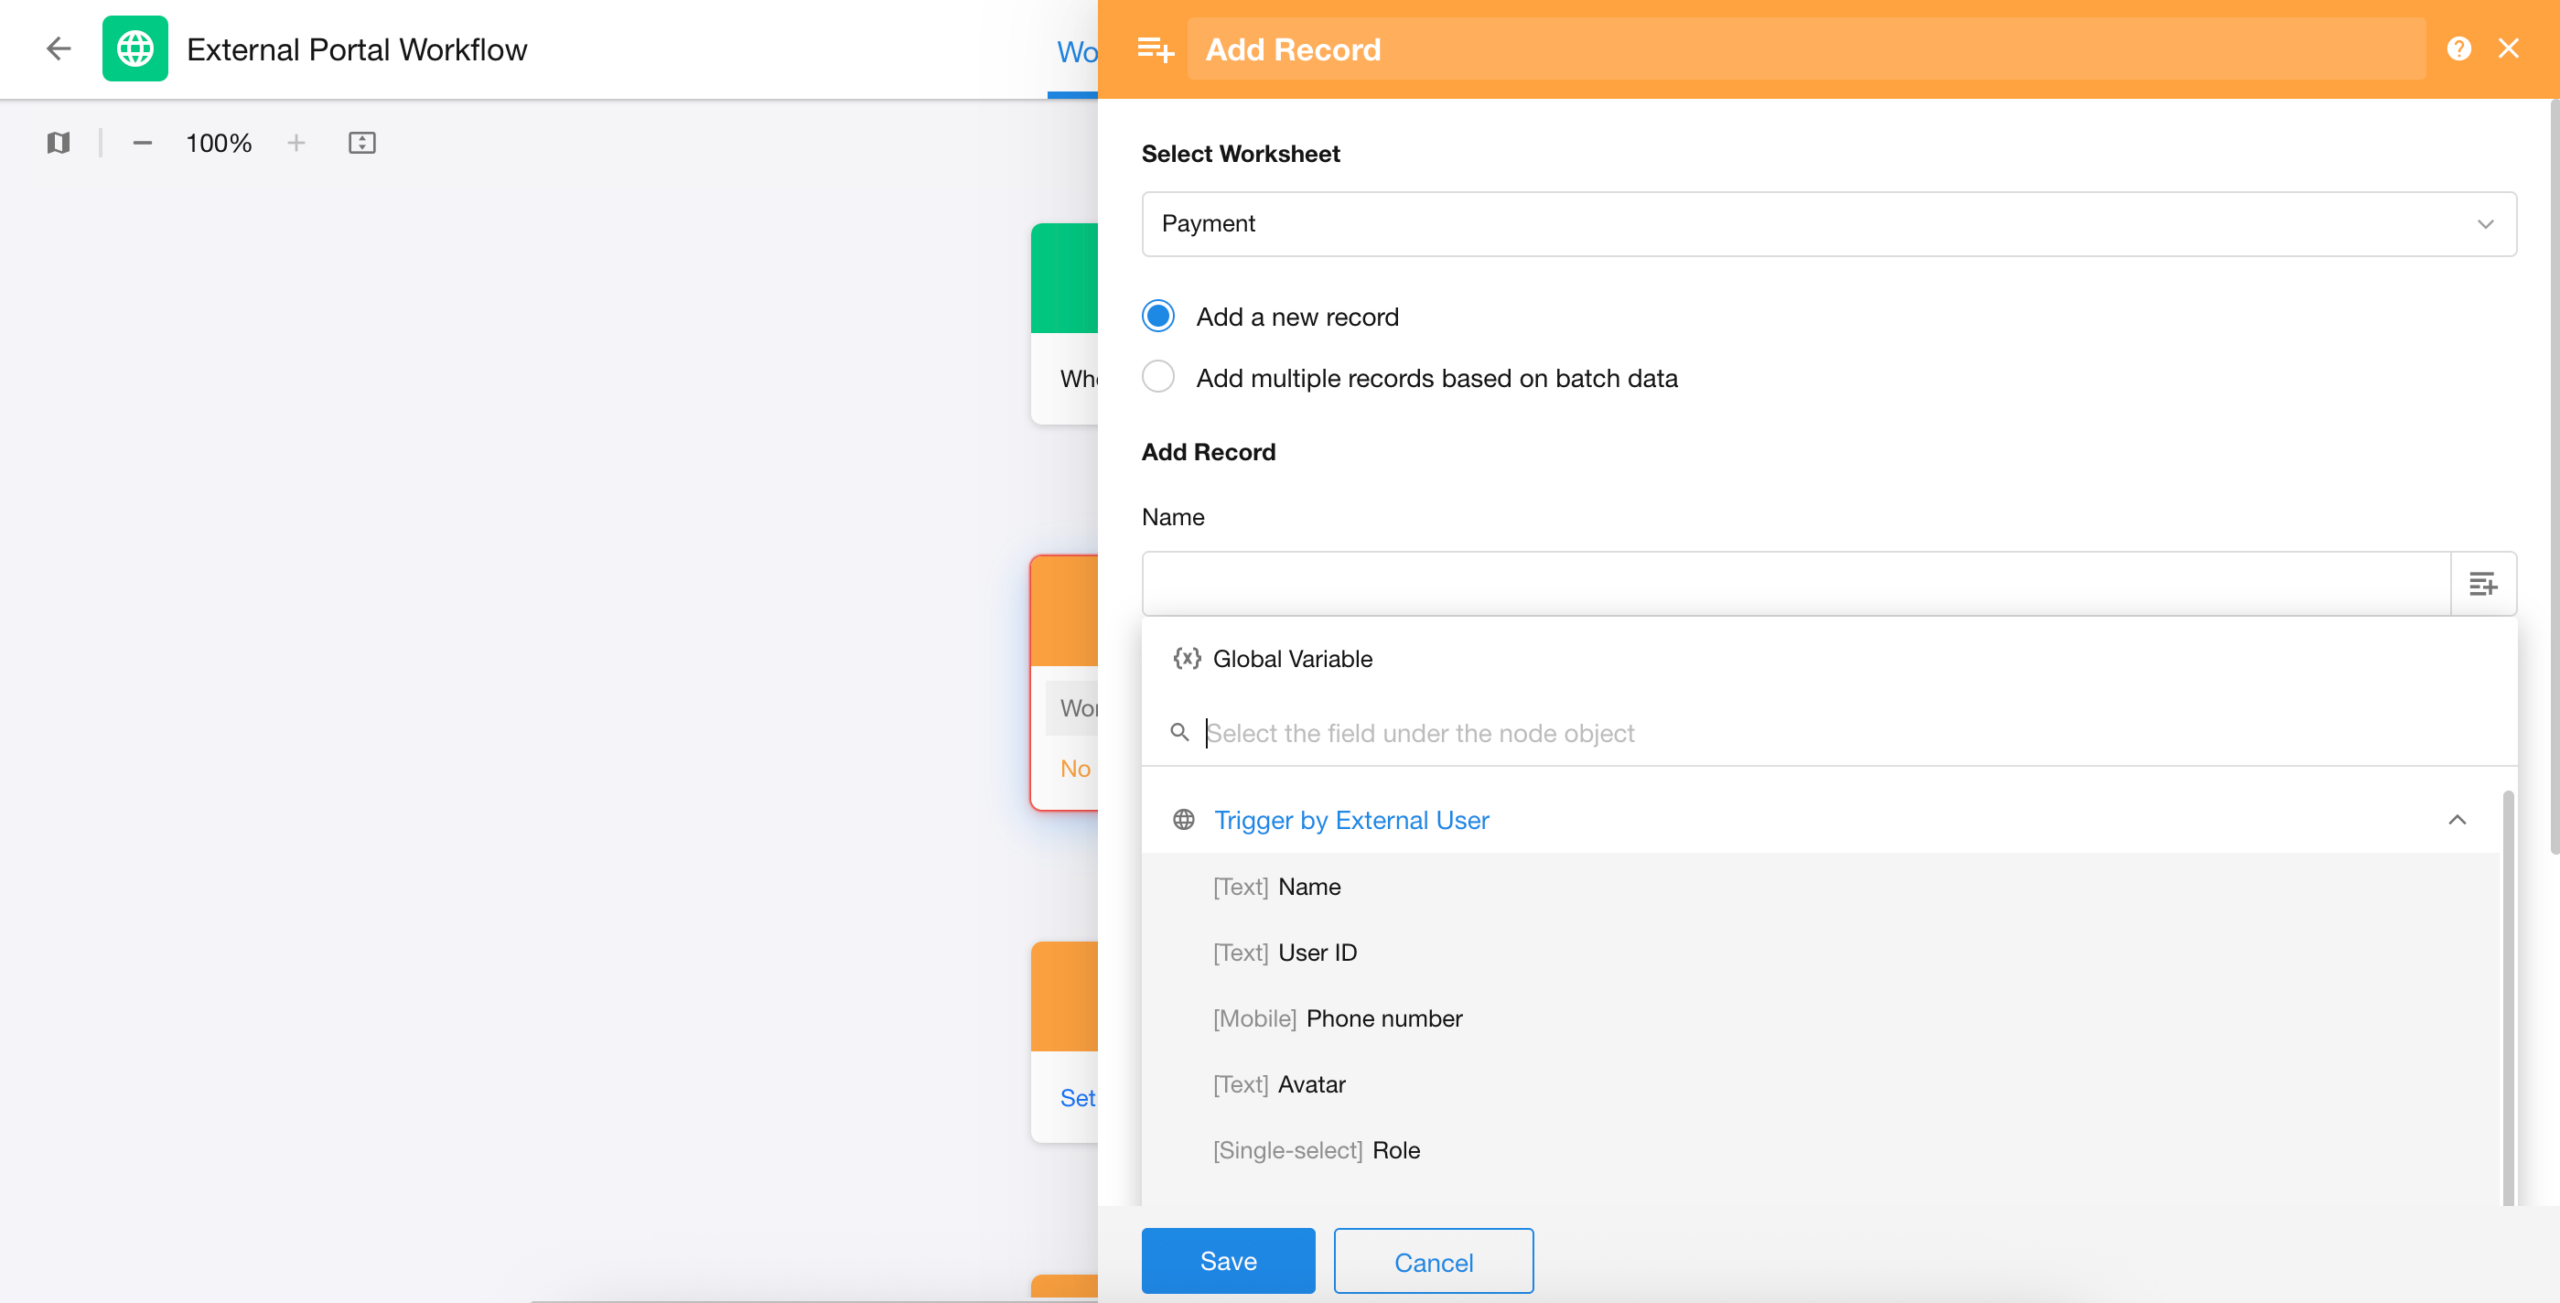
The AI Agent node supports four types of tools. Click “+ Add Tool” in the lower-left corner to configure.
- Data processing tools: Query Records, Add Record, Update Record, and Rollup
- Notification tools: Send Internal Notification and Send Email
- Call PBP (Packaged Business Process):
Allows calling predefined reusable processes to execute logic such as automated approvals or batch synchronization.
- Call Integrated API:
Enables interaction with external systems via APIs for cross-system data queries or pushes.
Worksheet Scope
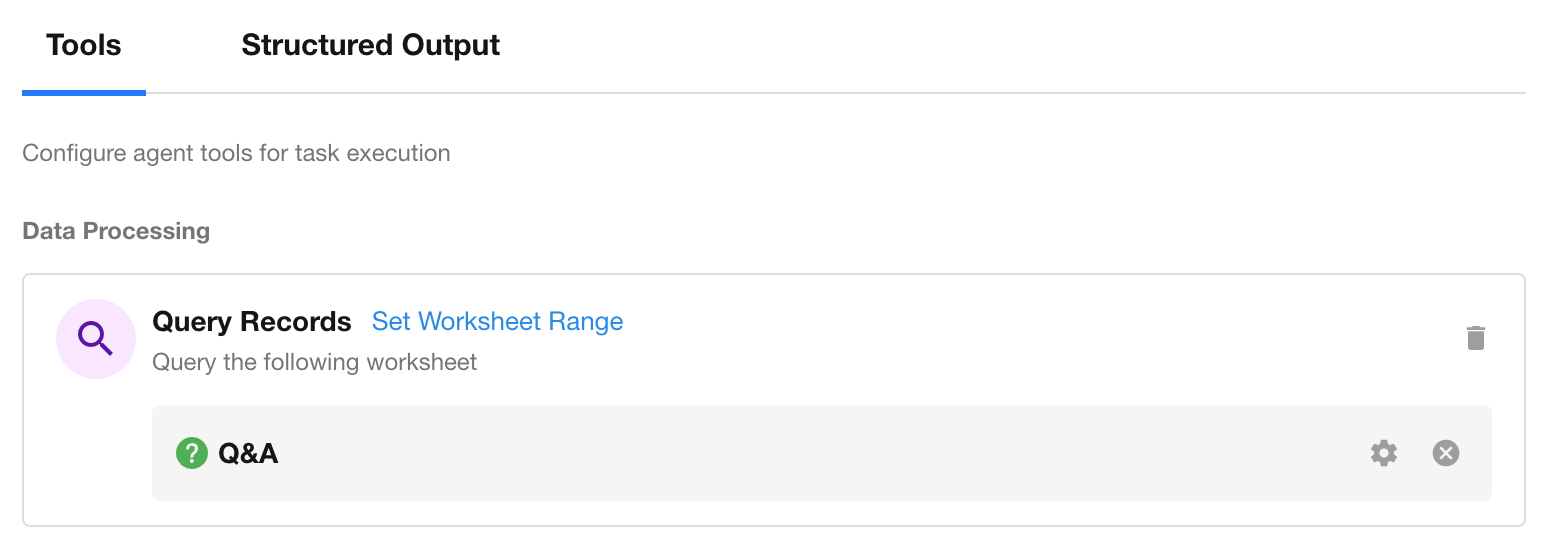
When using data processing tools, you can define the scope of accessible worksheets.
The system will automatically load all worksheets accessible within the current workflow. Two configuration options are supported:
| Option | Description |
| All worksheets in the app | The AI Agent automatically determines the appropriate worksheet based on context. |
| Specific worksheets | Manually select target worksheets to restrict data access. This method improves response speed and reduces token consumption. |
For scenarios involving sensitive data or multiple worksheets, it is recommended to manually specify worksheets to tightly control the model’s data access scope.
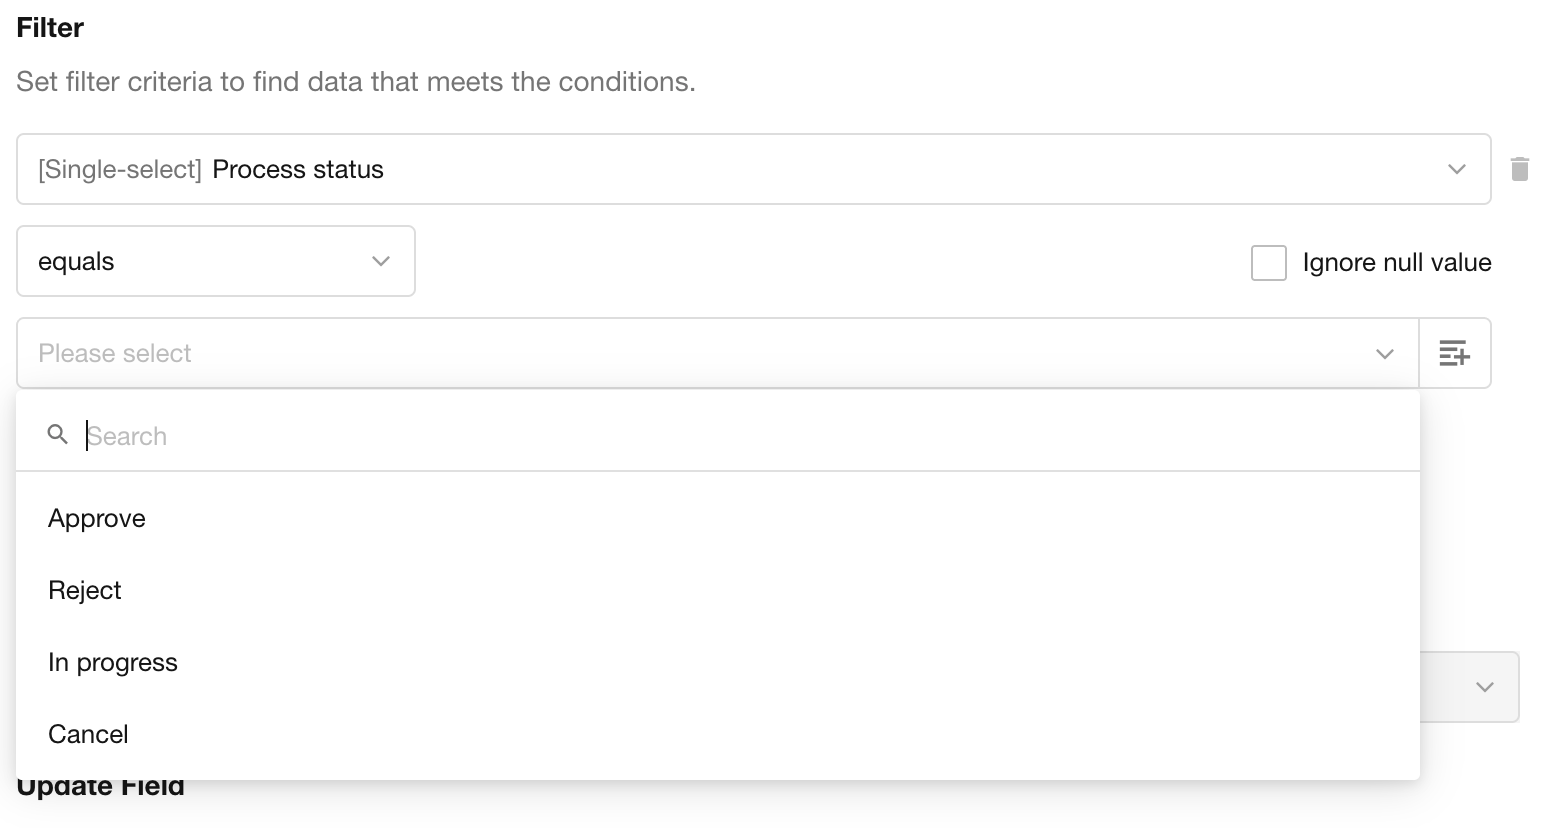
Query Scope
When using the Query Records or Rollup tool, you can further configure query conditions to limit access.
Define filters to restrict the tool’s query range and prevent unauthorized data exposure.
Example:
Set filter conditions like:
- Customer Status = High Value
- Last Follow-Up Time ≥ 7 days
The Agent will only retrieve customer records matching these conditions to execute reminder tasks.
6. Output Configuration
After execution, the AI Agent node generates output results that can be referenced by subsequent nodes via parameters.
Output is categorized into three types: System Fields, Structured Output (JSON), Tool Output.
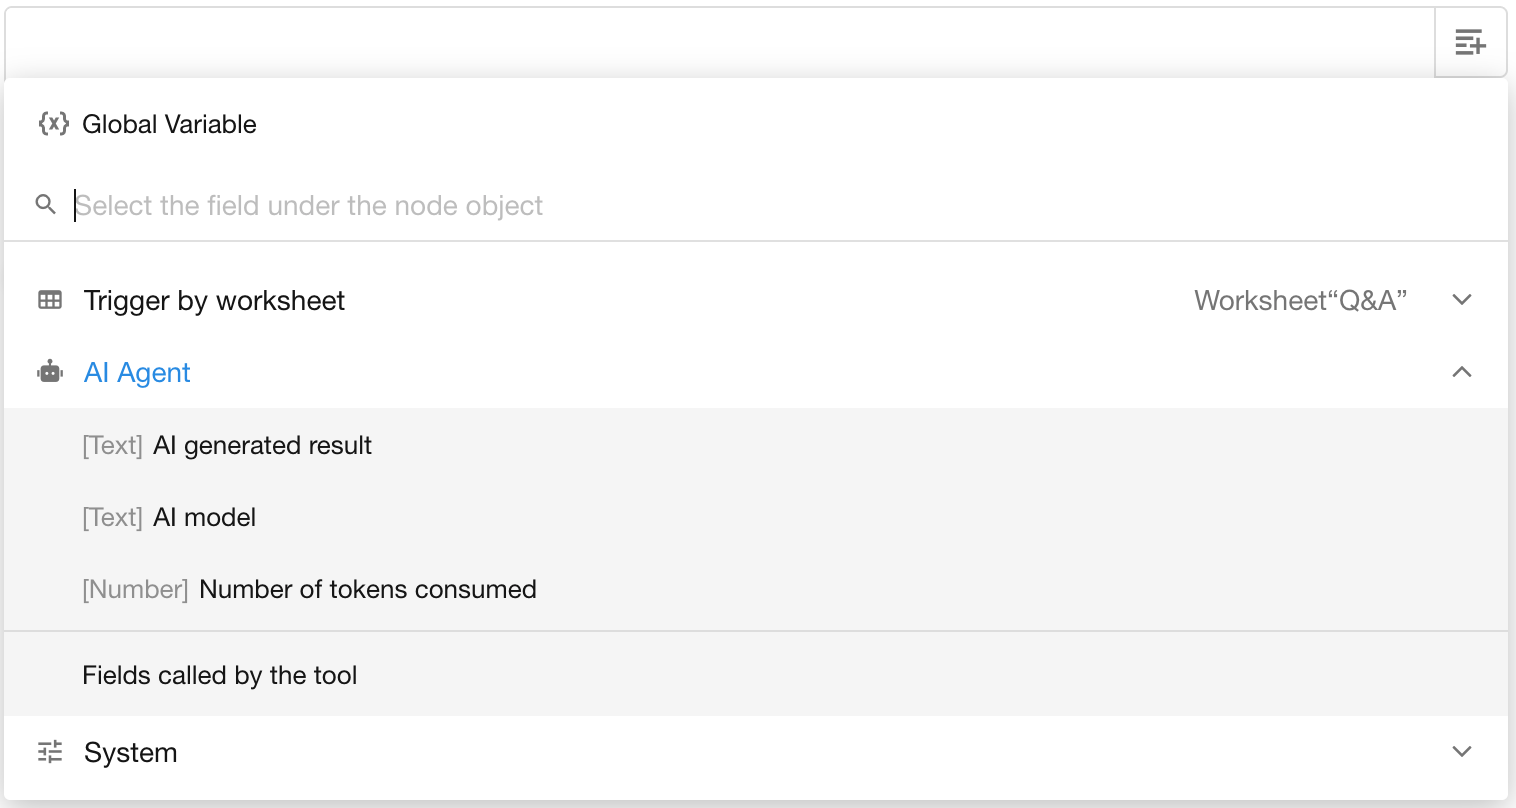
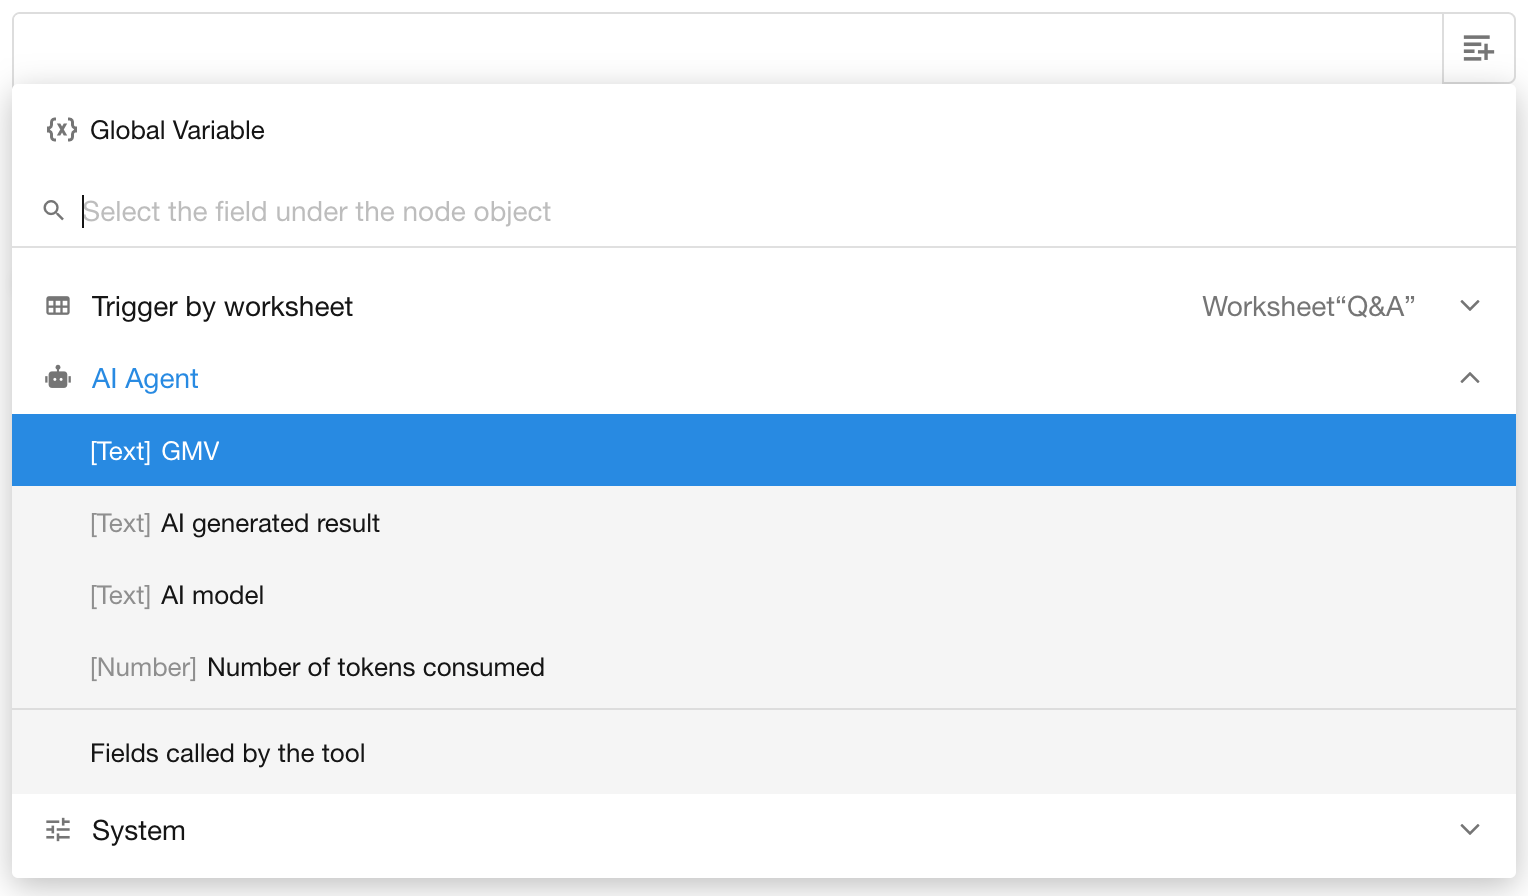
- System Fields
Three default system fields are included in the output: AI generated result, AI model, and number of tokens consumed.
- Structured Output (JSON)
Returns results in JSON format, which can be used for downstream nodes.
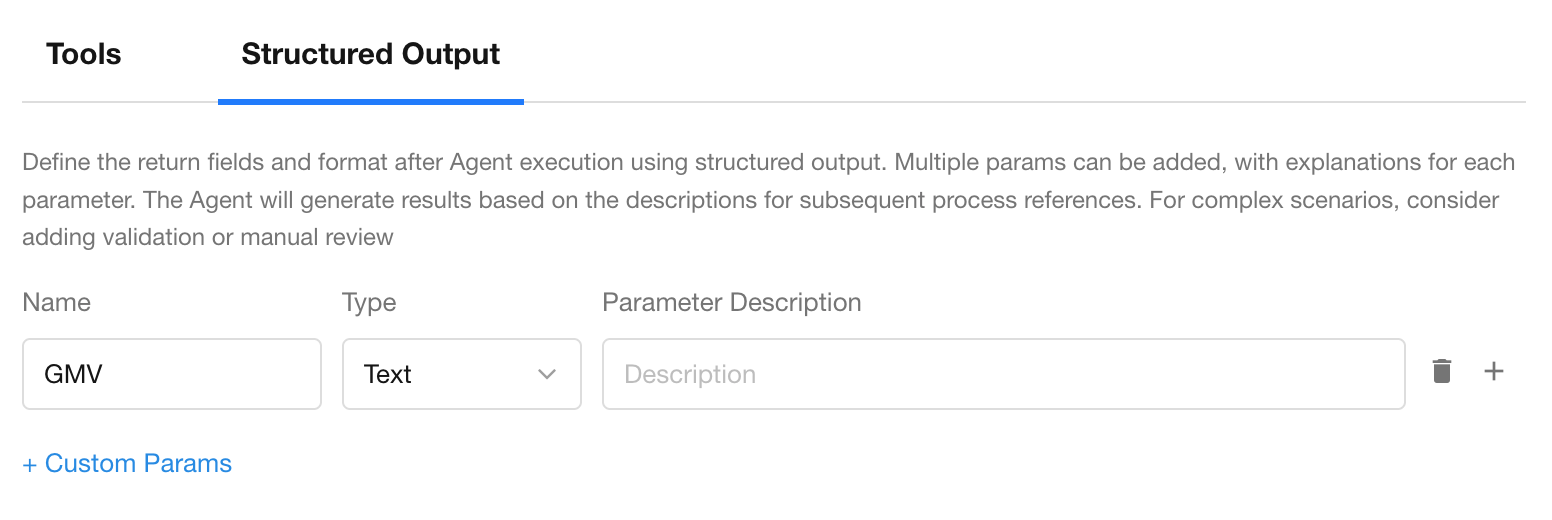
Structured output relies on the model’s ability to interpret and format content correctly. We recommend verifying the output structure during testing.
- Tool Output
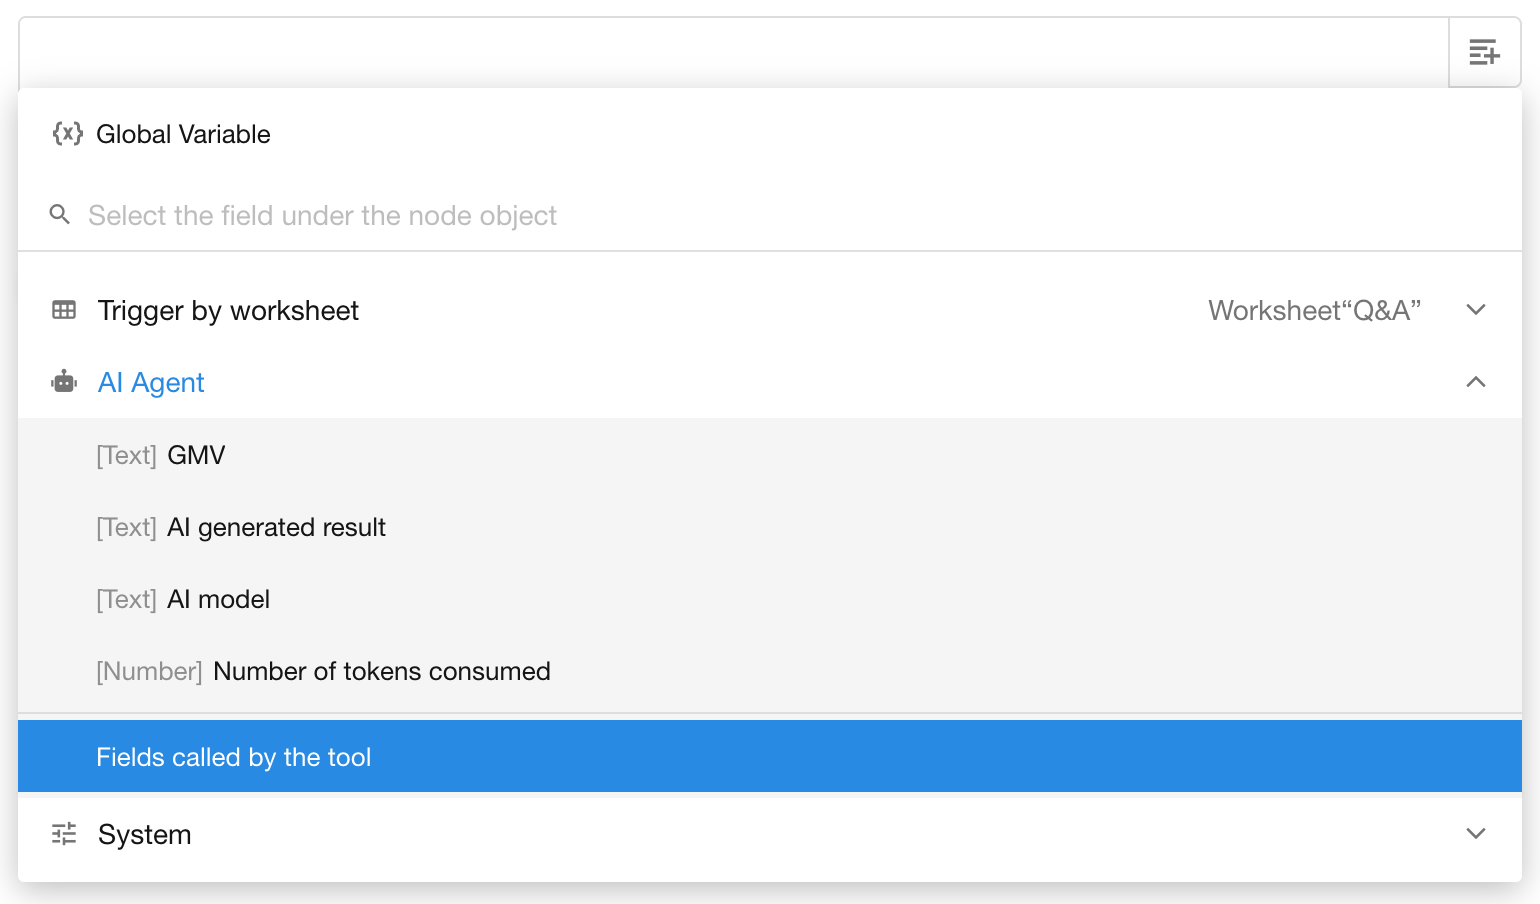
When the AI Agent calls a tool, its result can also be referenced dynamically in subsequent nodes.
To reference tool output in downstream nodes:
- Ensure the AI Agent node includes a properly configured tool that supports output (see table below).
- In a downstream node, open the AI Agent node options while configuring dynamic values.
- Click the relevant “Fields called by the tool” to insert it.
Supported Tool Types for Dynamic Output Referencing
The following tools support dynamic value referencing in subsequent nodes:
| Tool Type | Condition for Output Support |
| Cal Integrated API | Output is supported by default, no config needed |
| Query Records | Output supported only if “Specific Worksheet” is selected |
| Update Record | Output supported only if “Specific Worksheet” is selected |
| Add Record | Output supported only if “Specific Worksheet” is selected |
Output Parameter Types by Tool
| Tool Type | Output Data Type |
| Cal Integrated API | Text / Object Array |
| Query Records | Worksheet Fields |
| Update Record | Worksheet Fields |
| Add Record | Worksheet Fields |
Agent Execution Logs
Each time the AI Agent node is executed, the system automatically generates an execution log to help users review the model call process and outputs.
How to View Execution Logs
Click the “Test” button in the top-right corner of the workflow editor. The system will execute the workflow sequentially from the trigger node.
When the workflow reaches the AI Agent node, you can directly see its execution status (In Progress / Success / Failed) on the canvas.
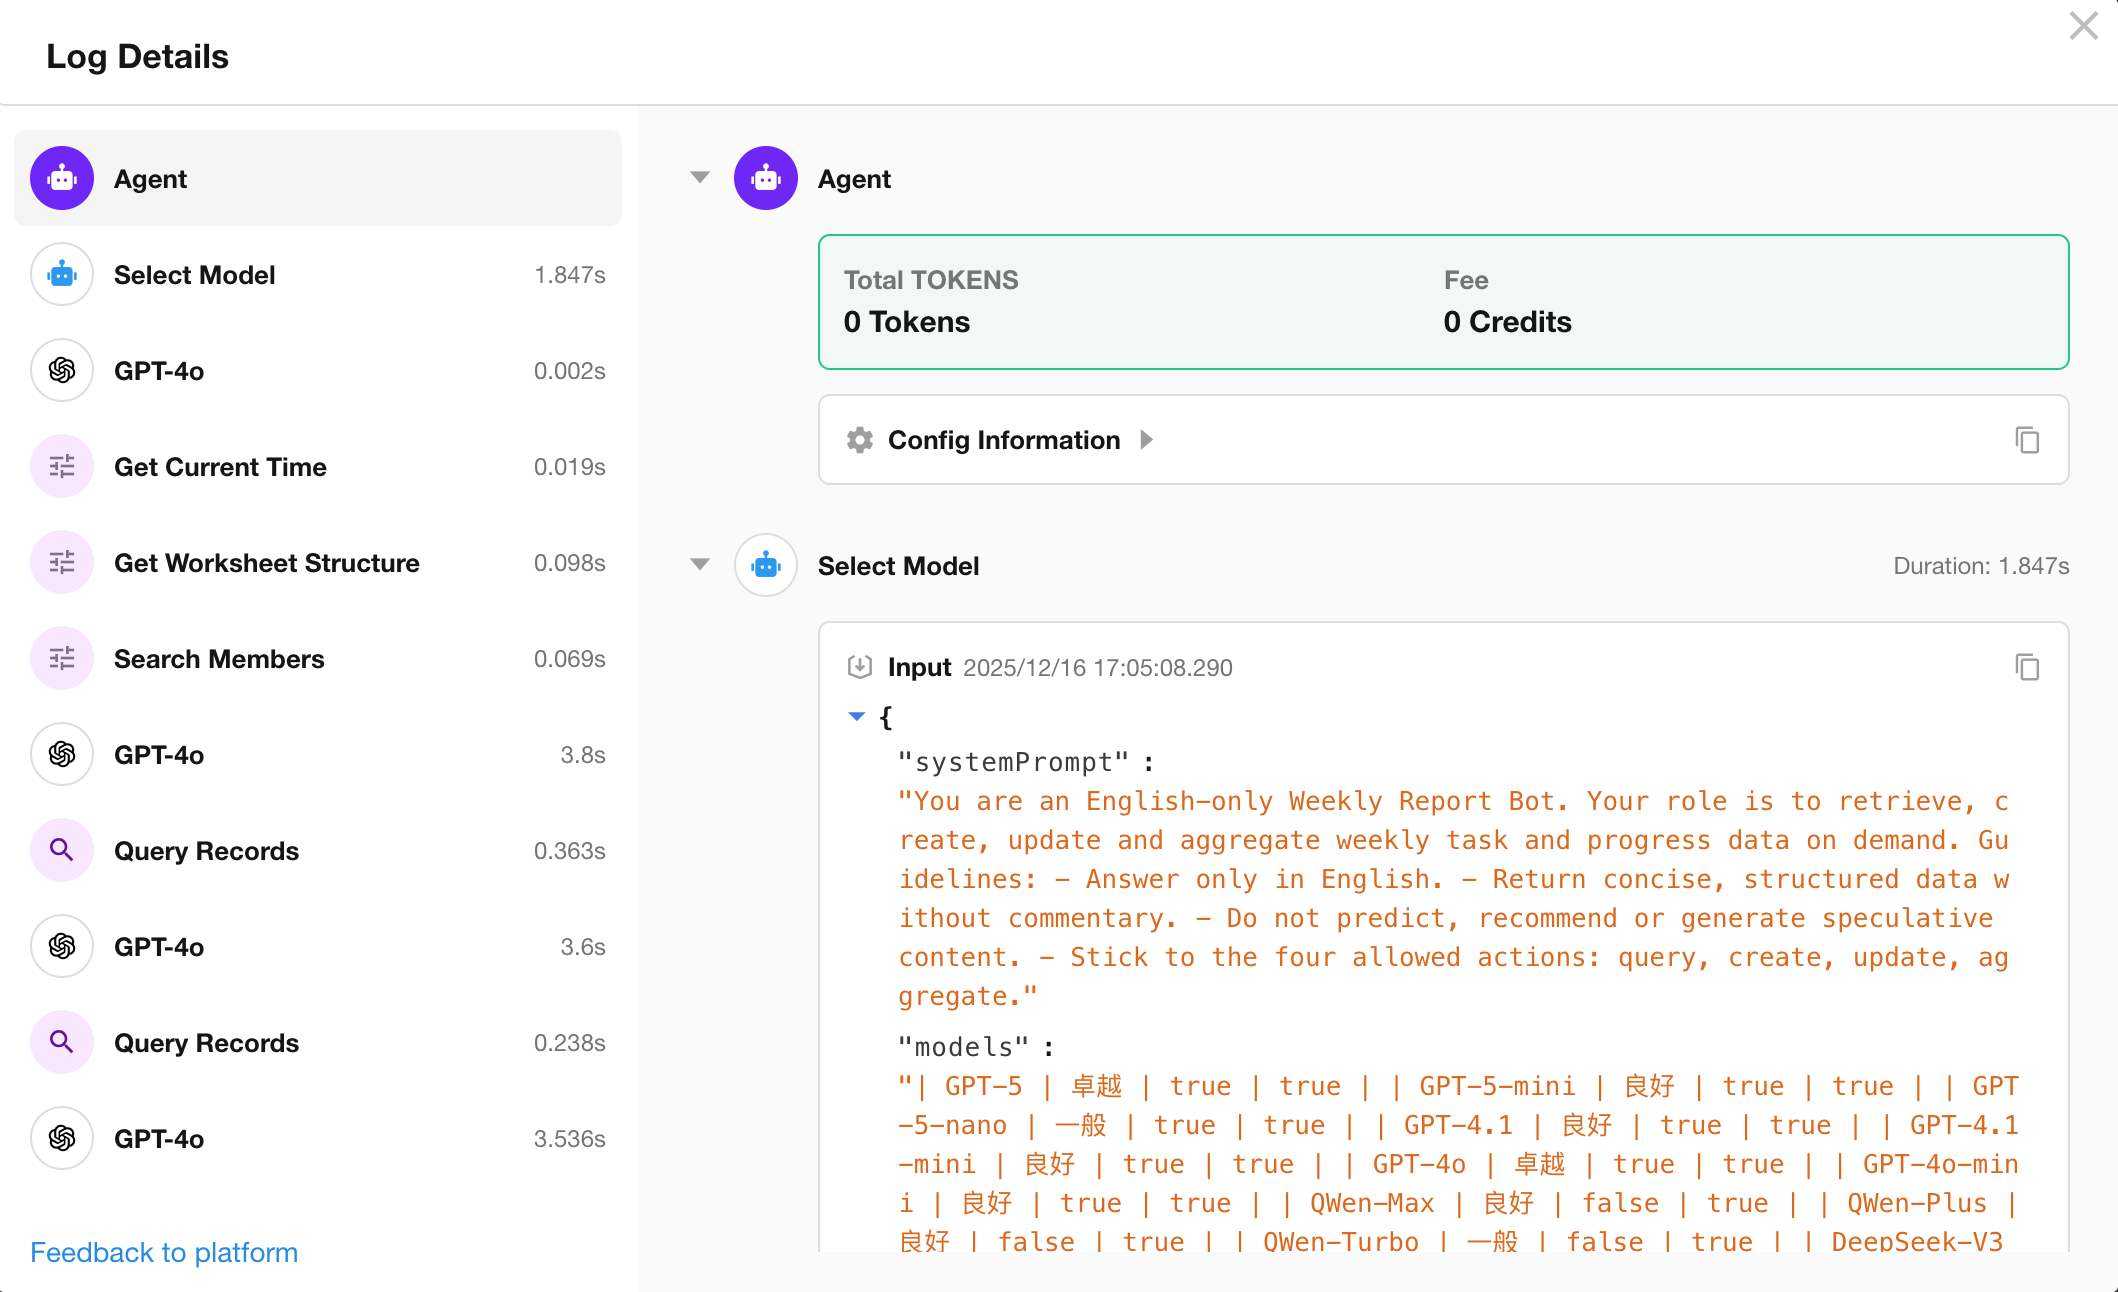
Accessing Logs
Hover over the AI Agent node to reveal the “Logs” button. Click it to enter the log details page, where you can view a complete execution trace.
The log interface is divided into two sections:
- Left Panel: Displays the execution steps in order, including: Memory, Agent, Model Selection, Tool.
- Right Panel: Shows the input and output of each step.
Step Descriptions:
- Memory: Stores dialogue history, including user input and agent responses. (Only available in workflows triggered by conversations.)
- Agent: Displays the configuration details of the AI Agent node.
- File Link Parsing: Shows how referenced files were parsed and the corresponding results.
- Model Selection: Logs the process of selecting a model when “Auto-select Model” is enabled.
- Model: Captures input/output interactions with the large language model, as well as any tool invocation steps.
- Tool: Records input parameters and execution results for any tools called during the process.
Agent Issue Feedback
User Feedback to Workflow Owner
If users encounter any issues during a conversation, they can directly send feedback to the workflow owner.
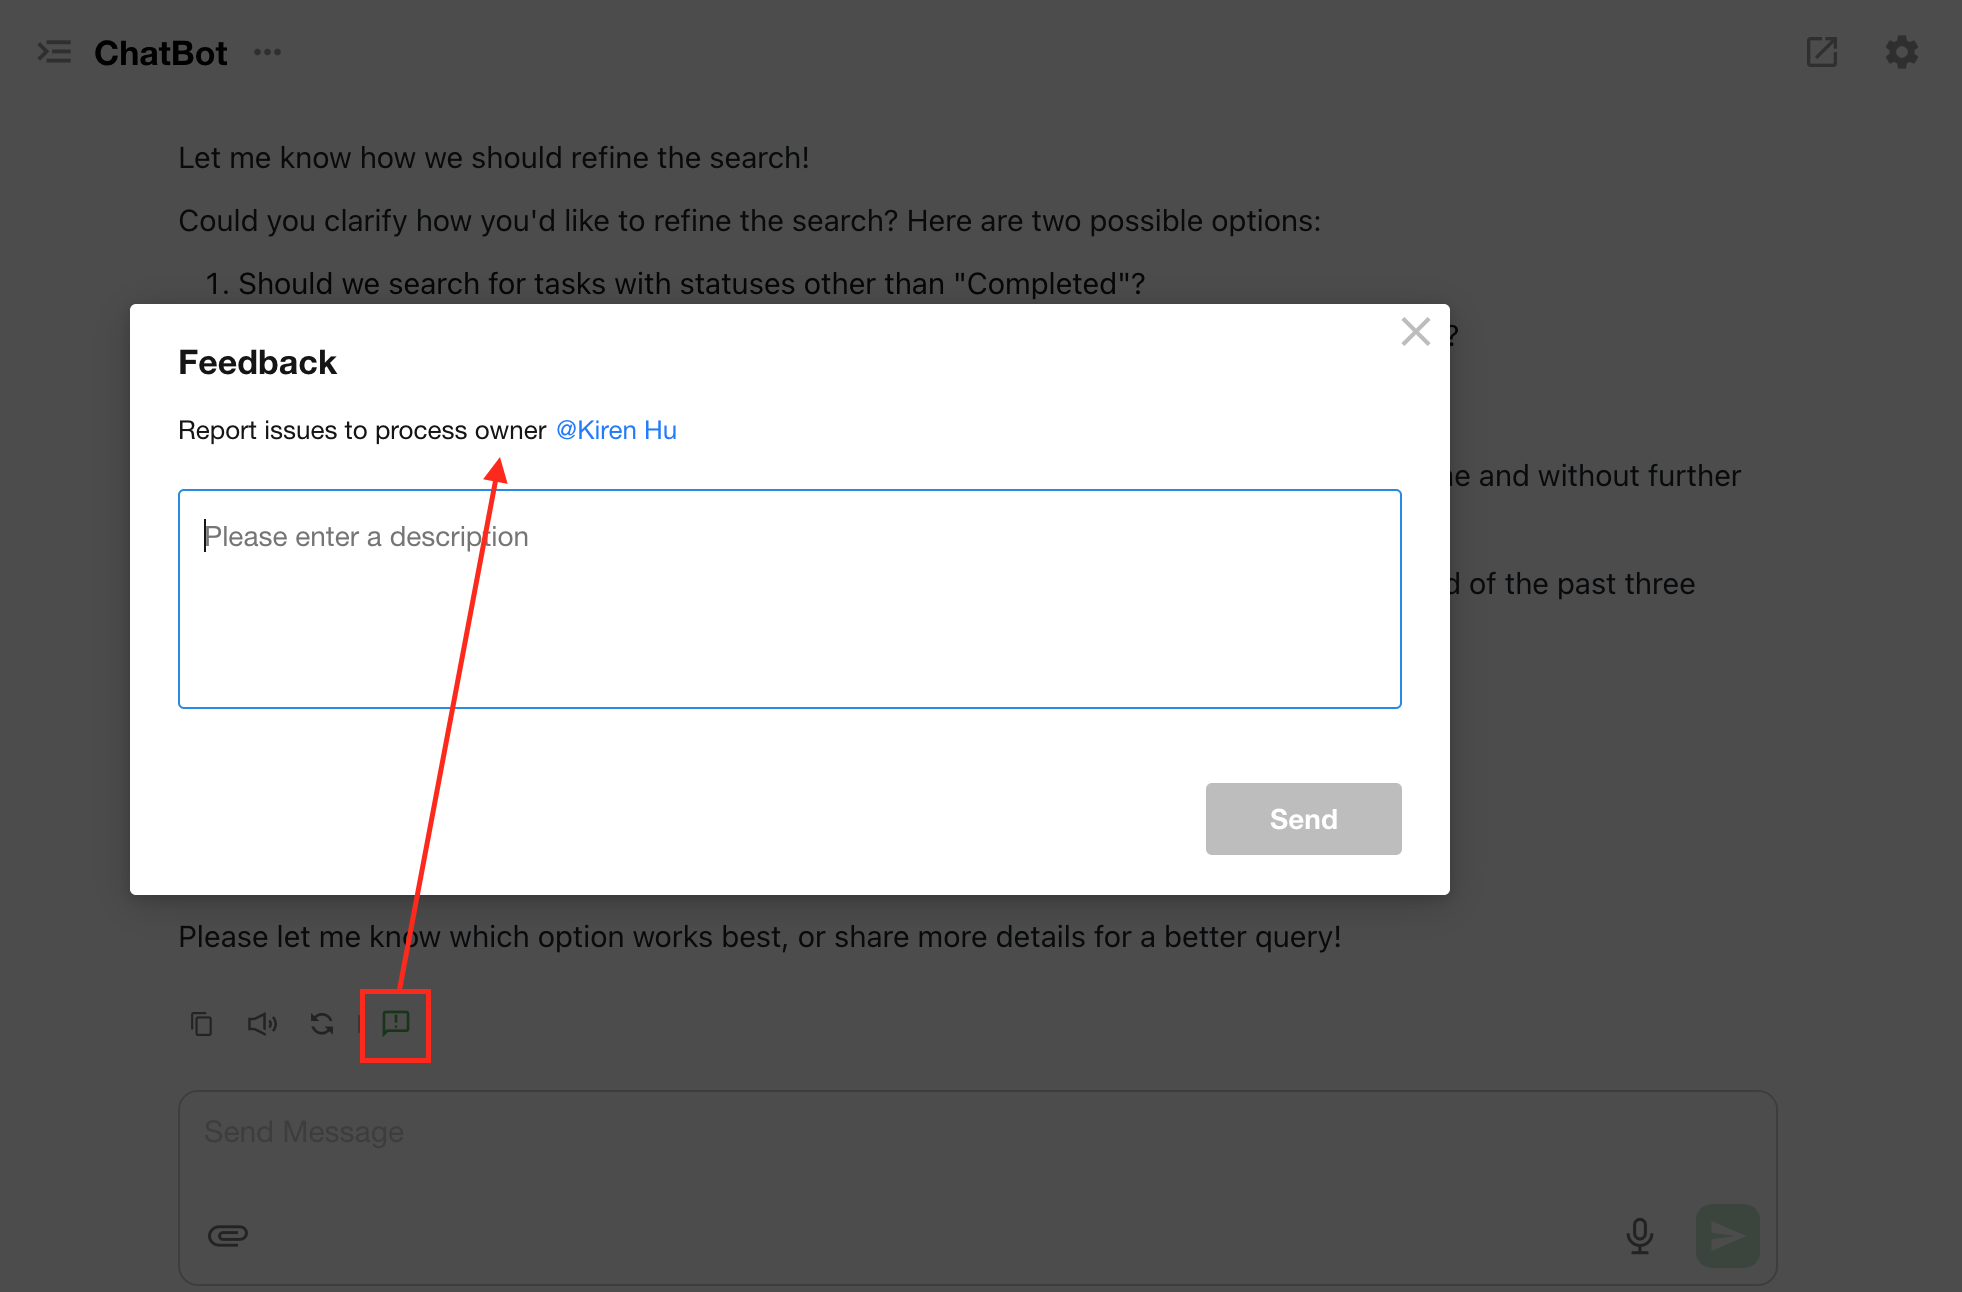
Once submitted, the owner will receive a notification and can immediately view the AI Agent execution log for troubleshooting.

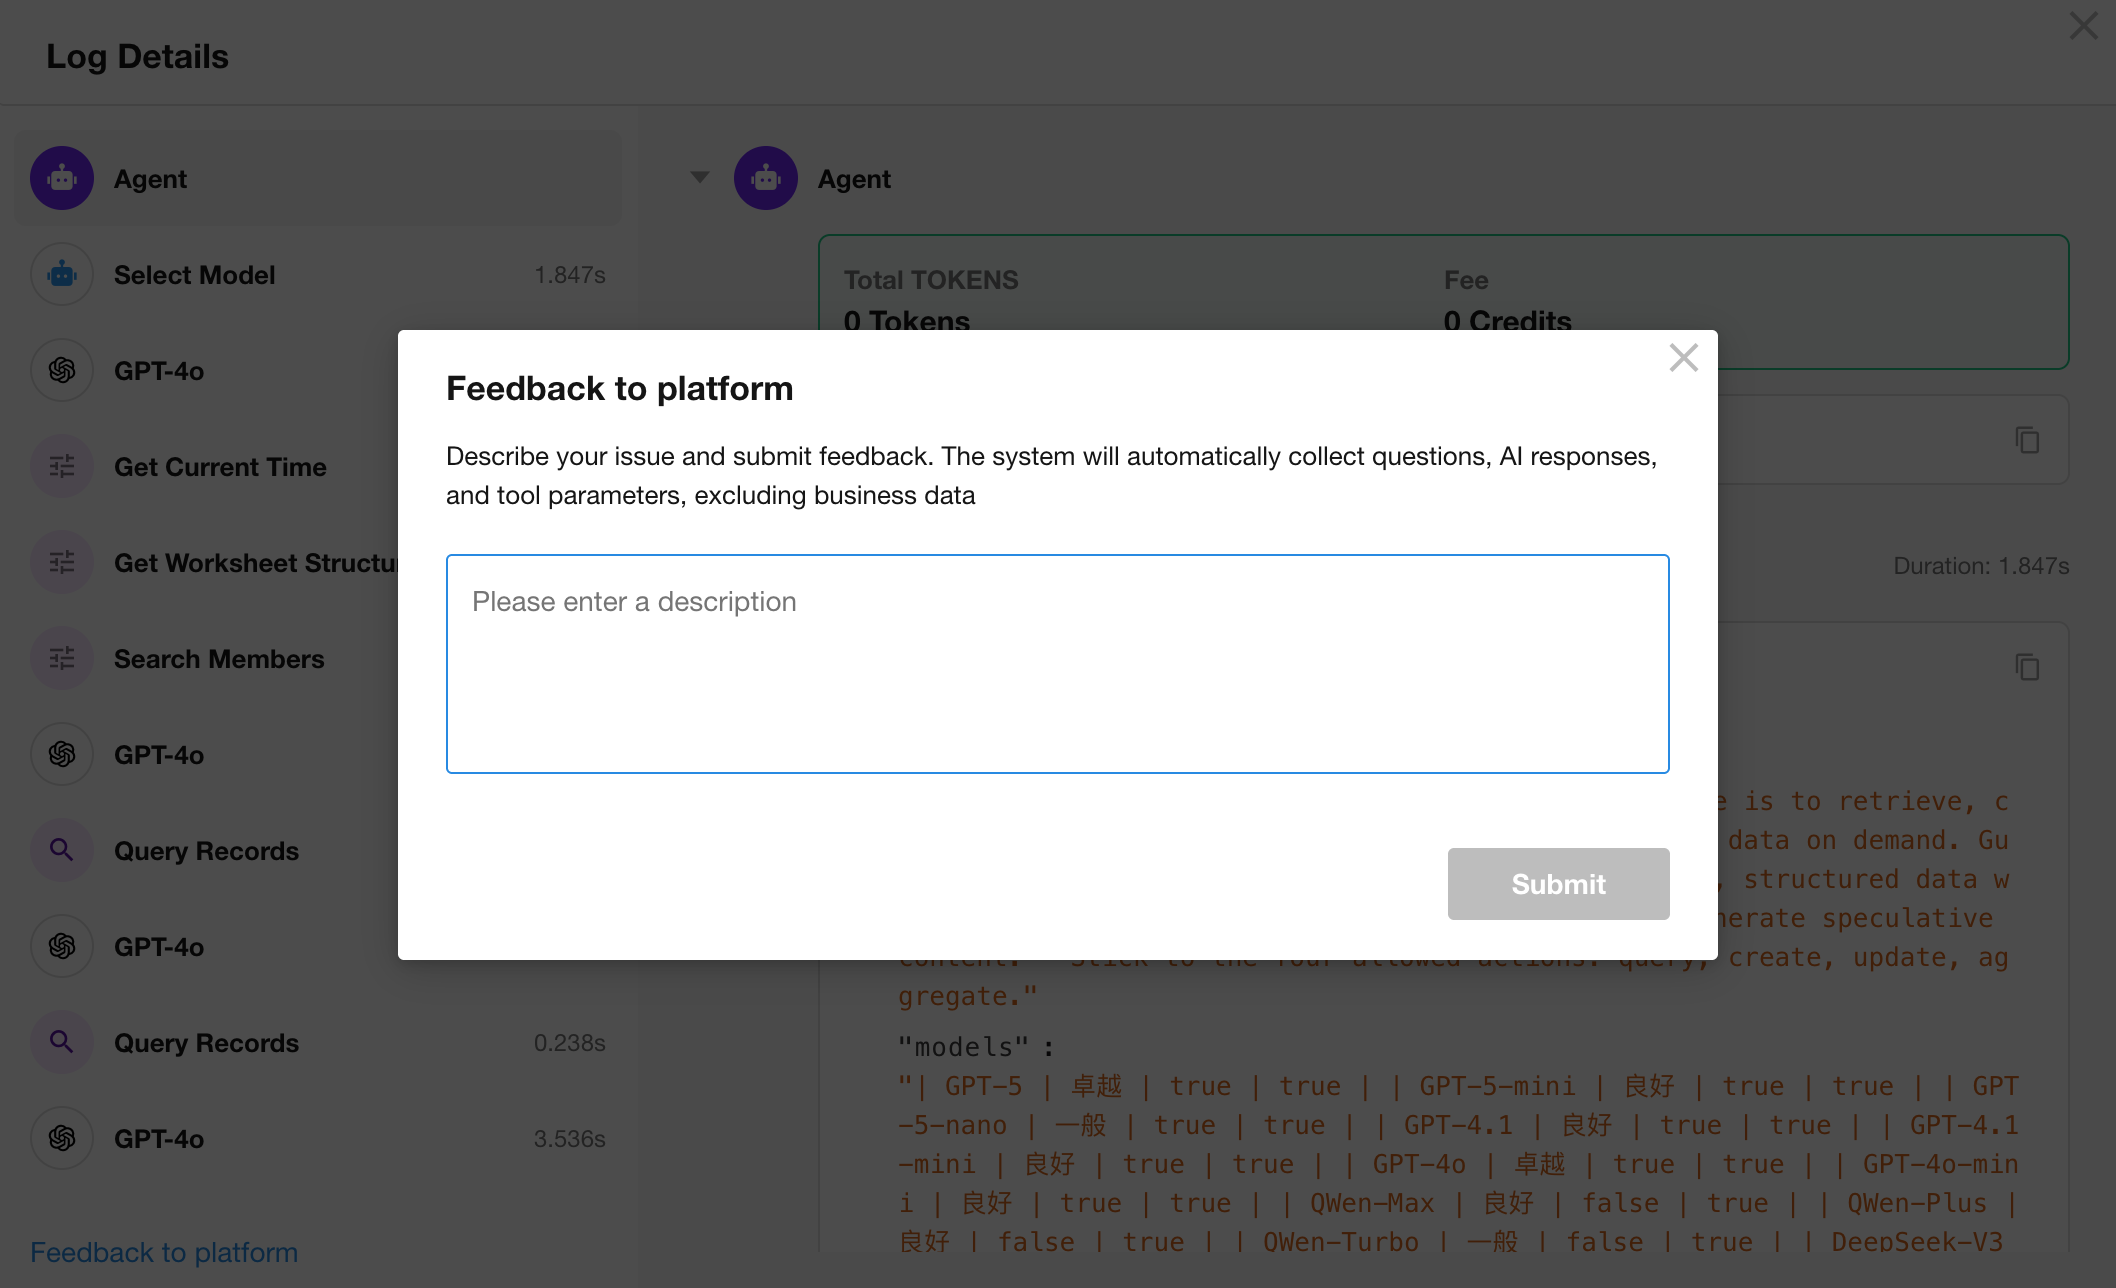
Workflow Owner Feedback to Platform
If, after investigation, the workflow owner believes the issue requires platform-level improvement, they can click “Feedback to Platform” in the lower-left corner of the logs interface.
ChatBot
ChatBot is an application item built on top of AI Agent capabilities. It enables users to engage in multi-turn conversations that drive business process automation through natural chat interactions.

Permissions Configuration
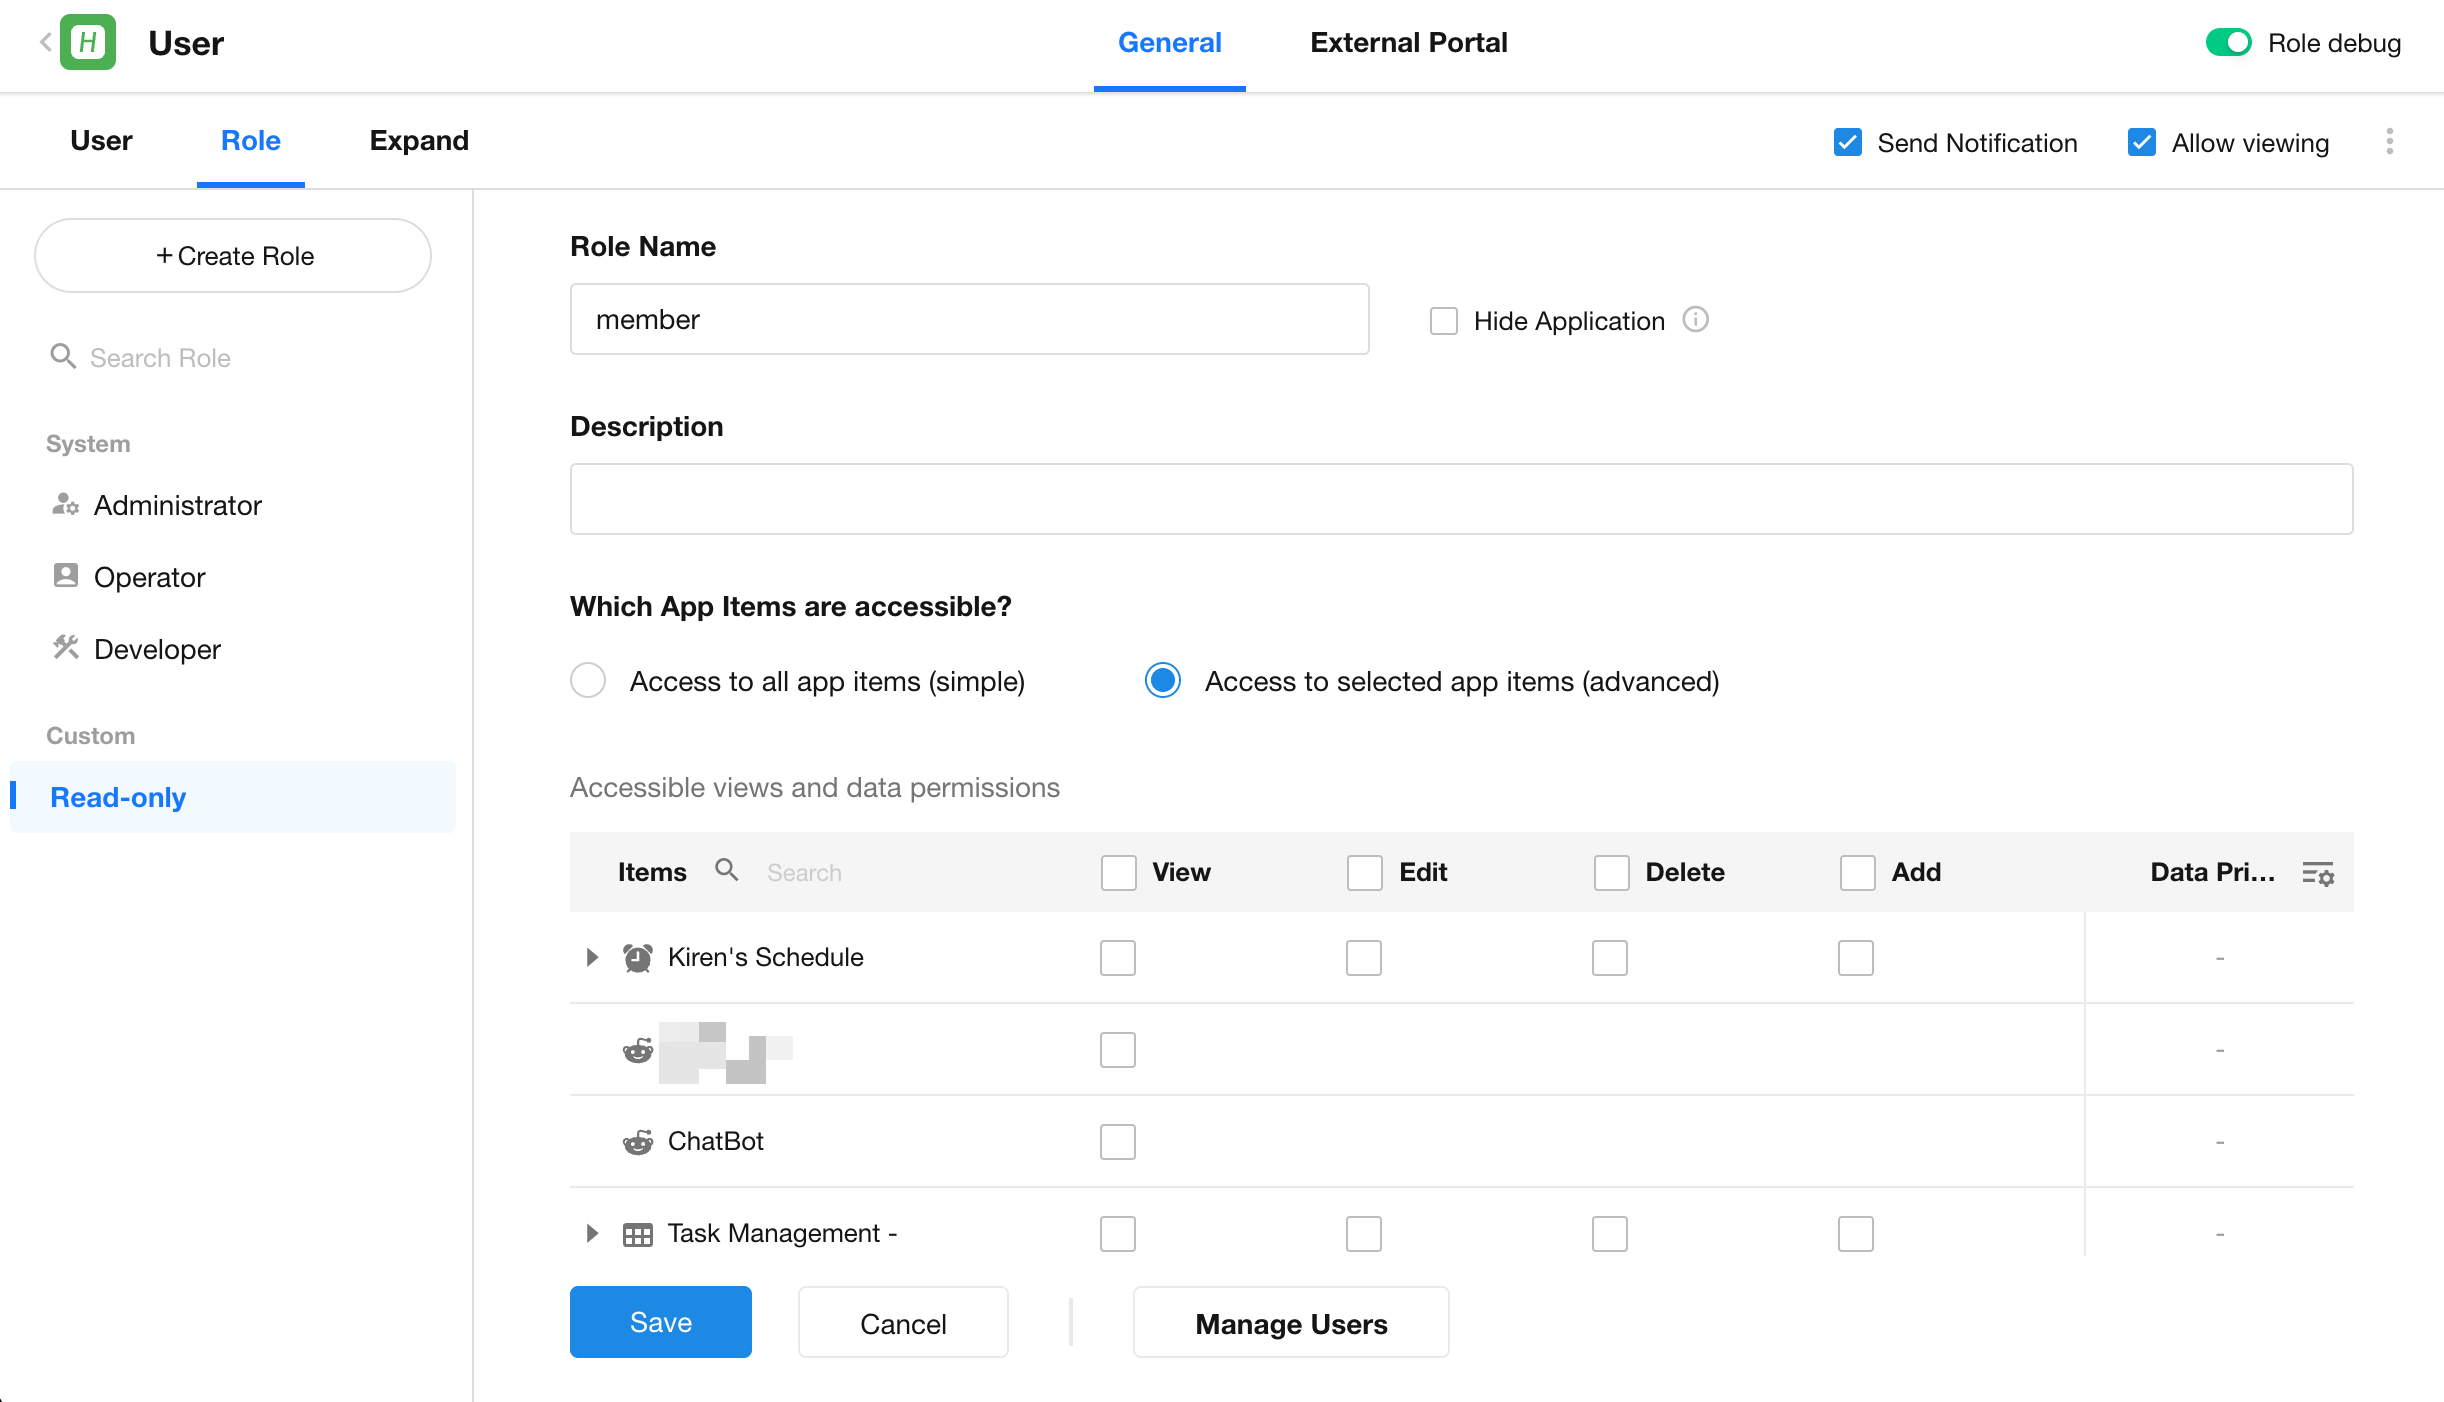
As an application item, the visibility and usage rights of the ChatBot follow the user role permissions configured within the app. The permission logic varies based on how the app items are distributed:
Permissions Within the Application
- Access to all app items (simple)
- Users can use the ChatBot.
- Access to selected app items (advanced)
- If the role is granted “View” permission for the ChatBot, the user can access and use it.
- If the “View” permission is not granted, the ChatBot will not be visible or accessible to the user.
Permissions in External Portal
- Access to all app items (simple)
- Eexternal users can use the ChatBot.
- Access to selected app items (advanced)
- If the role is granted “View” permission for the ChatBot, the user can access and use it.
- If the “View” permission is not granted, the ChatBot will not be visible or accessible to the user.
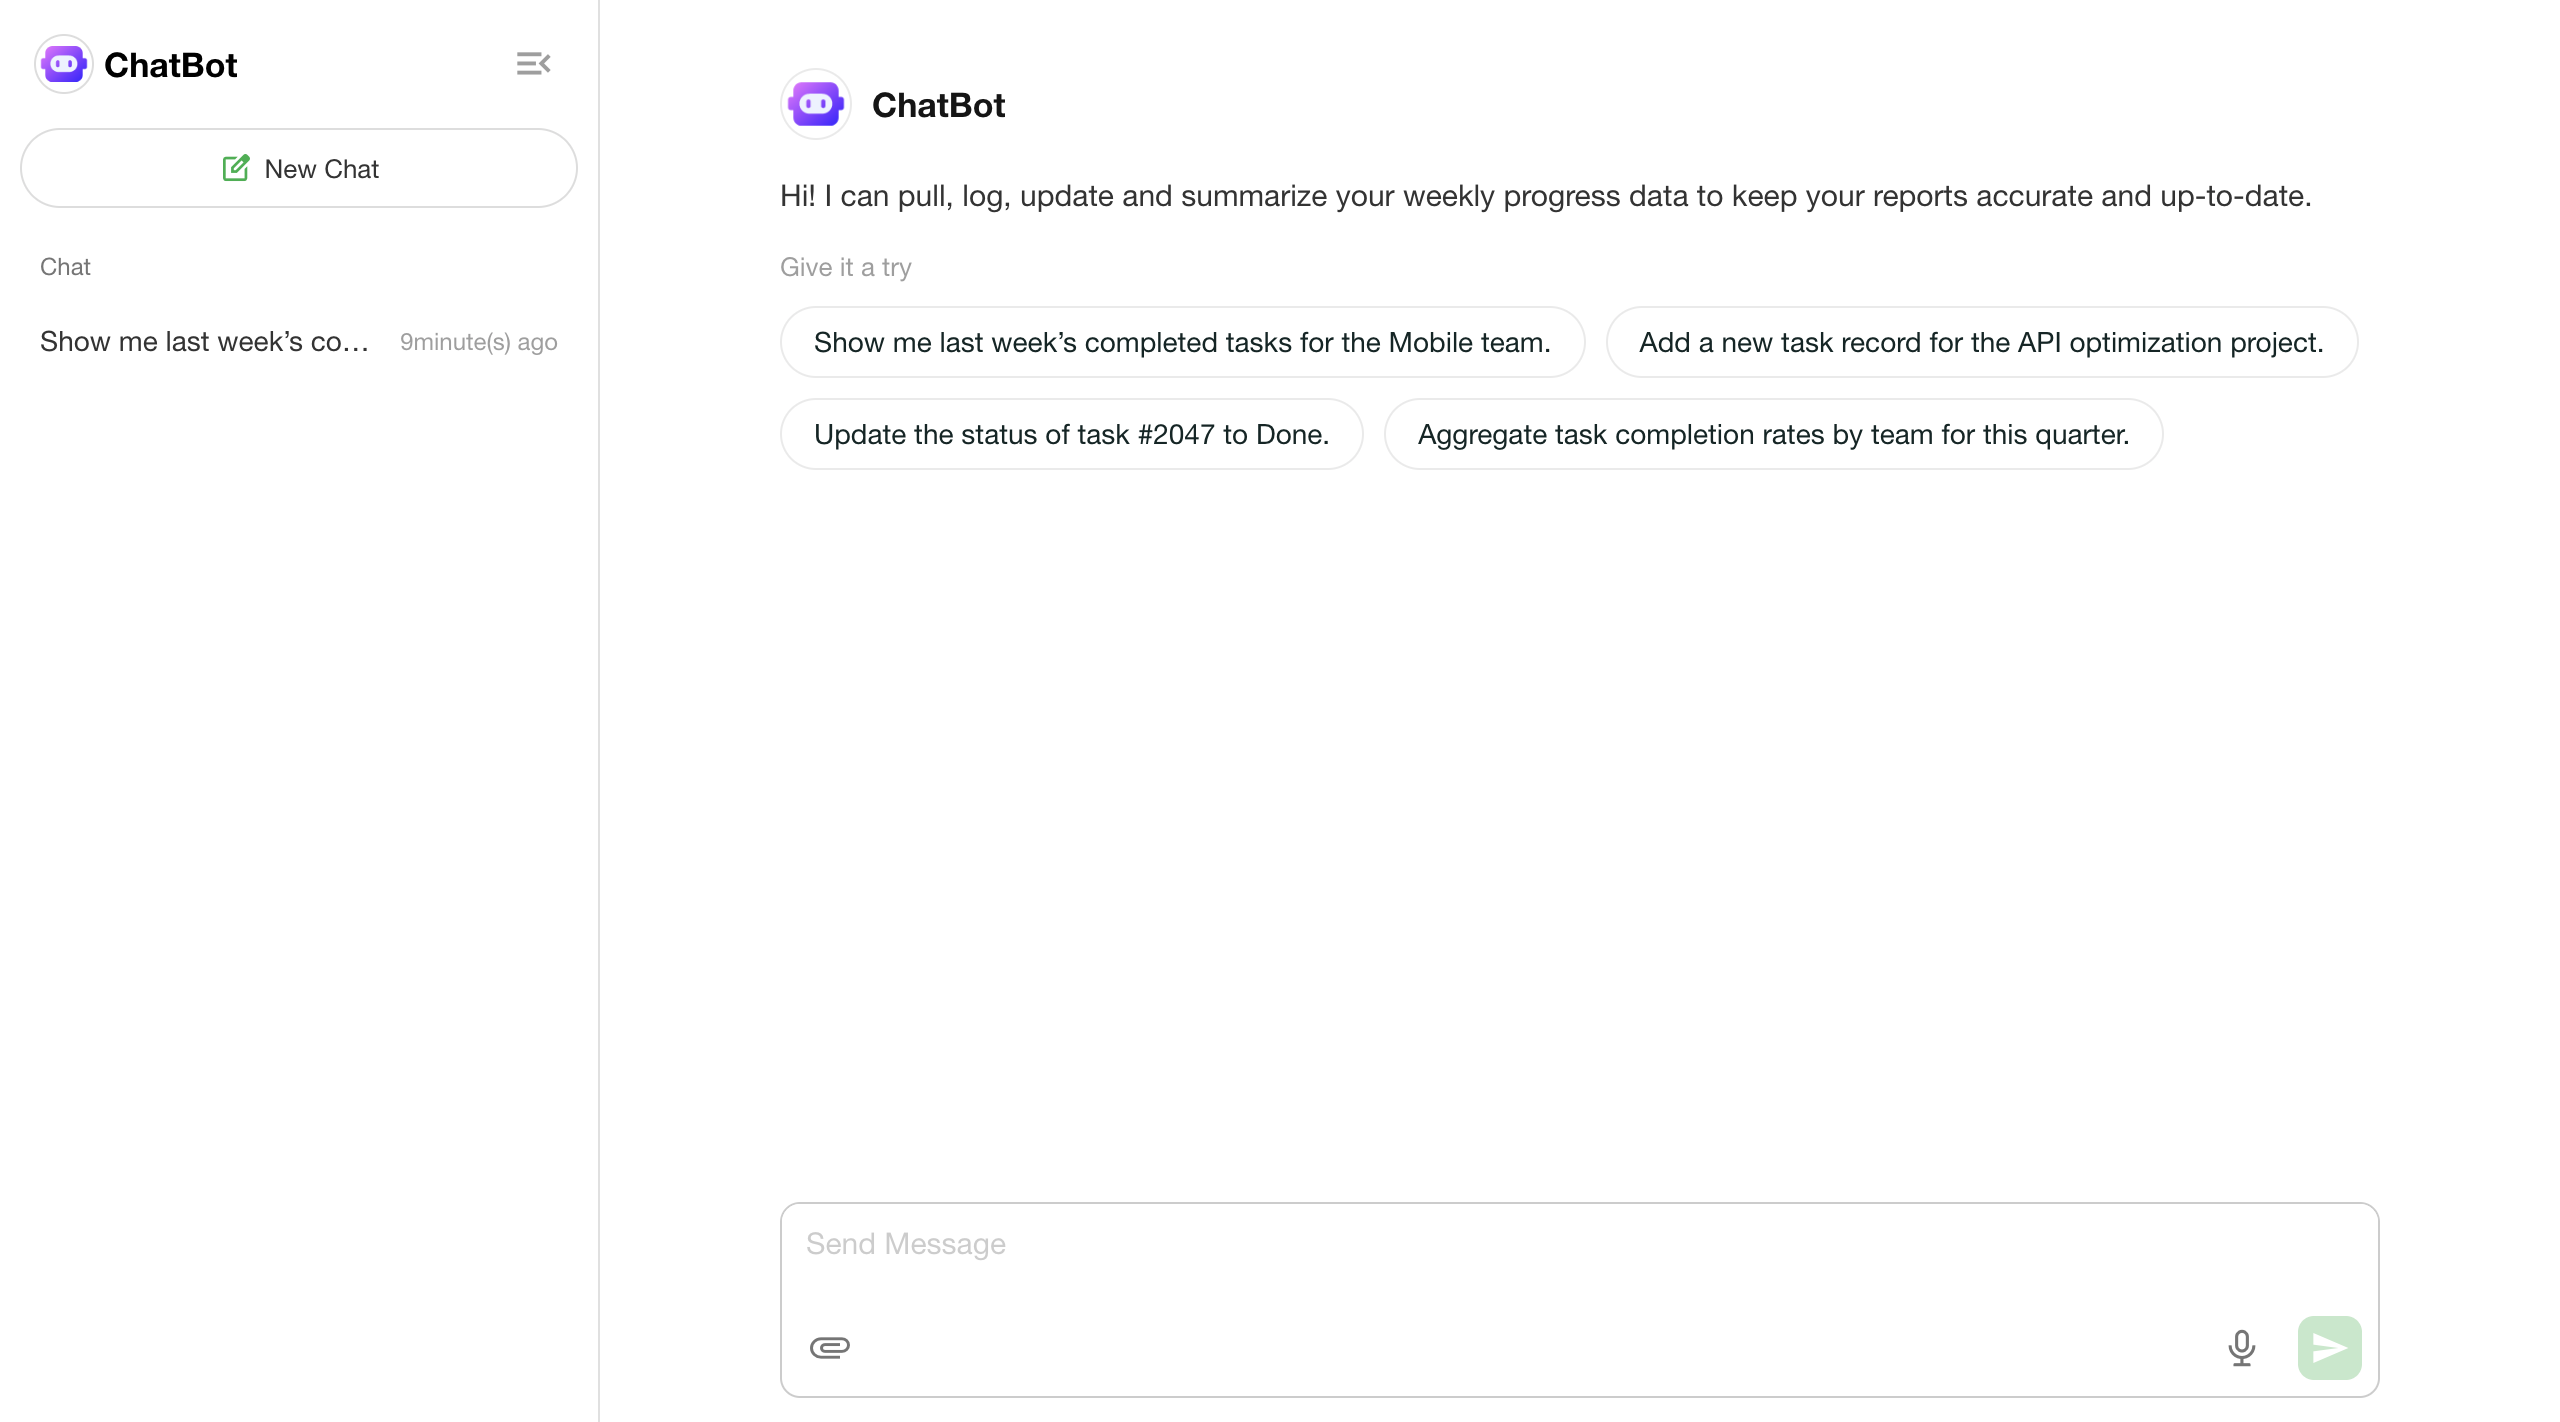
Conversation Interface
Welcome Message & Suggested Questions
- A welcome message and preset questions are displayed when the user first enters the ChatBot interface.
- Clicking a preset question will immediately send it as a message in the conversation.
Message Input & Sending
- Supports text input.
- Supports attachment upload, including images, PDFs, and other files.
- Supports voice-to-text input.
- During message generation, users can click the “Pause” button at any time to stop the process.
Conversation History
- The left panel displays personal conversation history from the past 30 days.
- Users can resume conversations from any previous conversation.
- Only the user’s own conversation data is visible in the history.
Start a New Conversation
- Click “New Chat” to start a separate, independent conversation.
- Each new conversation maintains its own context, without affecting historical records.
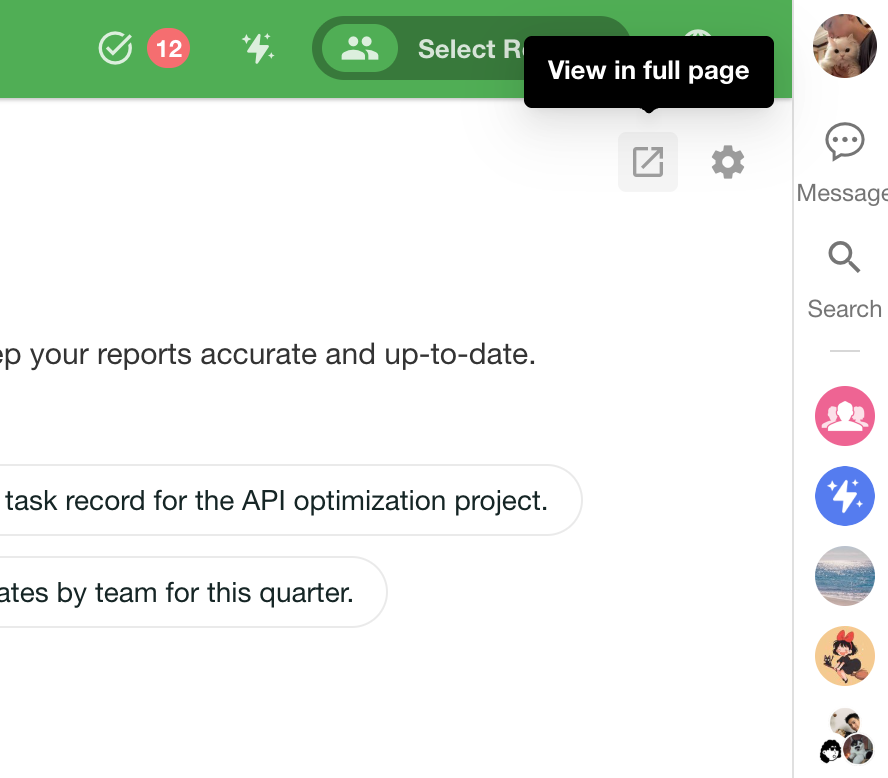
Conversation Landing Page
Click “View in full page” to view the conversation in a standalone interface.
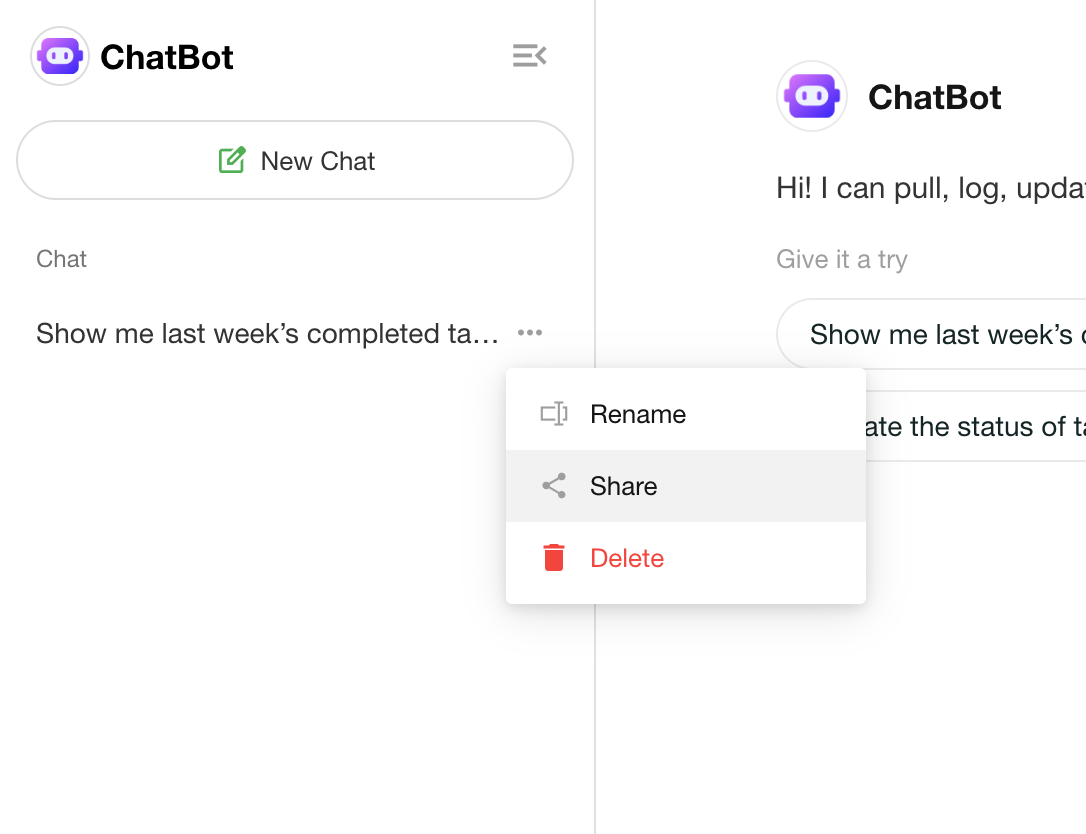
Share a Conversation
- Users can click the “Share” button in the conversation history to generate a public link.
- The shared link supports copying, QR code, password protection, and expiration settings.
- External visitors can view a full snapshot of the conversation via the link.
- After logging in, users can continue the conversation with the ChatBot. Access permissions will follow the permissions of the logged-in account.
Note: The ChatBot itself does not enforce direct read/write data permissions. All tool execution permissions still follow the original workflow and worksheet access configurations.
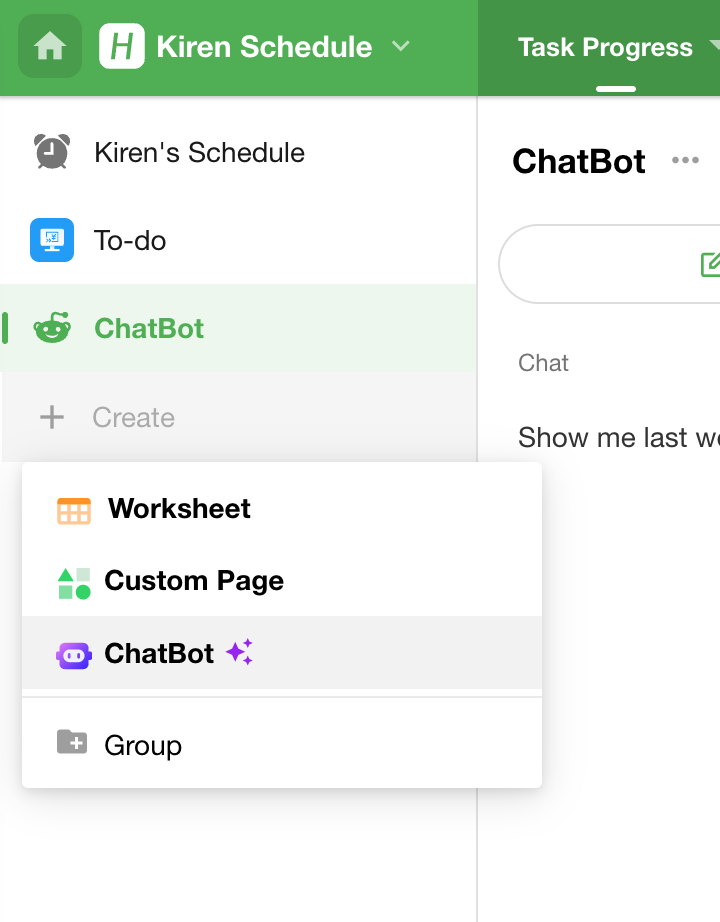
Create a ChatBot
1. Where to Create a ChatBot
Click the “+ Create” button in the left navigation panel of the app, then select ChatBot to open the creation dialog.
2. Enter a Description
Provide a description of the ChatBot’s purpose and functionality.
The system will also generate a few suggested descriptions based on the app context, shown in the “Give it a try” section.

3. Auto-Generated Configuration
After submitting the description, the system will automatically create the ChatBot and intelligently generate the necessary configuration.
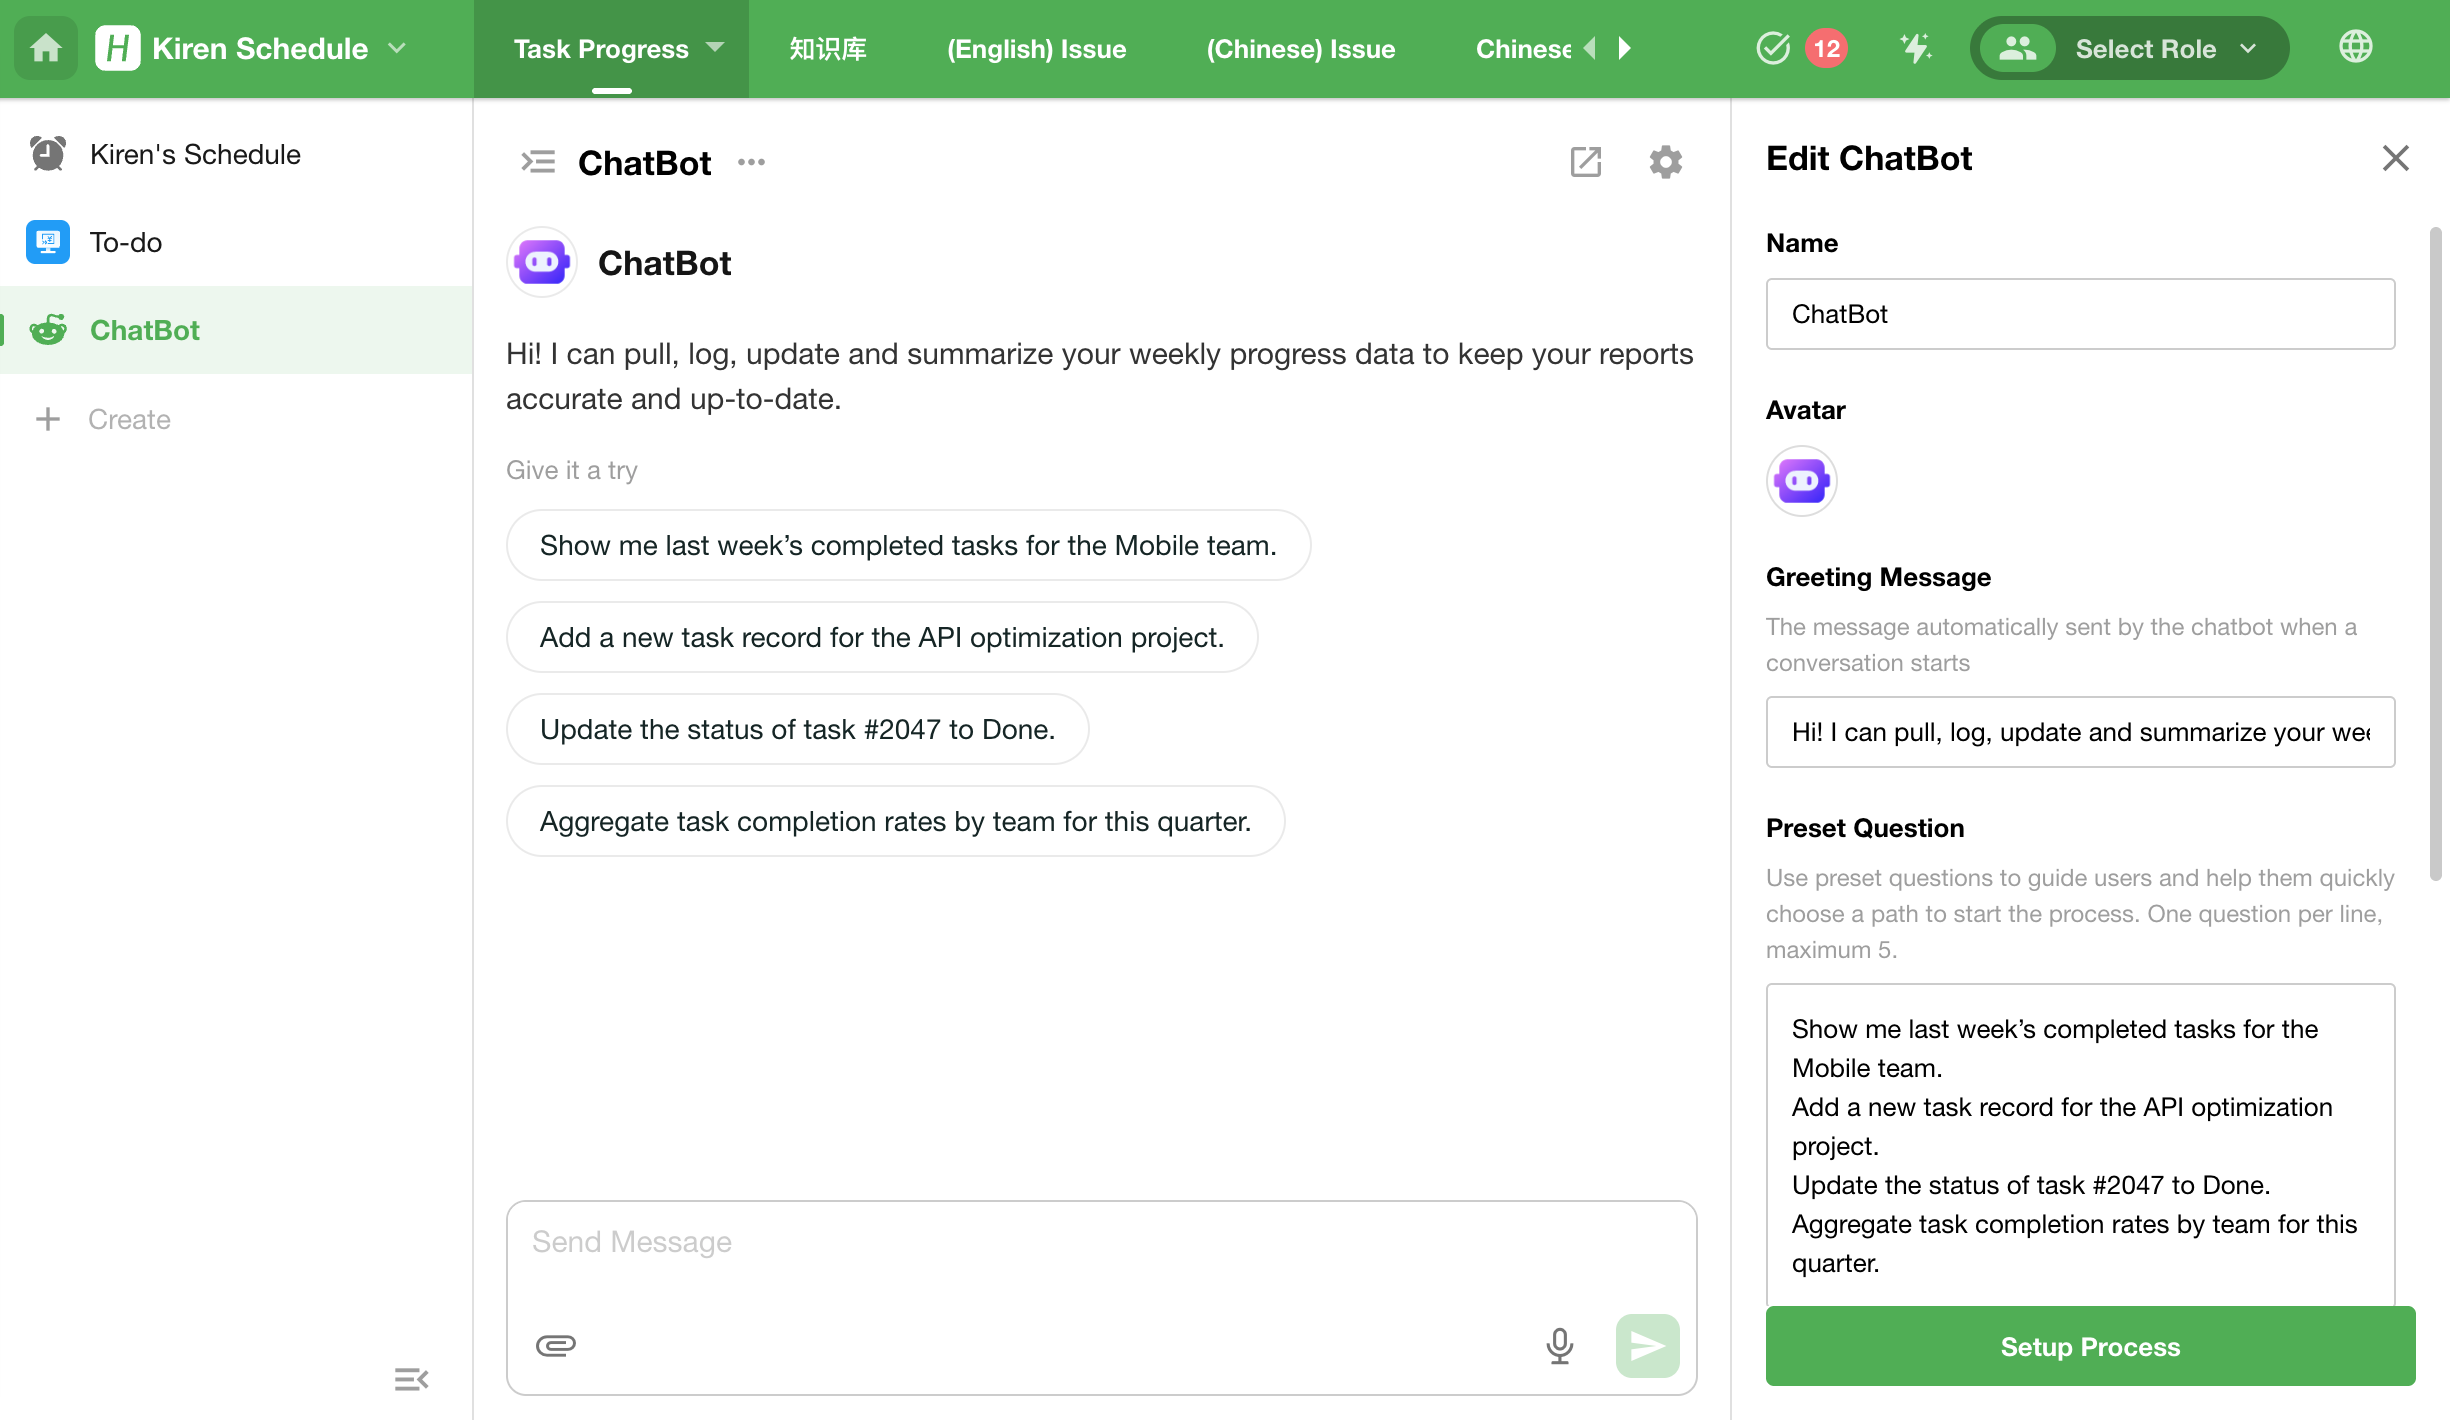
Configure the ChatBot
Users can modify the basic settings of a ChatBot via the right-side configuration panel, including:
- Name
- Avatar: Upload a PNG/JPG image
- Welcome Message: The first message shown when a conversation starts; fully customizable
- Preset Questions: Up to 5 questions can be configured
- Attachment Upload: When enabled, users can upload attachments during the conversation
- Conversation Sharing: Allow users to share conversations externally
- Configure Workflow: Jump to the linked workflow configuration page
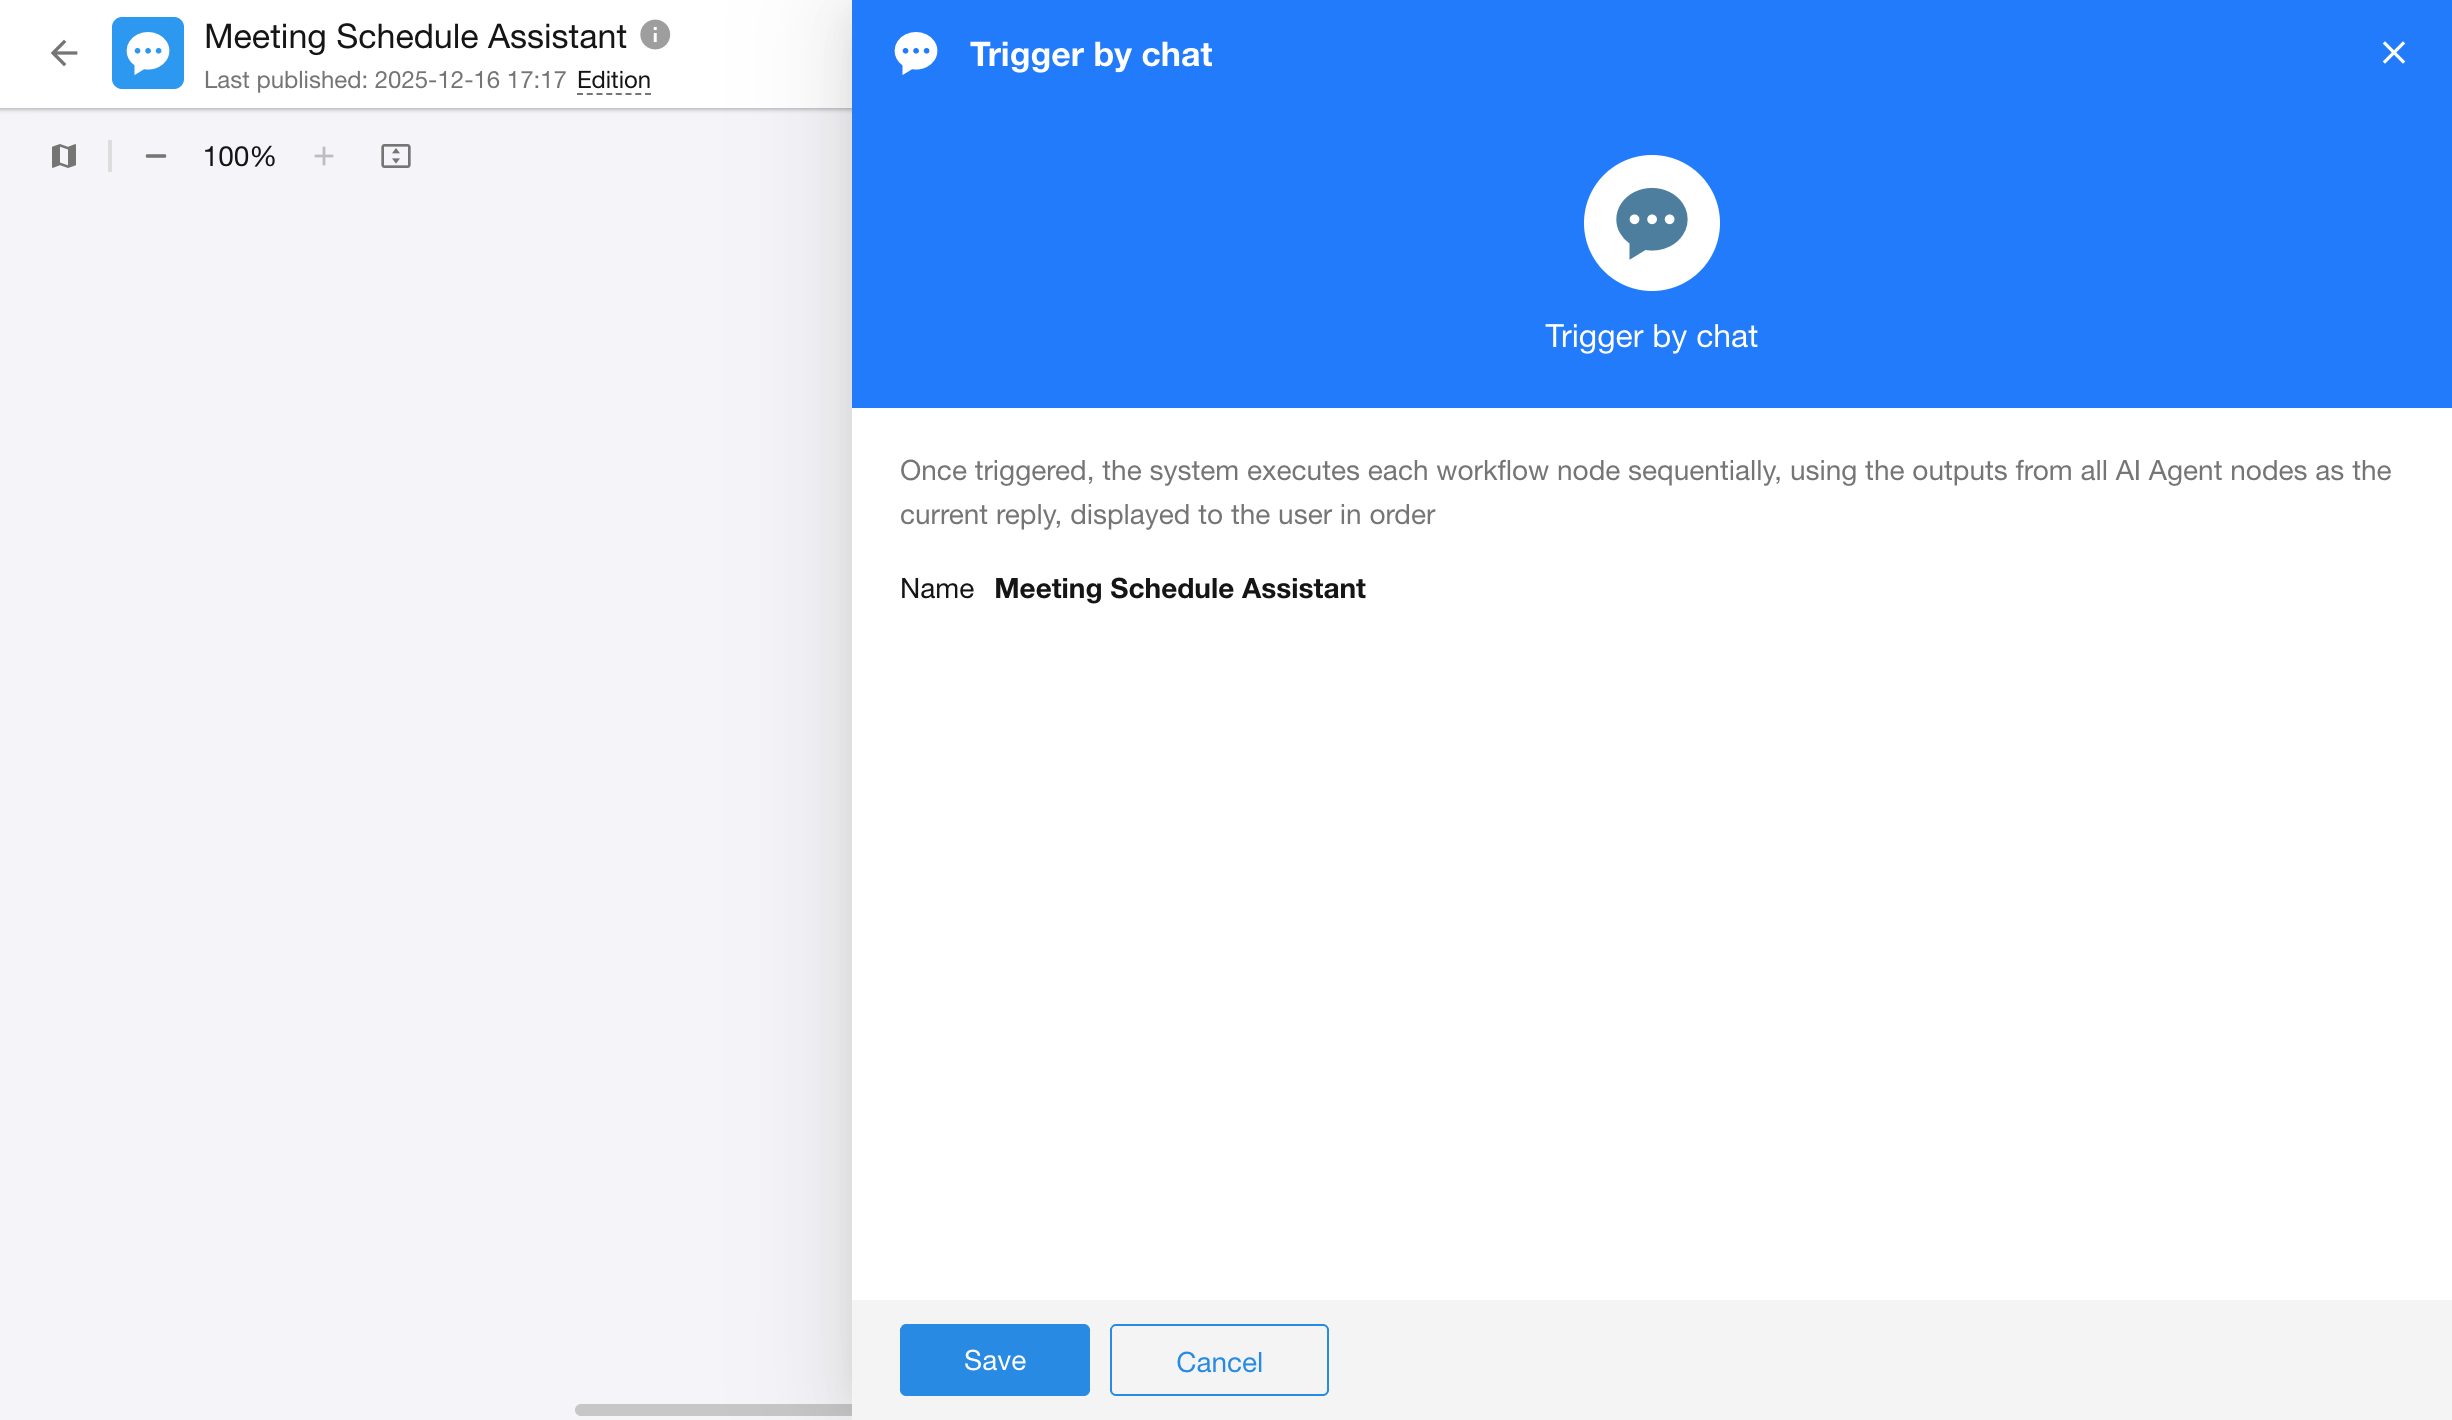
Workflow Triggered by Conversation
A Conversation Workflow is a workflow initiated through a ChatBot. It acts as a container for dialogue-centric workflow orchestration and business automation, enabling multi-turn interactions to tightly integrate with business processes.
1. Conversation Trigger Node
- Type: Trigger Node
- Function: Listens to user input from the ChatBot interface (text, attachments, etc.)
- Output Fields:
| Field Name | Type | Description |
| User Message | Text | Content of the user’s message |
| User Attachment | File | Uploaded file |
| Conversational User | Member | The current user in the conversation |
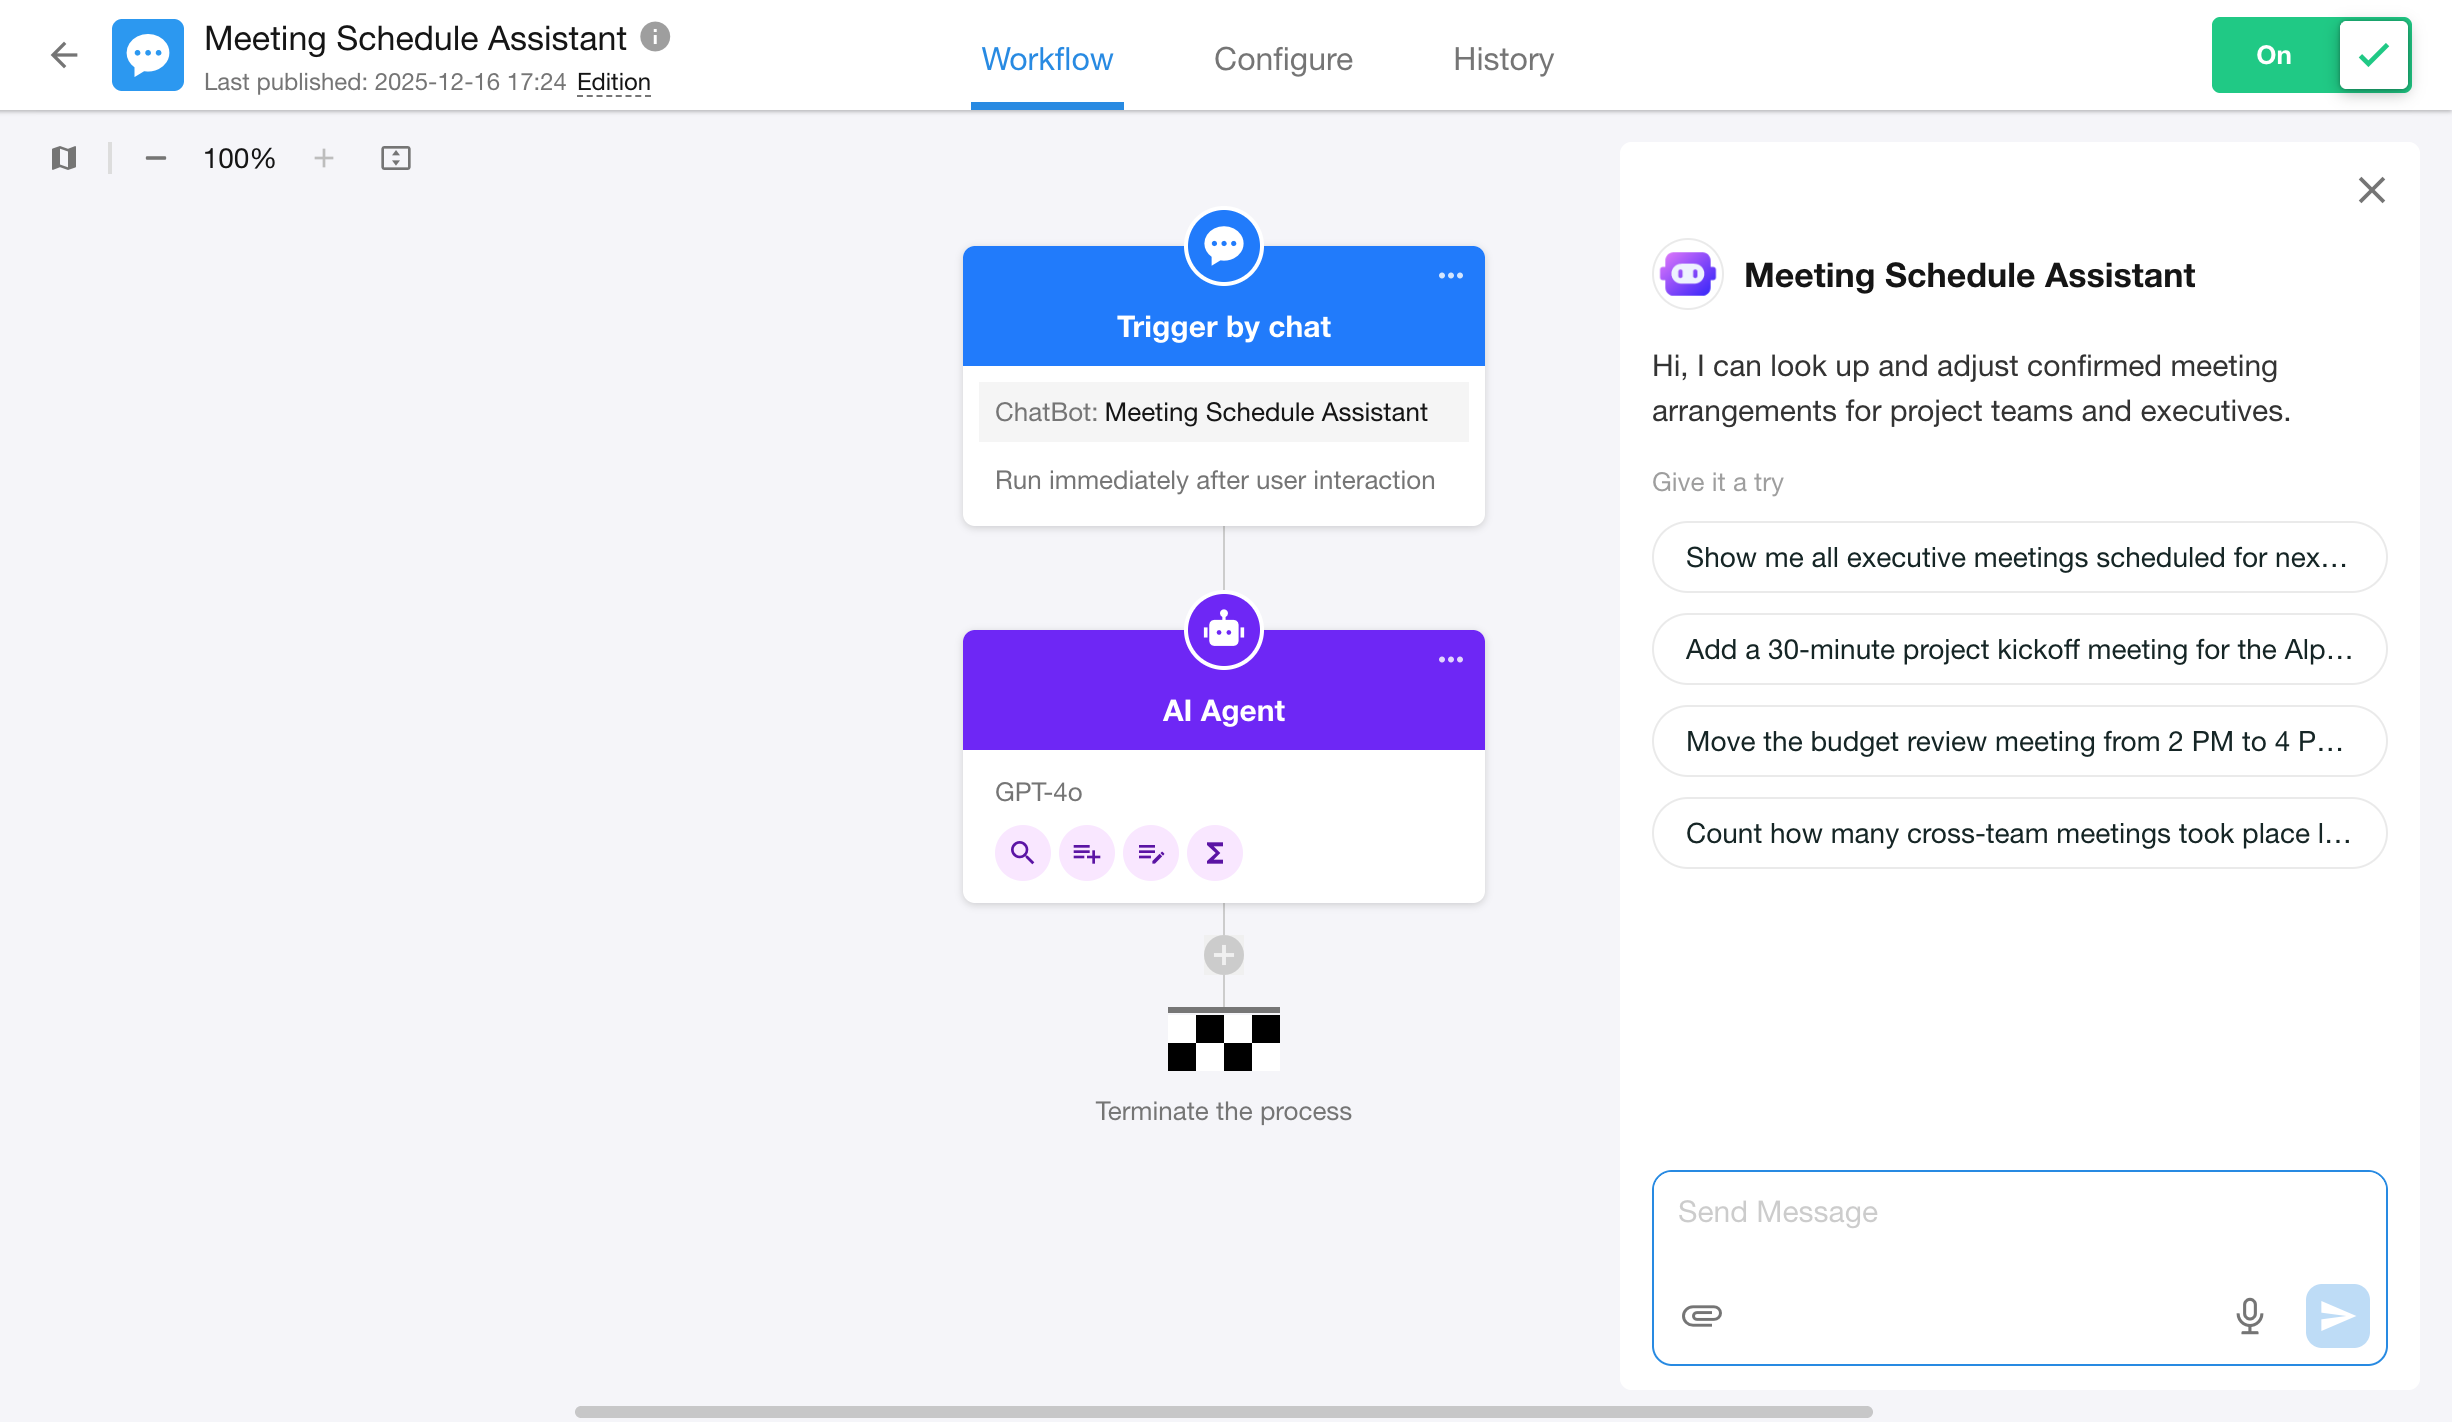
ChatBot Response Rules
- In each round, the ChatBot response will include all text-based outputs from AI Agent nodes in the conversation workflow, displayed in execution order. The current response is considered complete once the workflow reaches any of the following nodes:
- Approval Node
- Fill in Node
- Delay Node
- Subprocess
- PBP (Packaged Business Process)
- Approval Flow
- If all nodes in the workflow have completed, the round also ends.
2. AI Agent Node in Conversation Workflow
The basic functionality of the AI Agent node has been introduced previously. In conversation workflows, additional configuration options are available:
2.1 Conversation Memory Rounds

- The ChatBot will consider the most recent N conversation turns when generating a reply.
- A single conversation turn is defined as the period starting from when a message is received to when the next message is received. All content within this period—including the AI’s response(s), tool invocation, etc.—is considered part of the same conversation turn.
- Memory is session-scoped only:
- Each new conversation resets memory.
- Memory is not shared across conversations, users, or nodes.
- Range: 0 to 10 rounds, default: 5 rounds
2.2 Use System-Preset Reply Style

- When enabled, the Agent replies with a system-defined tone, format, and structure.
- When disabled, the reply style can be customized.
- Default: Enabled
2.3 User Permission Control

- If enabled, tool execution respects the data permissions of the conversation user.
- If disabled, the Agent bypasses user permissions and can access all data.
- Default: Enabled
2.4 Require User Confirmation Before Execution
When enabled, the ChatBot will request explicit user confirmation in the conversation before executing the associated action.

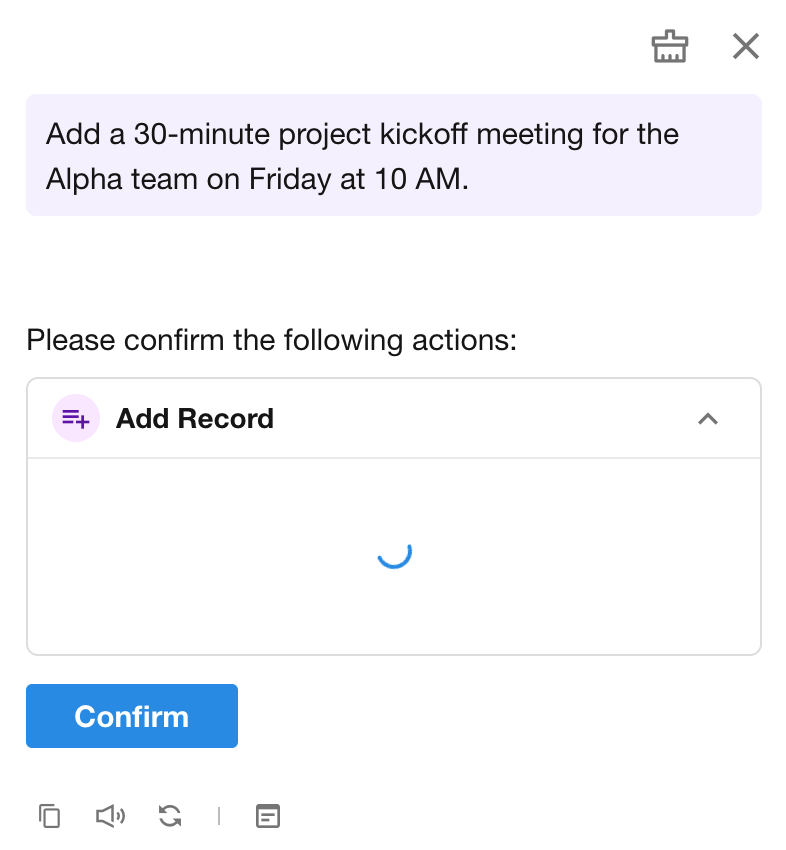
Supported tools for confirmation prompt:
- Add Record
- Update Record
- Send Internal Notification
- Send Email
- Call Packaged Business Process
- Call Integrated API
Debugging and Logs for Conversation Workflows
1. Debug a Conversation Workflow
Click the “Test” button in the upper-right corner of the workflow editor to open the test conversation window.
2. Detailed Logs for Conversation Workflows
Logs help trace the execution of each conversation round, making it easier to troubleshoot issues and analyze model behavior.
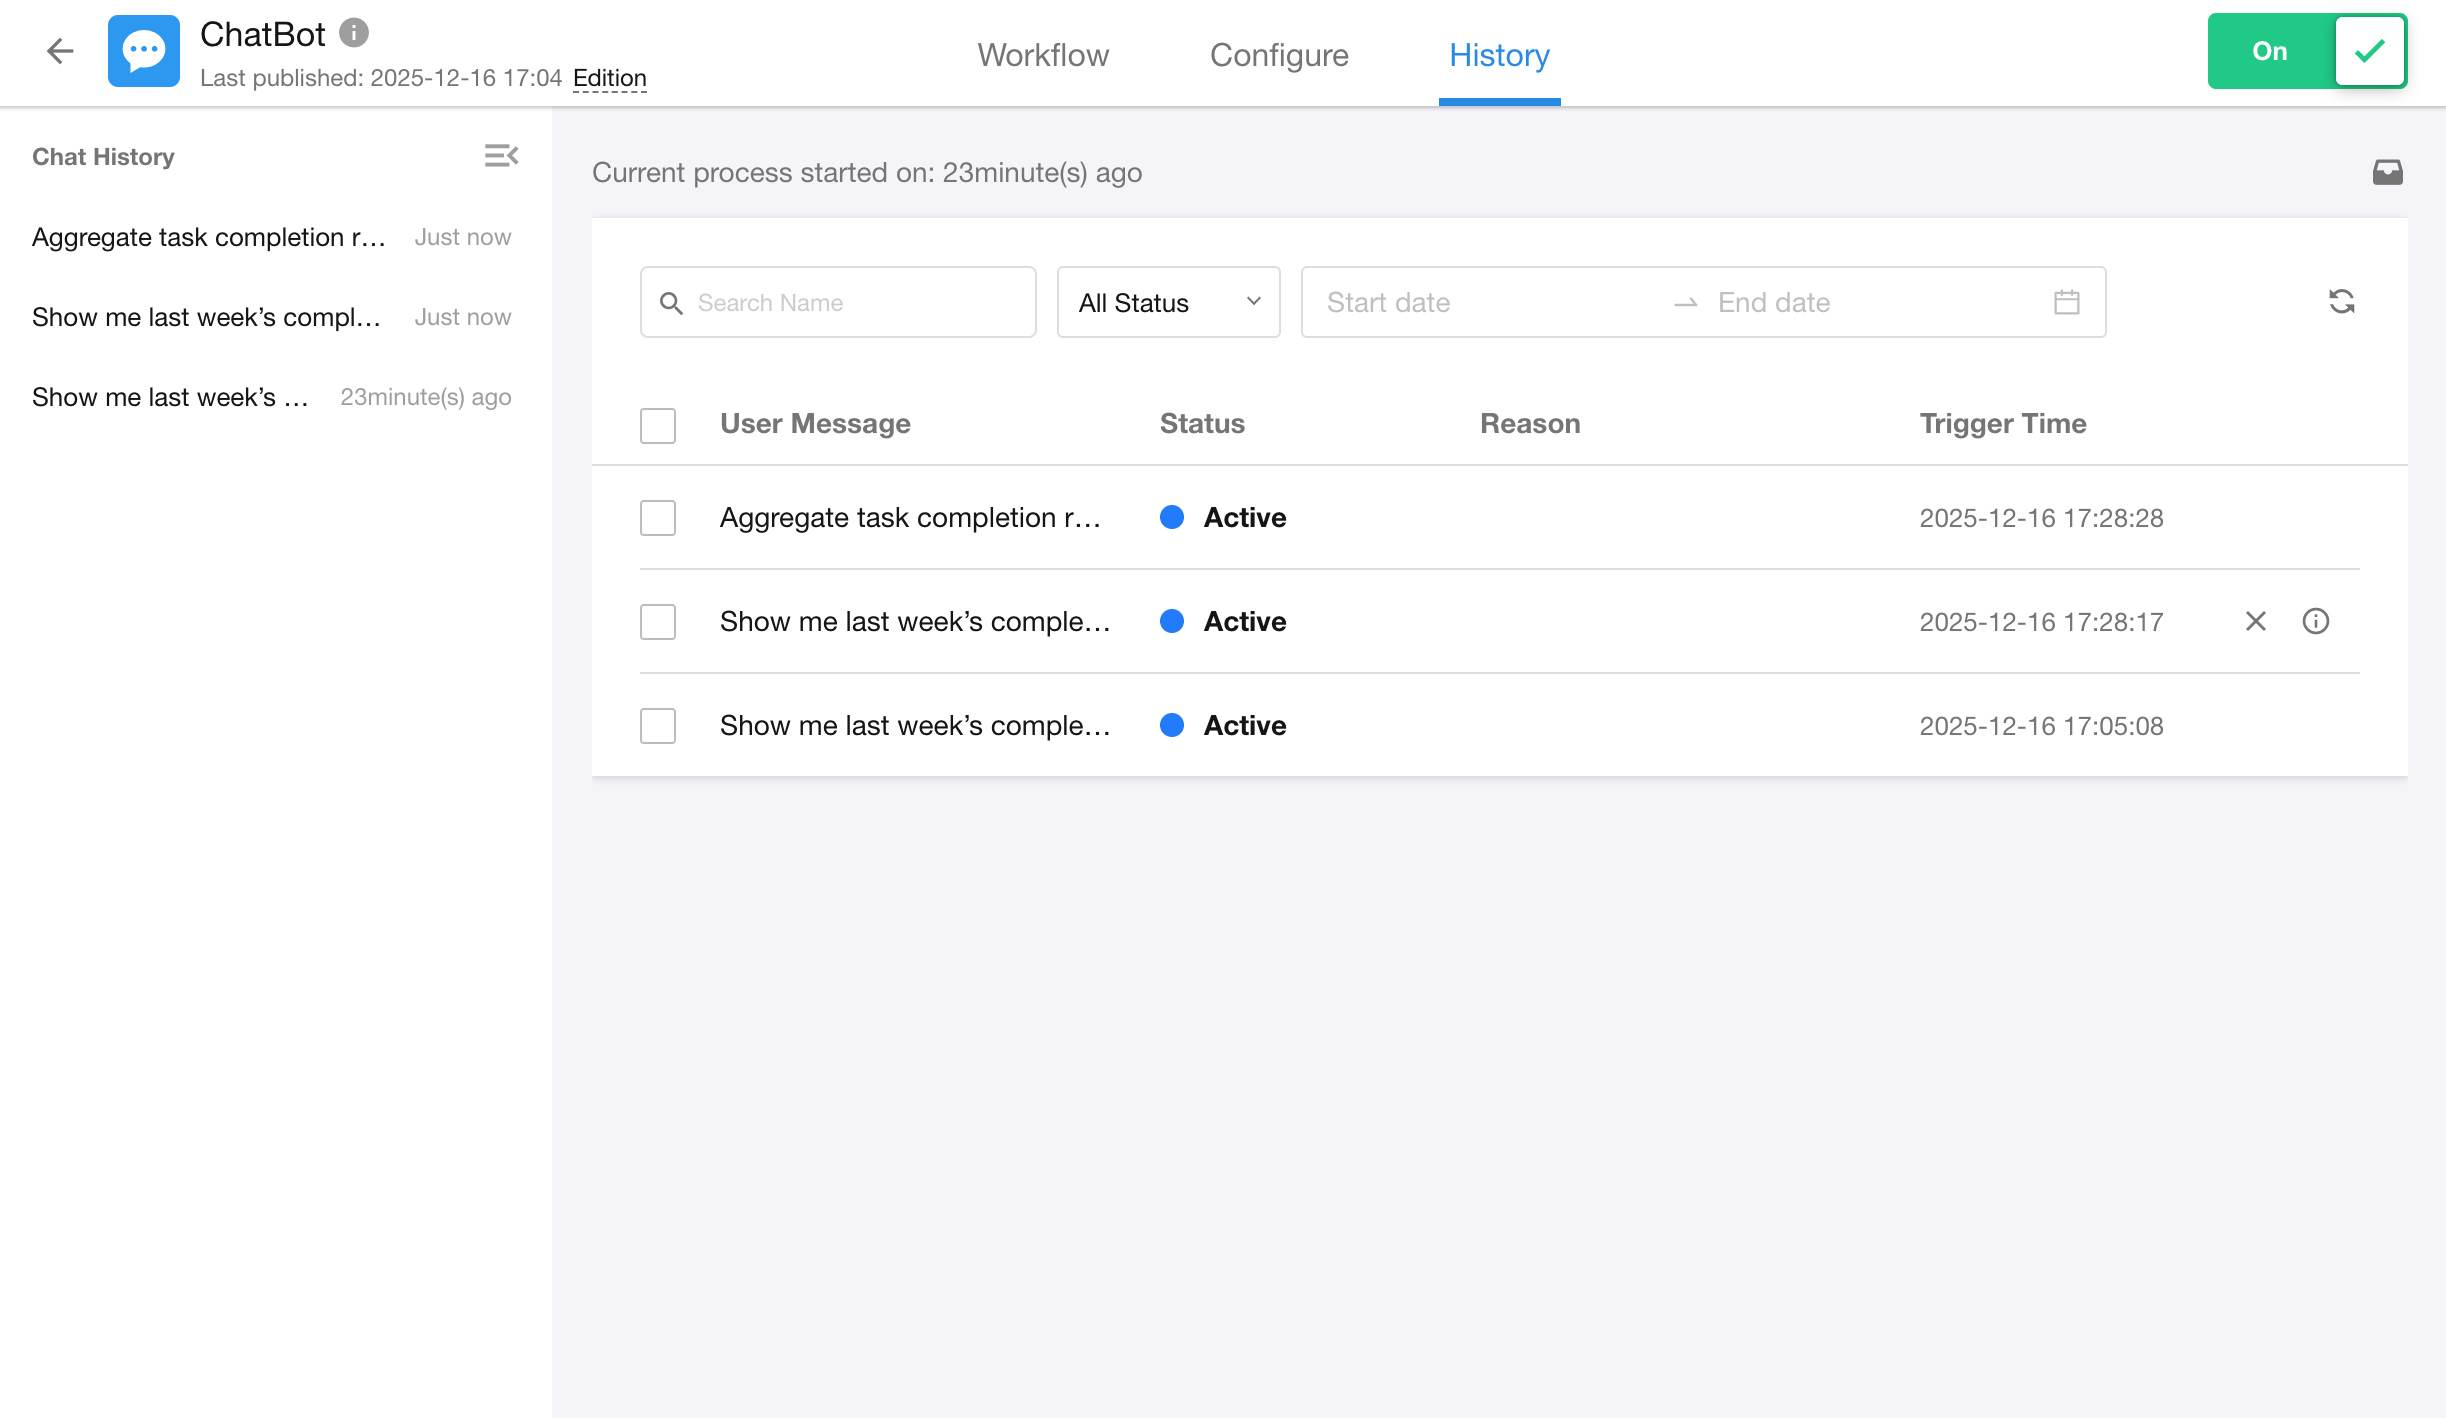
- Left Panel: Displays the user’s conversation history, sorted in reverse chronological order.
- Right Panel: Shows the execution log for each round in the selected conversation, including:
- User input message
- Execution status (Success / Failure)
- Failure reason
- Trigger time
Click any conversation entry to view the detailed workflow execution for that round.
Note: Test records are visible in the workflow logs, but they do not appear in the conversation history.
FAQ
Q1: Why is the ChatBot not responding after creation?
Please check whether the conversation workflow is enabled. You can also review the execution status of the AI Agent node in the Logs.
Q2: Why is there no response after uploading an attachment?
Make sure the “Attachment Upload” option is enabled in the ChatBot configuration.
Q3: Why do I get an error or insufficient permissions when querying data?
Check whether the “By User Permissions” option is enabled in the AI Agent node configuration.
Q4: How can I customize the reply format?
Disable “Use System-Preset Reply Style” in the AI Agent node, then define your own prompt structure.
Q5: How can I share a conversation with others?
Click the “⋯” button in the conversation list and select “Share” to generate a shareable link.
- You can set an expiration date and access password for the link
- The shared page displays a read-only snapshot of the full conversation
- Logged-in users can click “+ Chat” to continue conversations in a new page
- Sharing permissions:
- App administrators, operators, and developers can share app items
- Regular users can share their own conversations
Q6: If a conversation workflow includes multiple AI Agent nodes, how does the ChatBot respond?
After the conversation workflow is triggered, the system will execute all nodes in order. The outputs from all AI Agent nodes will be aggregated and displayed together as the complete response for that round.
Mingo
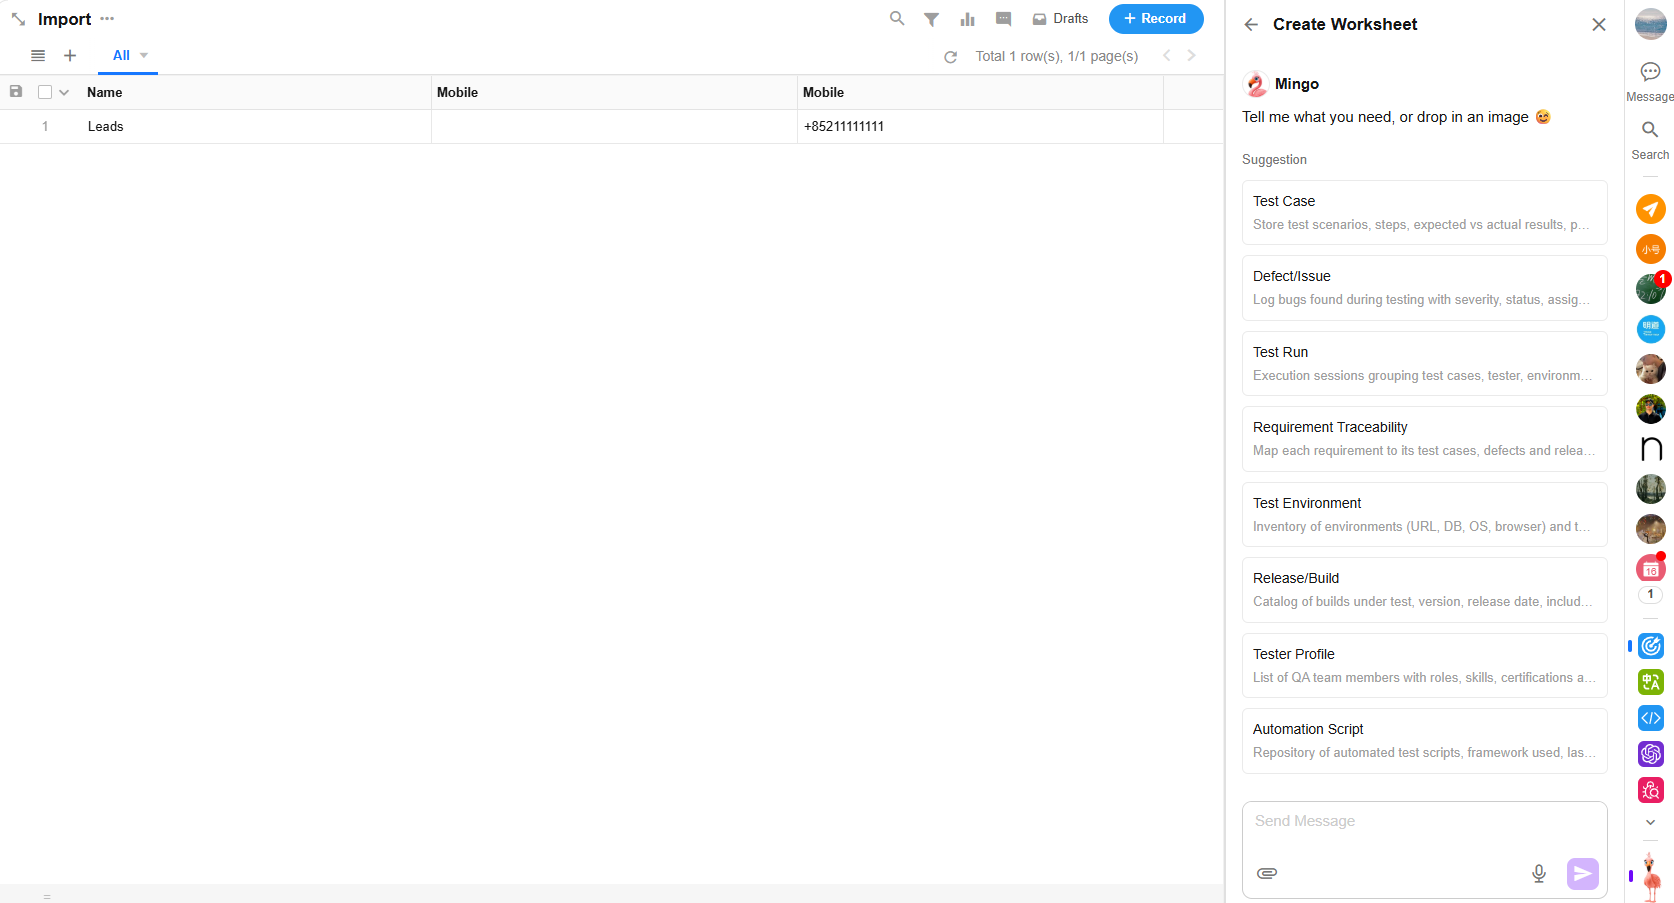
Mingo-Assisted Worksheet Creation
Mingo leverages AI to help users quickly create worksheets, including auto-generating worksheet fields and form layouts. It also suggests related worksheets that can be added next, allowing users to continue building their data structure seamlessly.
1. Generate Recommended Worksheets
Based on existing worksheets within the app, Mingo provides intelligent suggestions for worksheets that can further enhance your data model.
Alternatively, you can describe your needs directly via AI chat for personalized assistance.
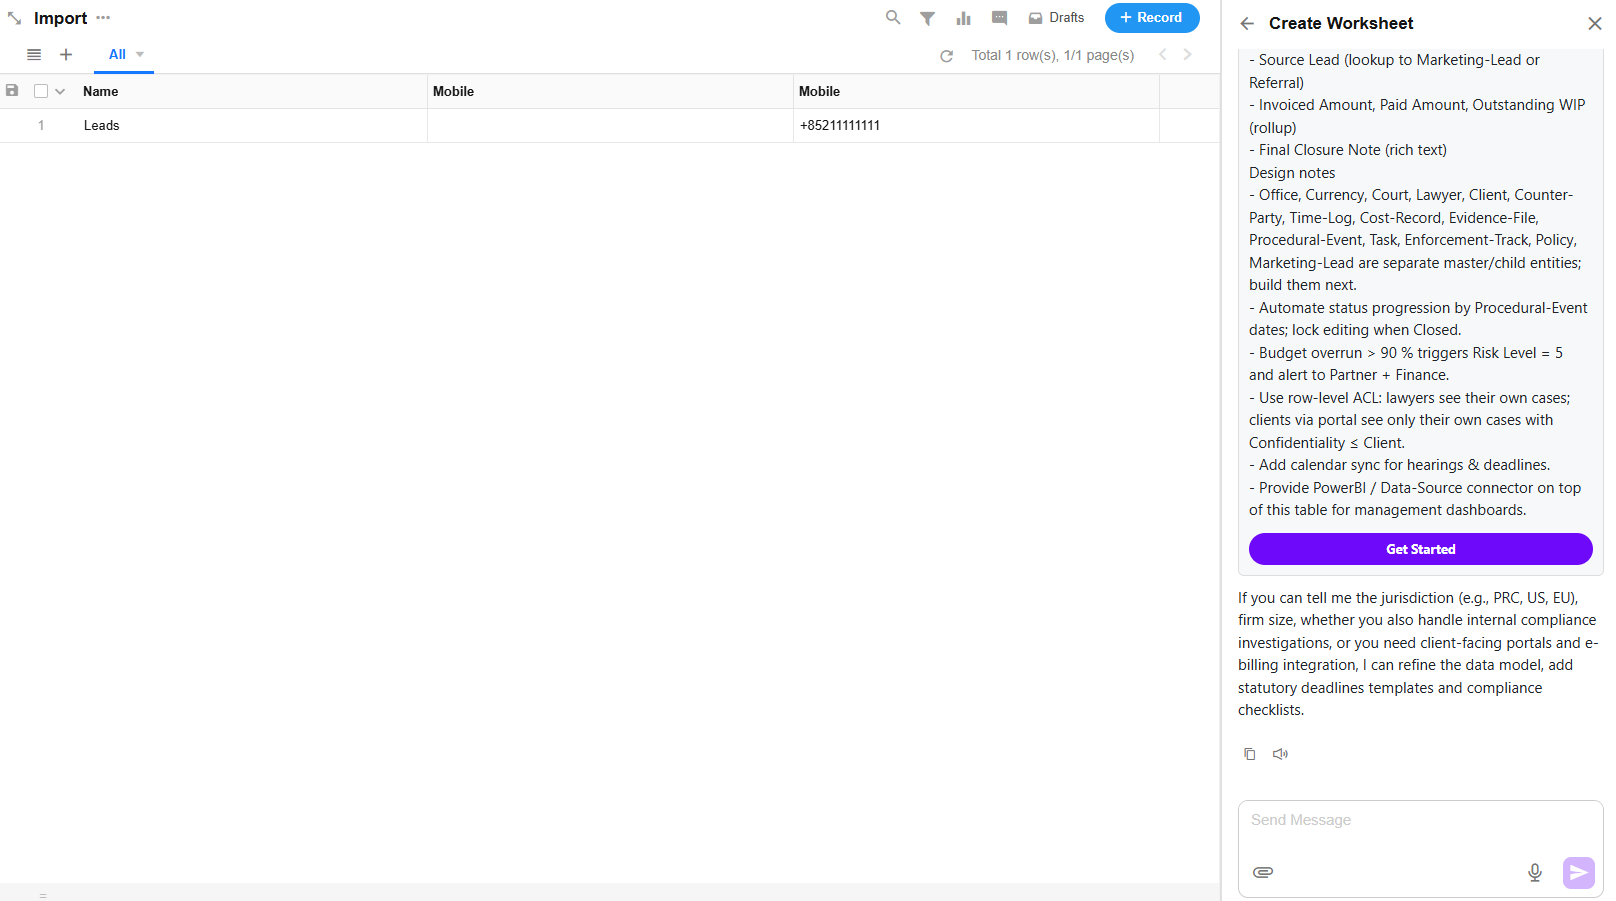
2. Refine Requirements
Mingo supports multi-turn conversations to refine and expand your worksheet creation needs. Through interaction, it helps generate more accurate and complete requirement descriptions.
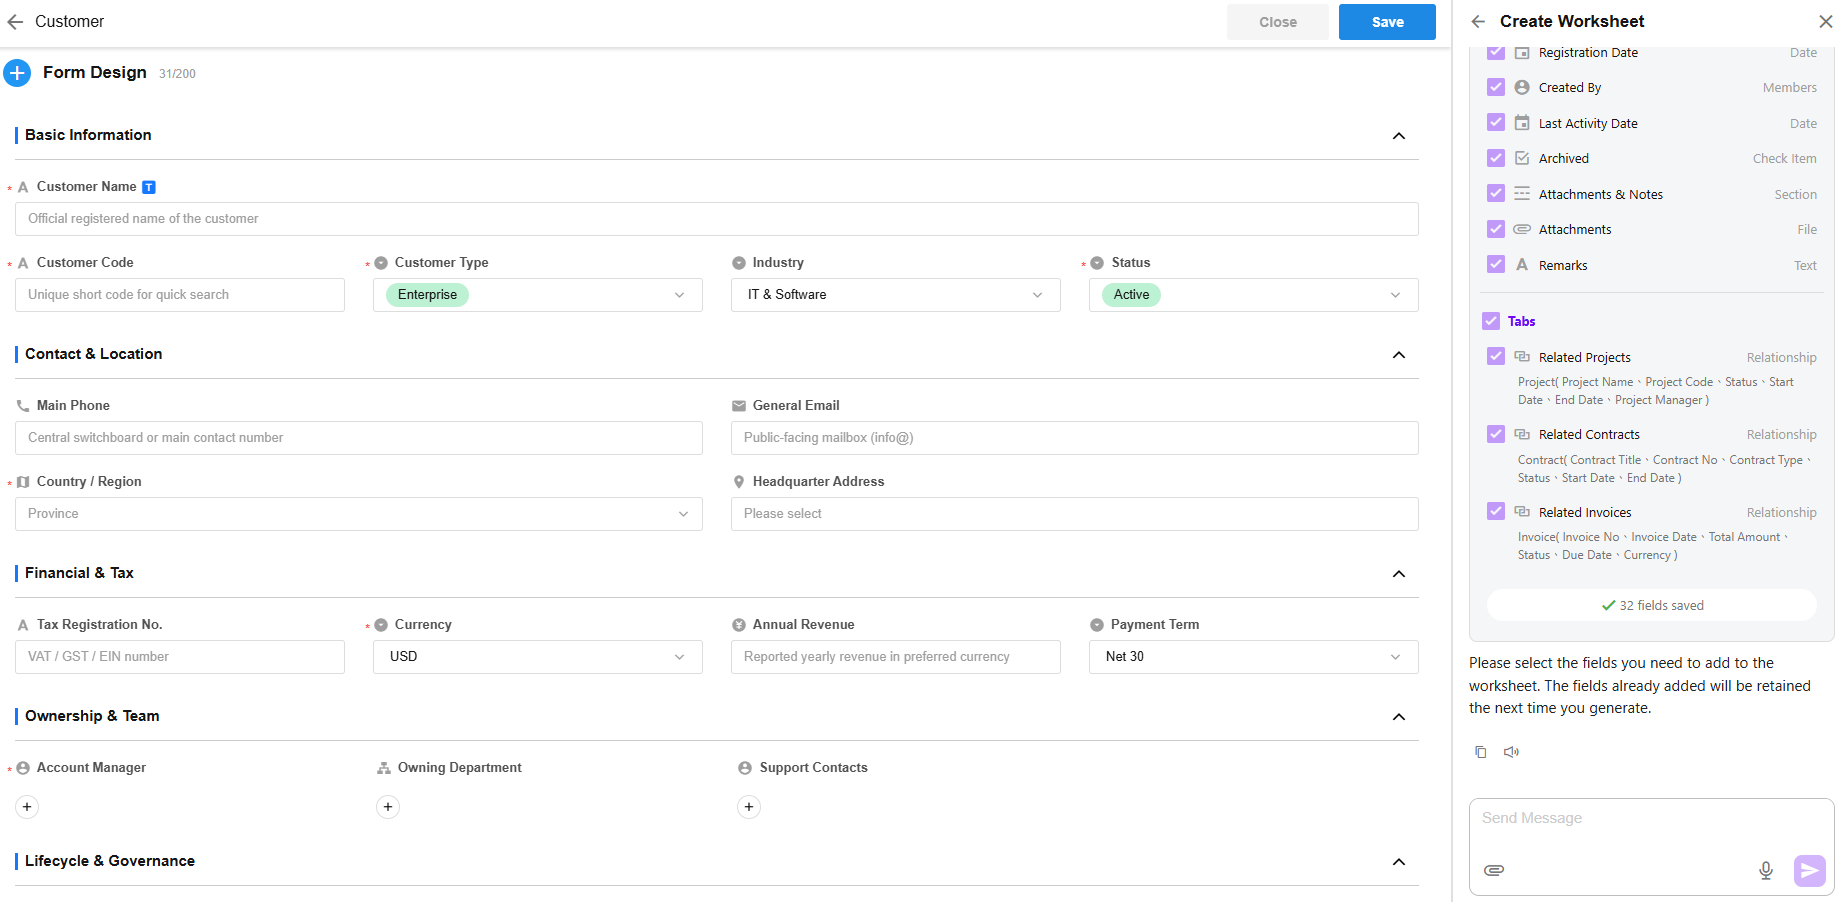
3. Create and Add Worksheet Fields
-
- Click “Get Started”, and Mingo will:
- Select a recommended icon
- Create the worksheet
- Auto-generate worksheet fields and the corresponding form layout
- If any fields are suitable to be expanded into related worksheets, Mingo will suggest creating them. Users can choose whether to add them.
- Click “Get Started”, and Mingo will:

4. Save Fields or Regenerate via Conversation
- Once fields are generated, you can add them to the worksheet as needed.
- You can also continue chatting with Mingo to regenerate fields. Any fields already added to the form will be retained in the next generation cycle.
- If new related worksheets are added, you can continue to generate fields for those worksheets as well.
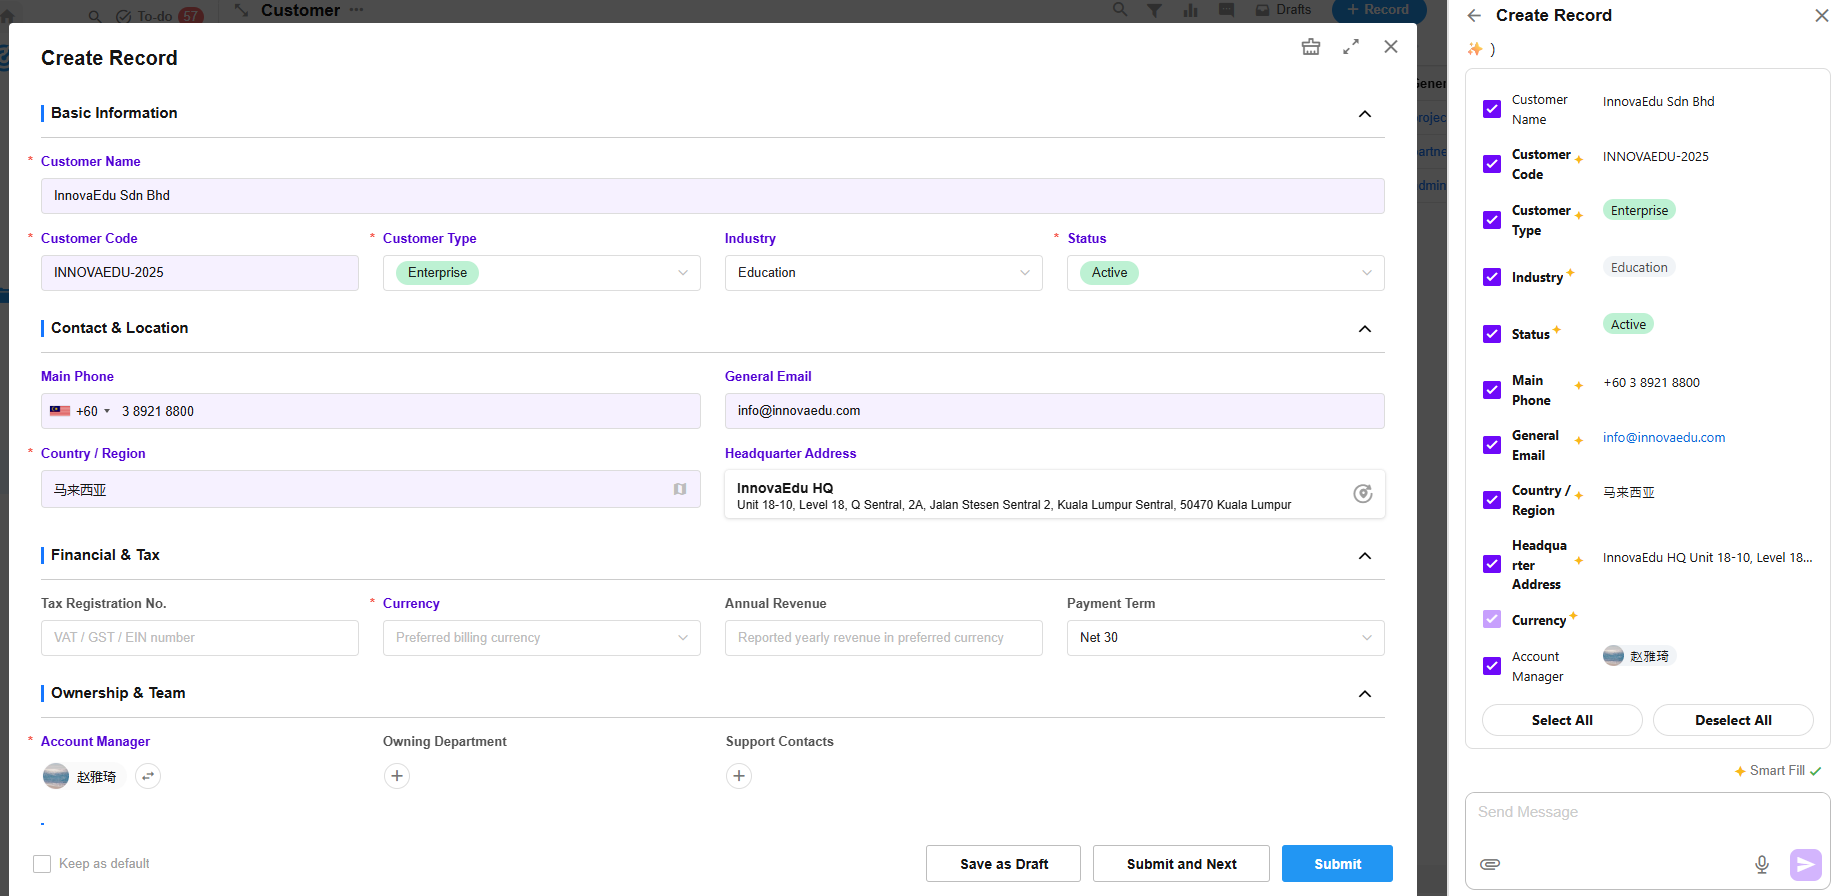
Mingo-Assisted Record Creation
Mingo uses AI to interpret user input—whether text or images—and populate the corresponding worksheet fields accordingly.
- Smart Fill (Default)
In Smart Fill mode, Mingo not only maps the user’s input to the appropriate fields, but also intelligently infers, suggests, or retrieves additional information (including via online search) to auto-fill as many fields as possible.
Fields populated by Smart Fill are marked with a “✨” indicator.
- Precise Fill
In Precise Fill mode, Mingo will only fill in the fields based strictly on the user’s input, without any inference or expansion.
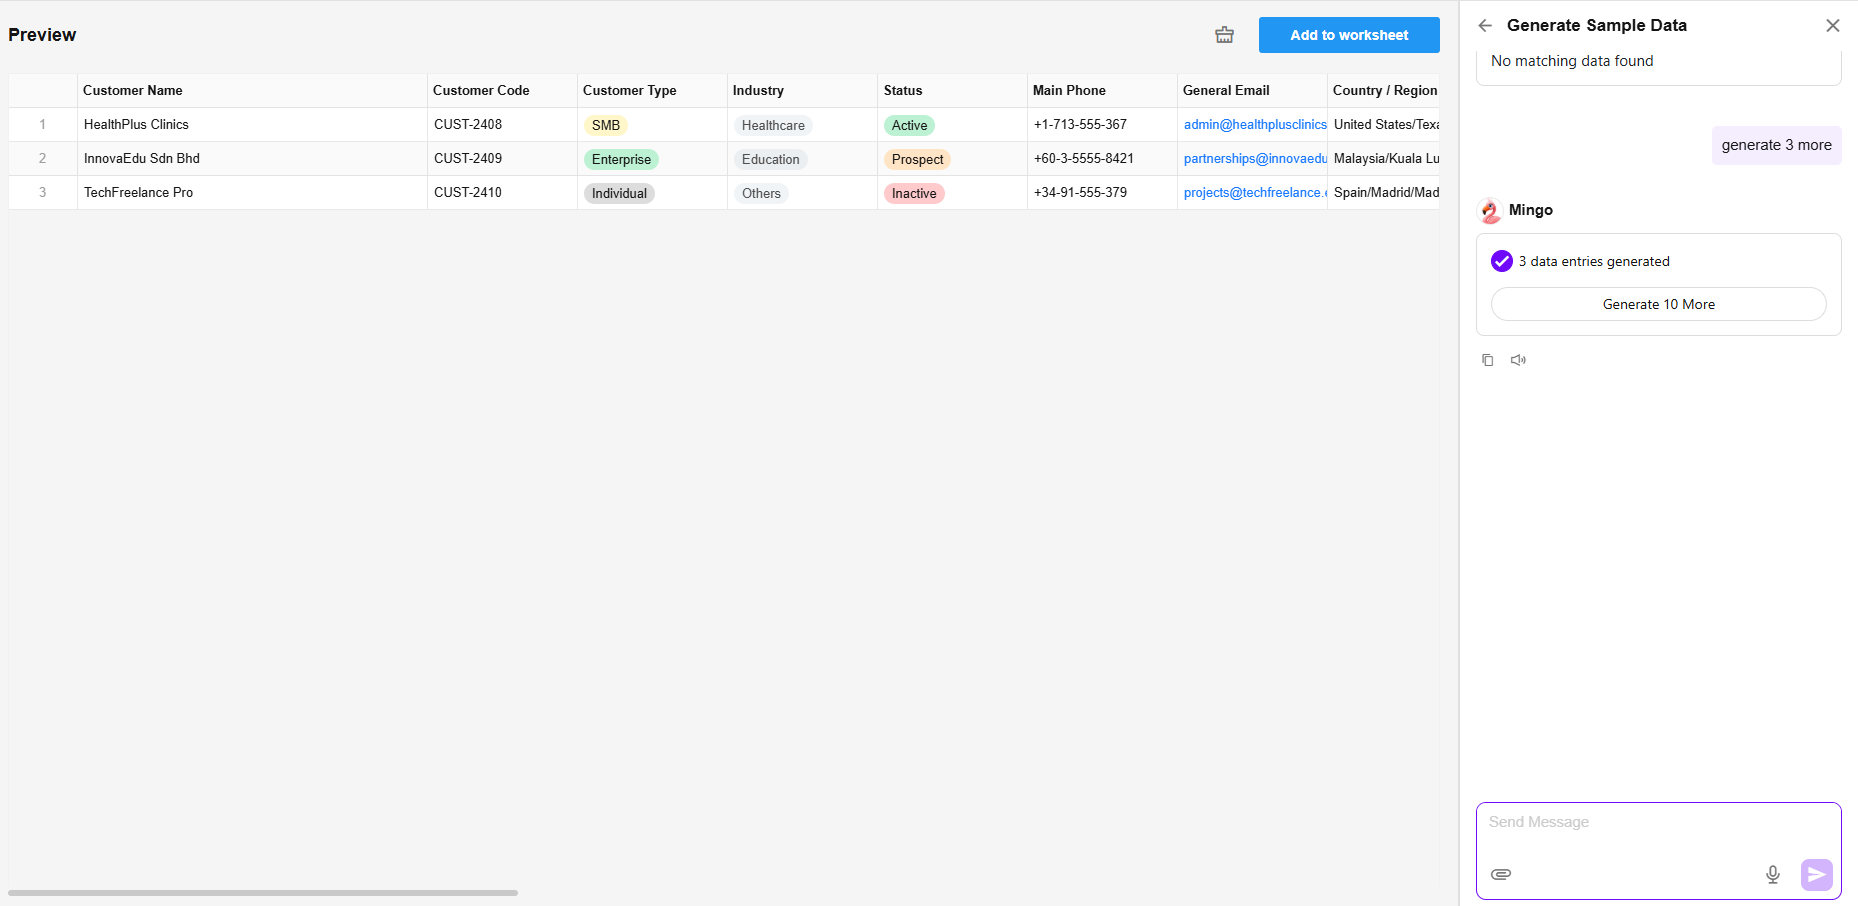
Mingo-Assisted Sample Data Generation
Mingo uses AI to generate realistic sample data based on the current worksheet fields, helping users quickly prepare data for demos or testing purposes.
- Sample data will be generated for all non-read-only fields in the worksheet.
- All data is fictitious and for demonstration only. Only users with system roles (App Admin, Operator, Developer) are allowed to generate sample data.
Application
App Upgrade: Plugins Generated via App Import Must Be Upgraded with the App
If the app includes custom-developed plugins, these plugins will be exported together with the app and can only be used within that app.
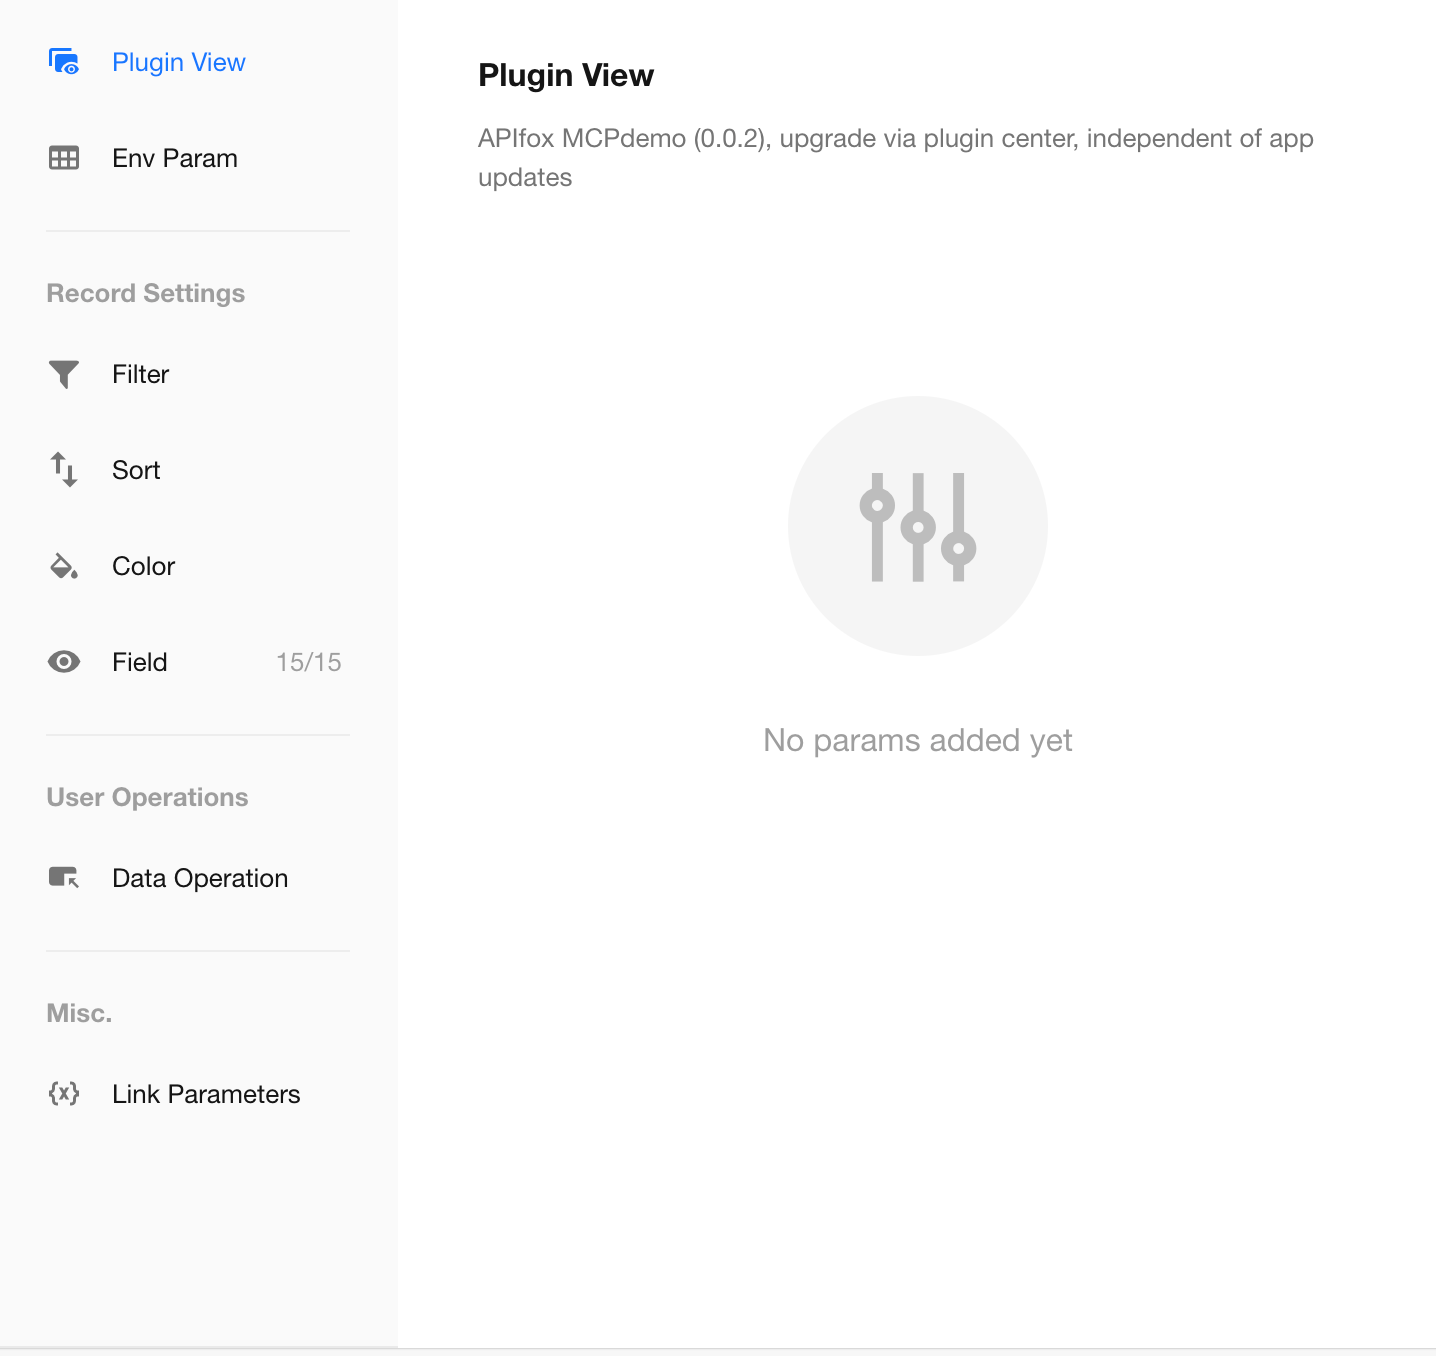
- For shared plugins from the organization’s Plugin Center:
- Upgrade method: Upgrade the plugin independently in the Plugin Center. These do not upgrade with the app.
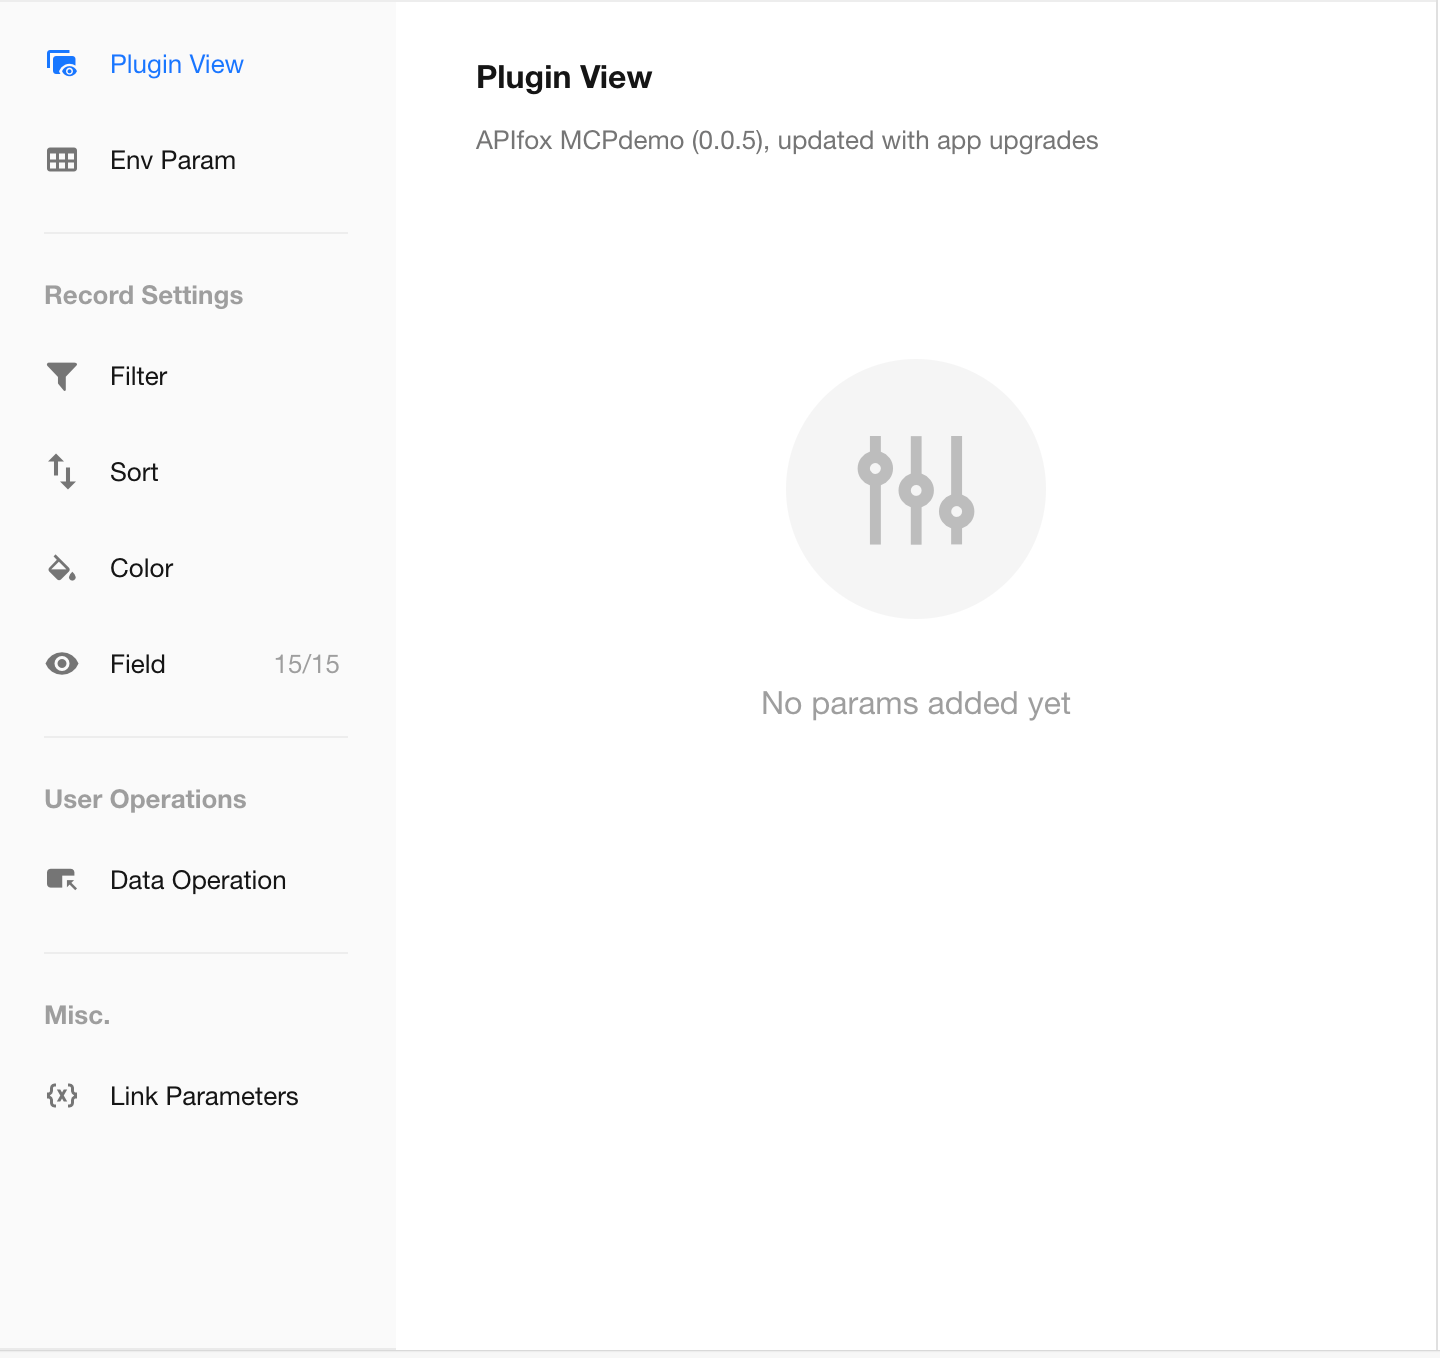
- For plugins generated during app import (i.e., bundled with the app):
- Upgrade method: These plugins will be upgraded along with the app.
 |
 |
MCP Server
What is MCP
As Agent-based applications rapidly evolve, developers are encountering common challenges during tool development and integration: the lack of unified standards hampers efficiency; constant adaptation across different platforms increases time and manpower costs; and open-source tools vary in quality, making maintenance and consolidation of high-quality capabilities expensive.
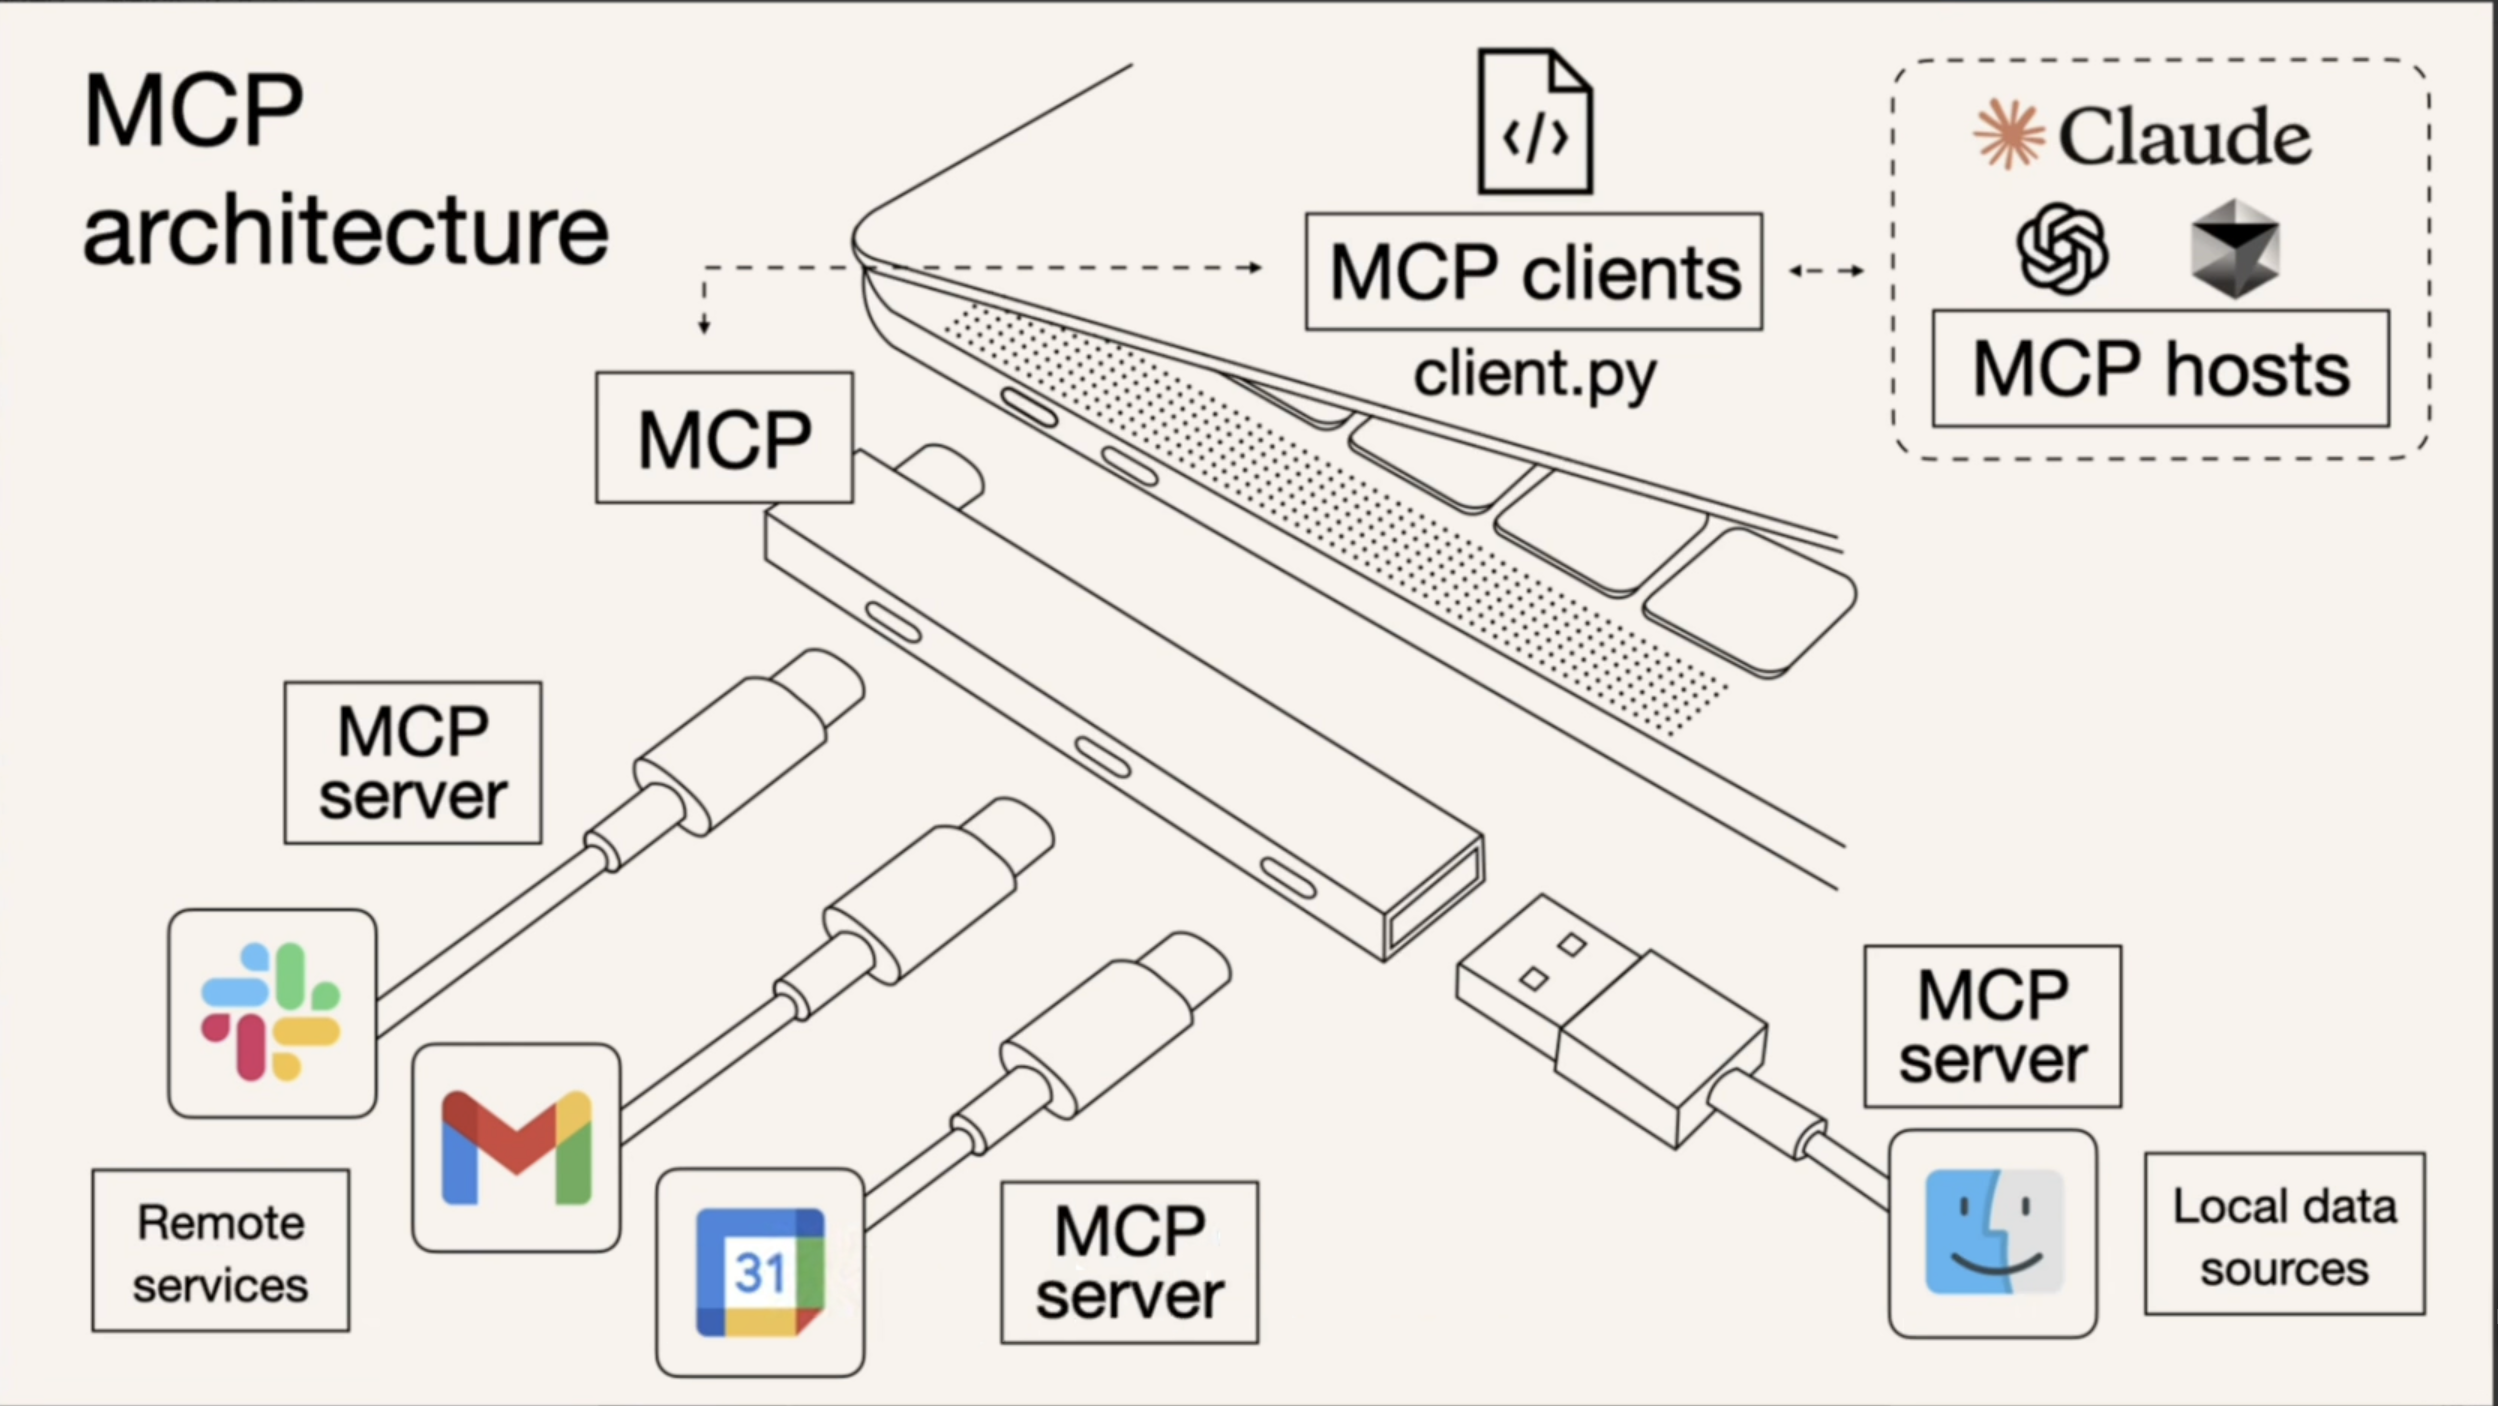
That’s where MCP (Model Context Protocol) comes in. Released by Anthropic, MCP is a leading open protocol designed to establish a secure and consistent two-way connection between large language models (LLMs) and external data sources. It addresses the fragmentation in tool implementation and enables cross-model compatibility.
Think of MCP as the universal plug or USB-C port for AI applications. Just as USB-C provides a standardized way to connect electronic devices, MCP provides a standardized way to connect AI applications to external systems.
Understand Agent / MCP / API (Tool) Through the Story of a Smart Butler
Imagine you have a smart butler at home. You simply express your needs, and the butler takes care of everything.
That’s the role of an Agent in the technical world.
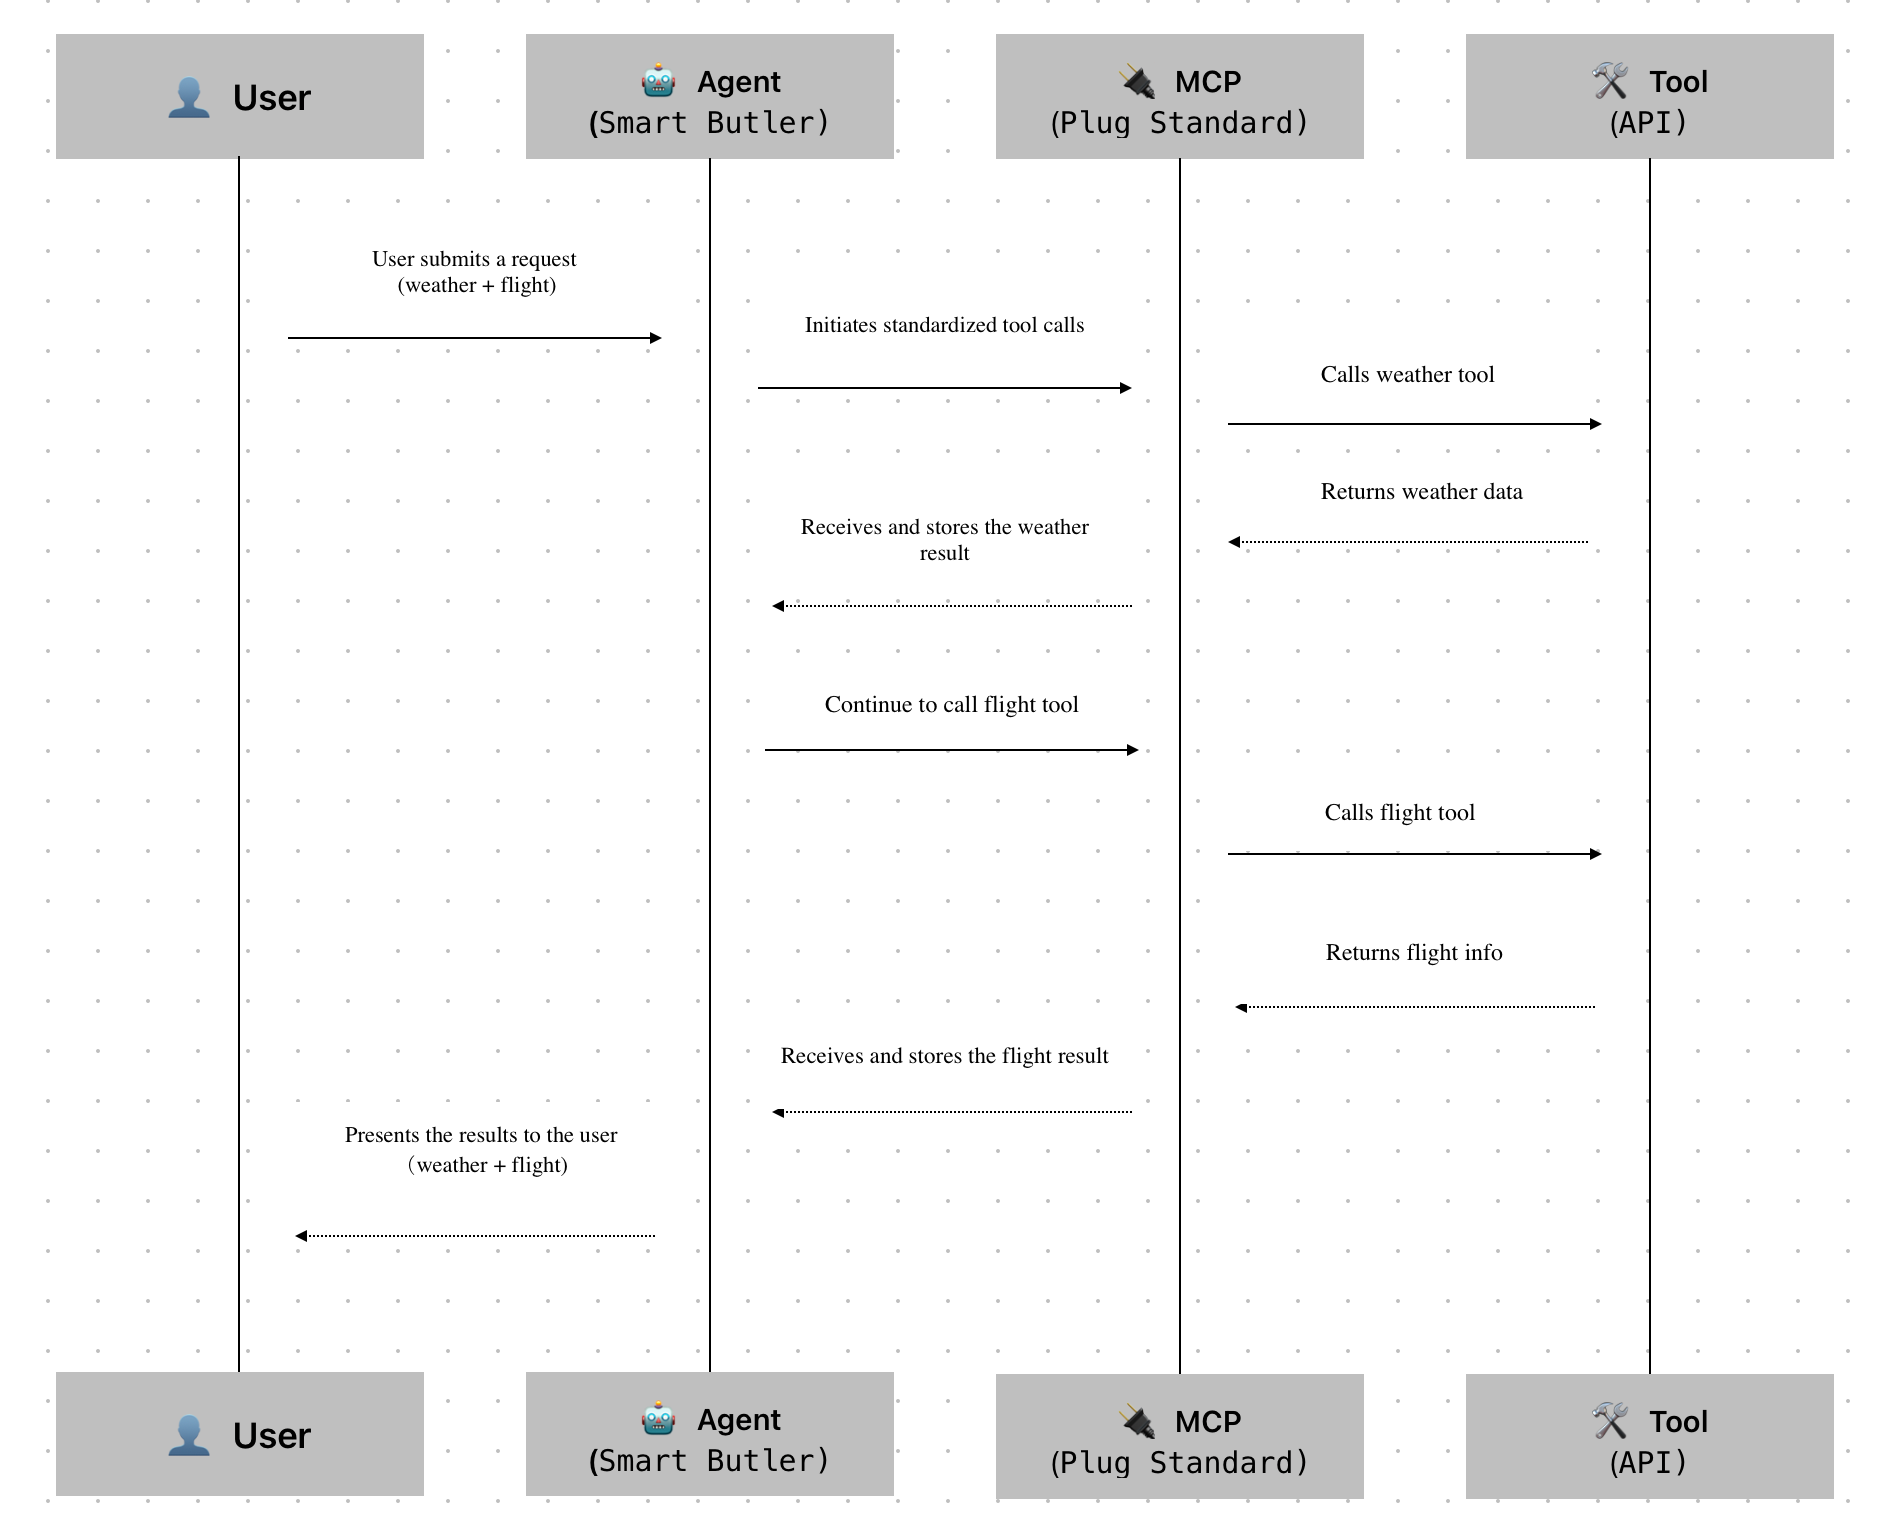
| Role | In the Story | In Technology | Main Responsibility |
| 👤 User | The homeowner | End user | Raises requests and waits for results |
| 🤖 Agent | The smart butler | Intelligent Agent | Understands the request and orchestrates tools
|
| 🔌 MCP | The plug standard (e.g., Type-C) | Protocol layer | Even the smartest butler struggles if every tool works differently.
MCP solves the “tool invocation standardization” issue, allowing the butler to focus on task planning instead of interface compatibility.
|
| 🛠️ Tool | Various tools (weather, flights, email) | APIs or services | Tools are the entities that perform the actual tasks:
• Weather tool → Returns weather info • Flight tool → Provides flight options • Email tool → Sends confirmation emails |
Evolution of Three Development Approaches: API Docs → Function Call → MCP
“Human Understanding” → “Model-Assisted Understanding” → “Model Execution via Protocol”
The table below summarizes the key differences:
| Dimension | API Documentation | Function Call | MCP |
| 🧠 Understanding Entity | Human developers | Model + human (manual tool registration) | Model (auto protocol interpretation) |
| 🎯 Target Audience | Human-readable docs | Model-readable function signatures | Machine-readable protocol for models |
| 🚀 Usage Flow | Read docs → Write request → Execute | Manually define function schema → model invokes | MCP auto-exposes capabilities → model discovers and invokes |
| 🧩 Tool Setup | Require separate wrappers per platform | Register tool functions per platform | Configure MCP service address once |
| 🔍 Discoverability | Manual documentation lookup | Manual registration | Auto-discovered by model (dynamic capability detection) |
| 🔄 Tool Update | Manual doc sync required | Each platform must update separately | MCP auto-syncs capability manifest |
| 🧰 Integration Complexity | High: manual wrappers & prompt tuning | Medium: define function schemas | Low: auto-exposed via protocol, no duplicate config |
| 🧠 Model Comprehension | Driven by prompt + doc interpretation | Depend on function schema clarity | Protocol-defined structured types enable native model understanding |
| 🔒 Invocation Security | Weak (prone to parameter errors) | Moderate (schema constrains input format) | Strong (protocol-level validation + context control) |
| 💬 Analogy | “Read the manual and do it yourself” | “Read function signature, follow the format” | “Plug in Type-C, auto-detect and run” |
| ⚙️ Abstraction Layer | Application layer | SDK layer | Protocol layer |
| 🌐 Extensibility | Low: custom wrappers needed | Medium: depend on platform support | High: cross-platform capability standardization |
| 👩💻 Developer Experience | Manual-centric: write & maintain docs | Semi-automated: still need schema & setup | Fully automated: integrate once, reuse across LLMs |
How to Use
APIfox MCP and HAP MCP serve different purposes depending on your integration needs:
- APIfox MCP allows large language models to read and understand the API documentation of HAP applications
- HAP MCP enables direct access and manipulation of application data — designed for “executing business actions through the model”
| APIfox MCP | HAP MCP | |
| Purpose | Enable the model to understand HAP API documentation | Allow the model to execute HAP application APIs |
| Access |
|
 |
| Use Case | When the goal is to understand available API structures for generating API call strategies or orchestrating workflows.
Example: For a Customer Case Management application, if you want to create a real-time data dashboard, you can let the model (via a client like Cursor) access the API documentation using APIfox MCP (preferably V3 APIs). |
When the goal is to perform actions or access real-time data directly within a production environment.
Example: In an orchestration flow, the model may directly retrieve application data, perform analysis, map fields, or update records using HAP MCP. |
| Characteristics |
|
|
MCP Configuration
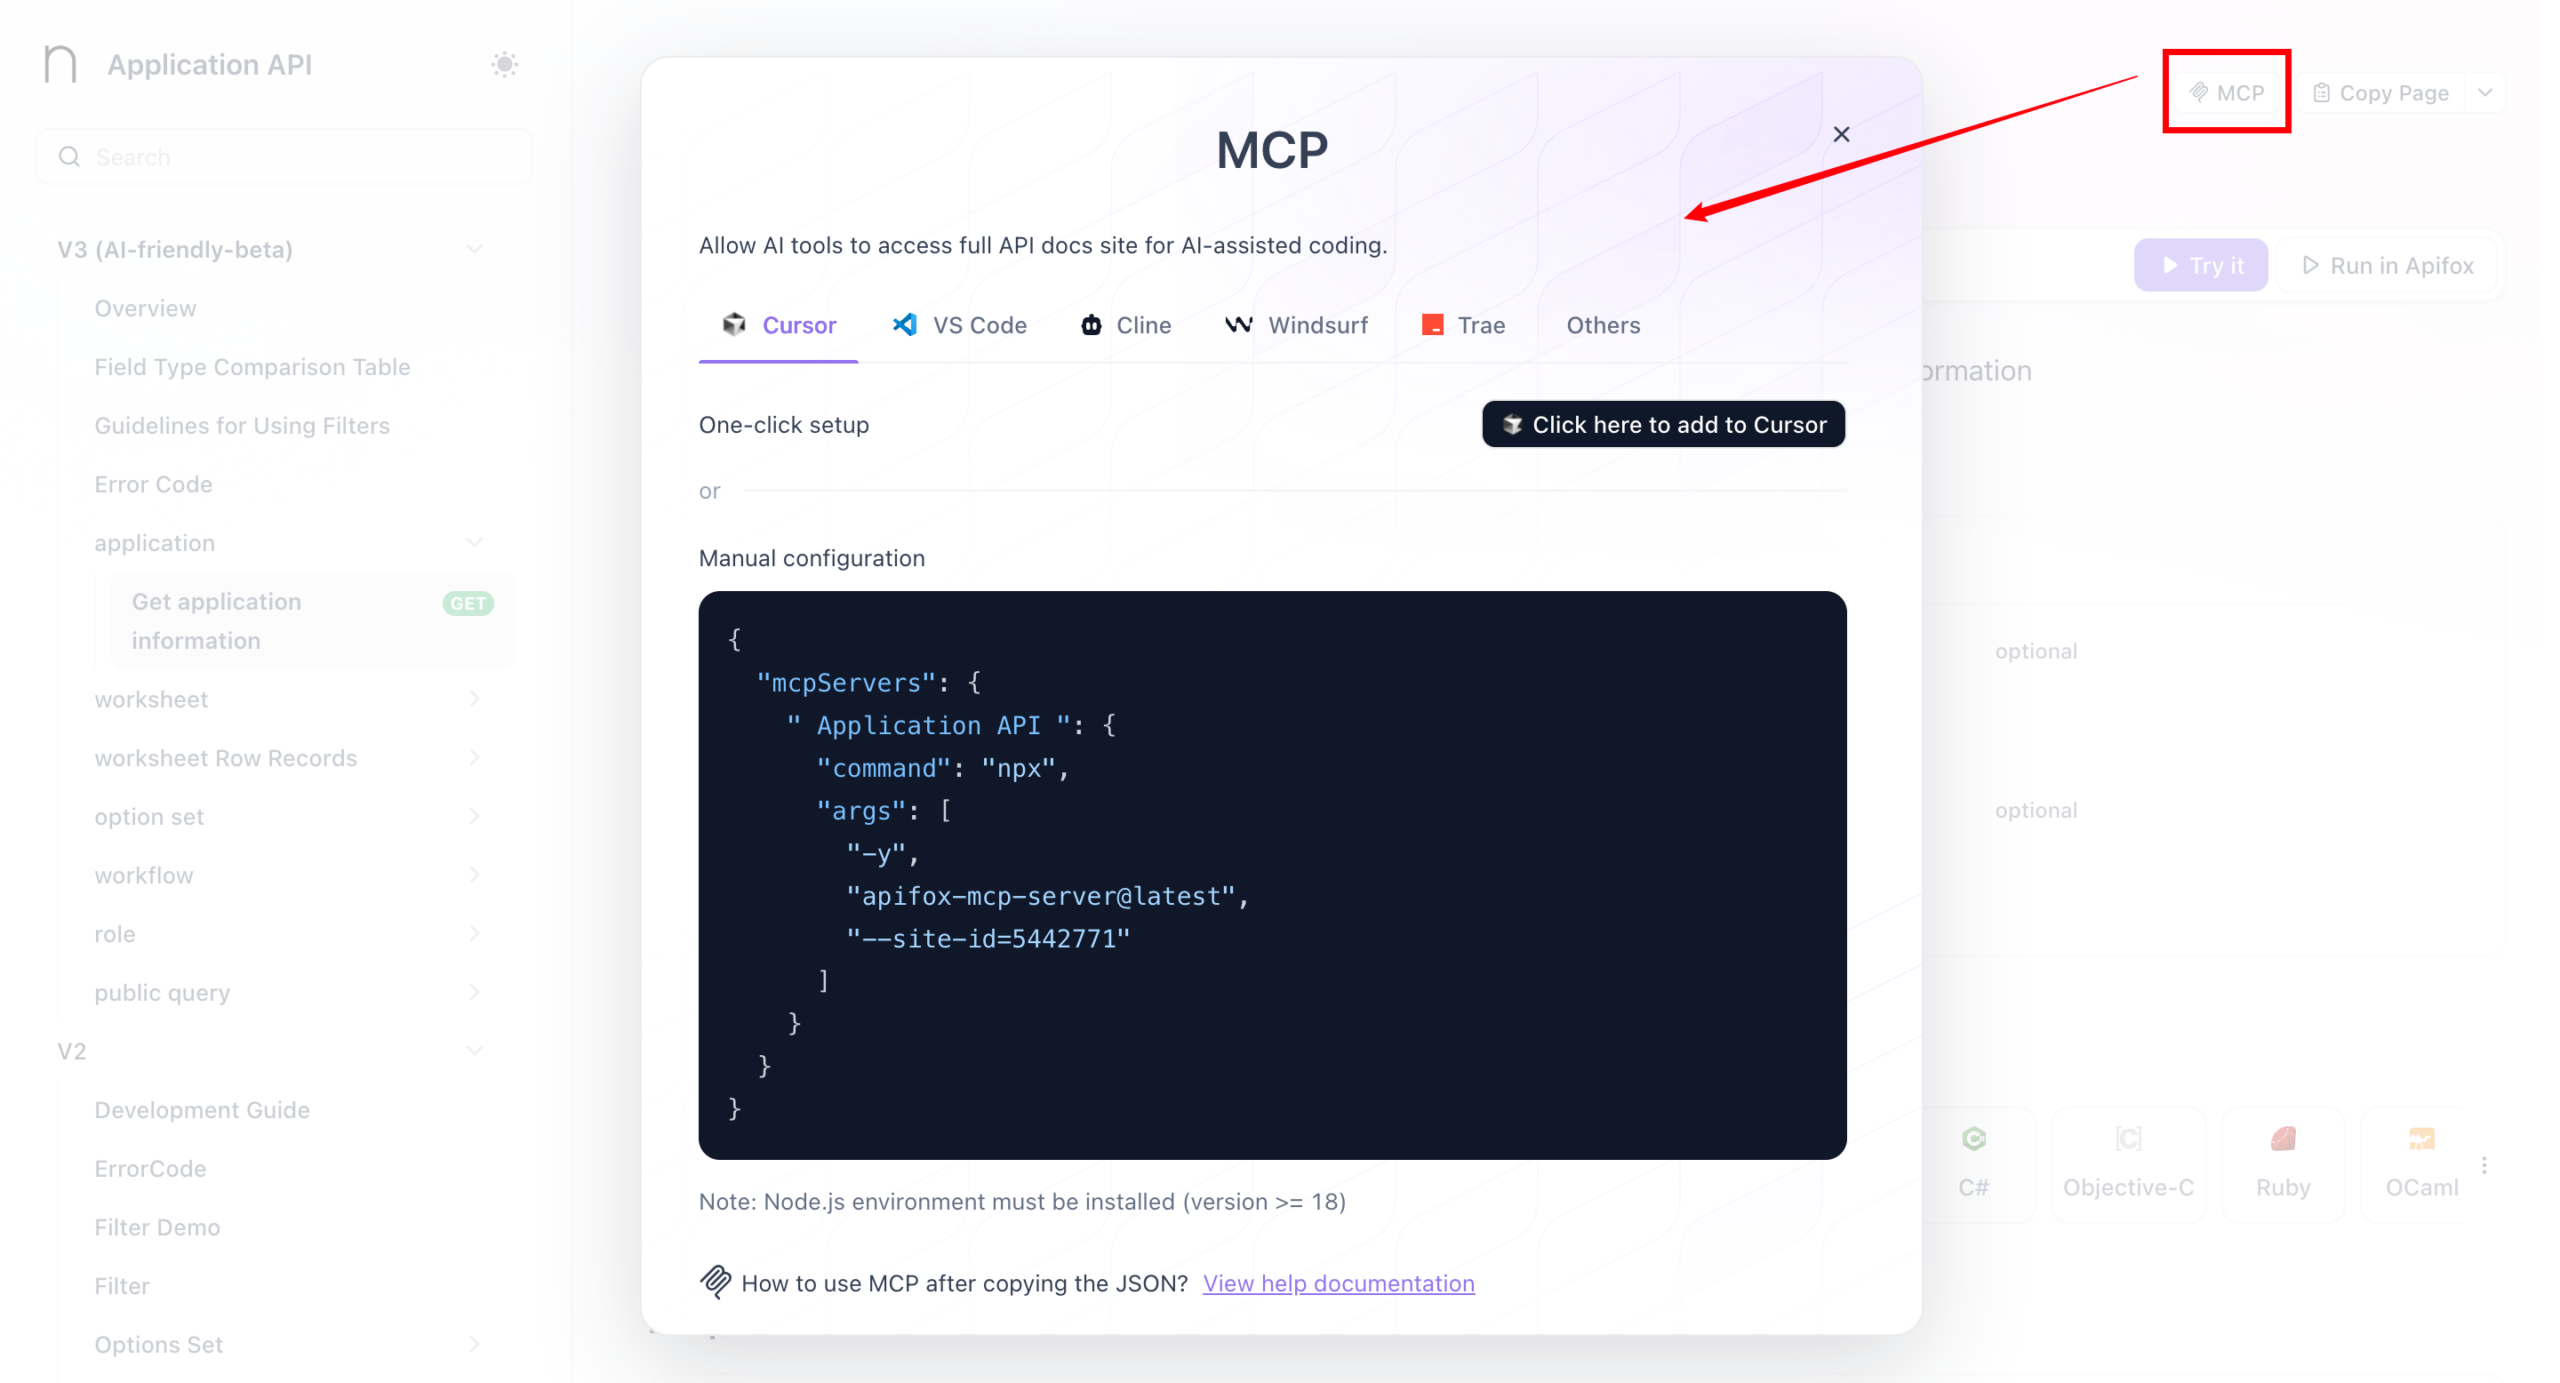
Retrive MCP Configuration from HAP
- Open the Application API Documentation, navigate to the MCP tab, and copy the generated URL for use in the configurations below.

Cursor
- Go to Settings → Tools & MCP, and add a new MCP Server
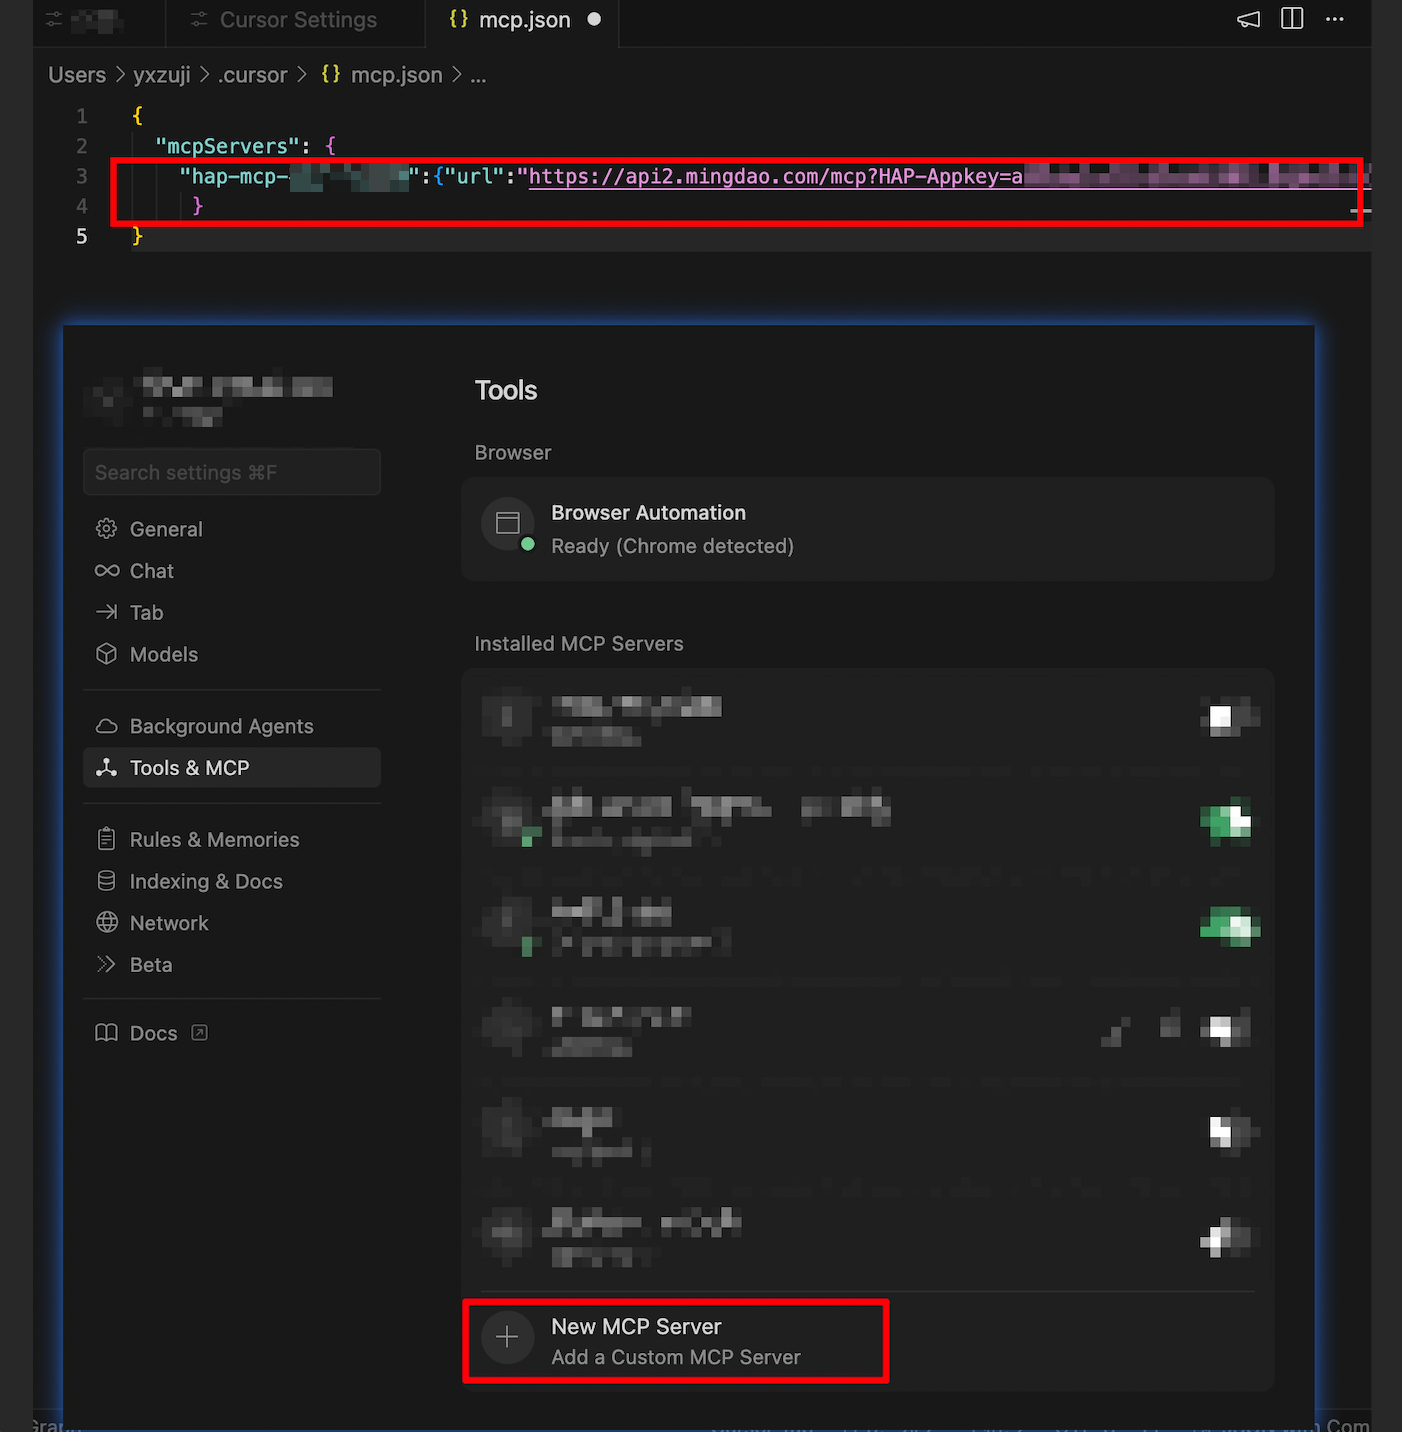
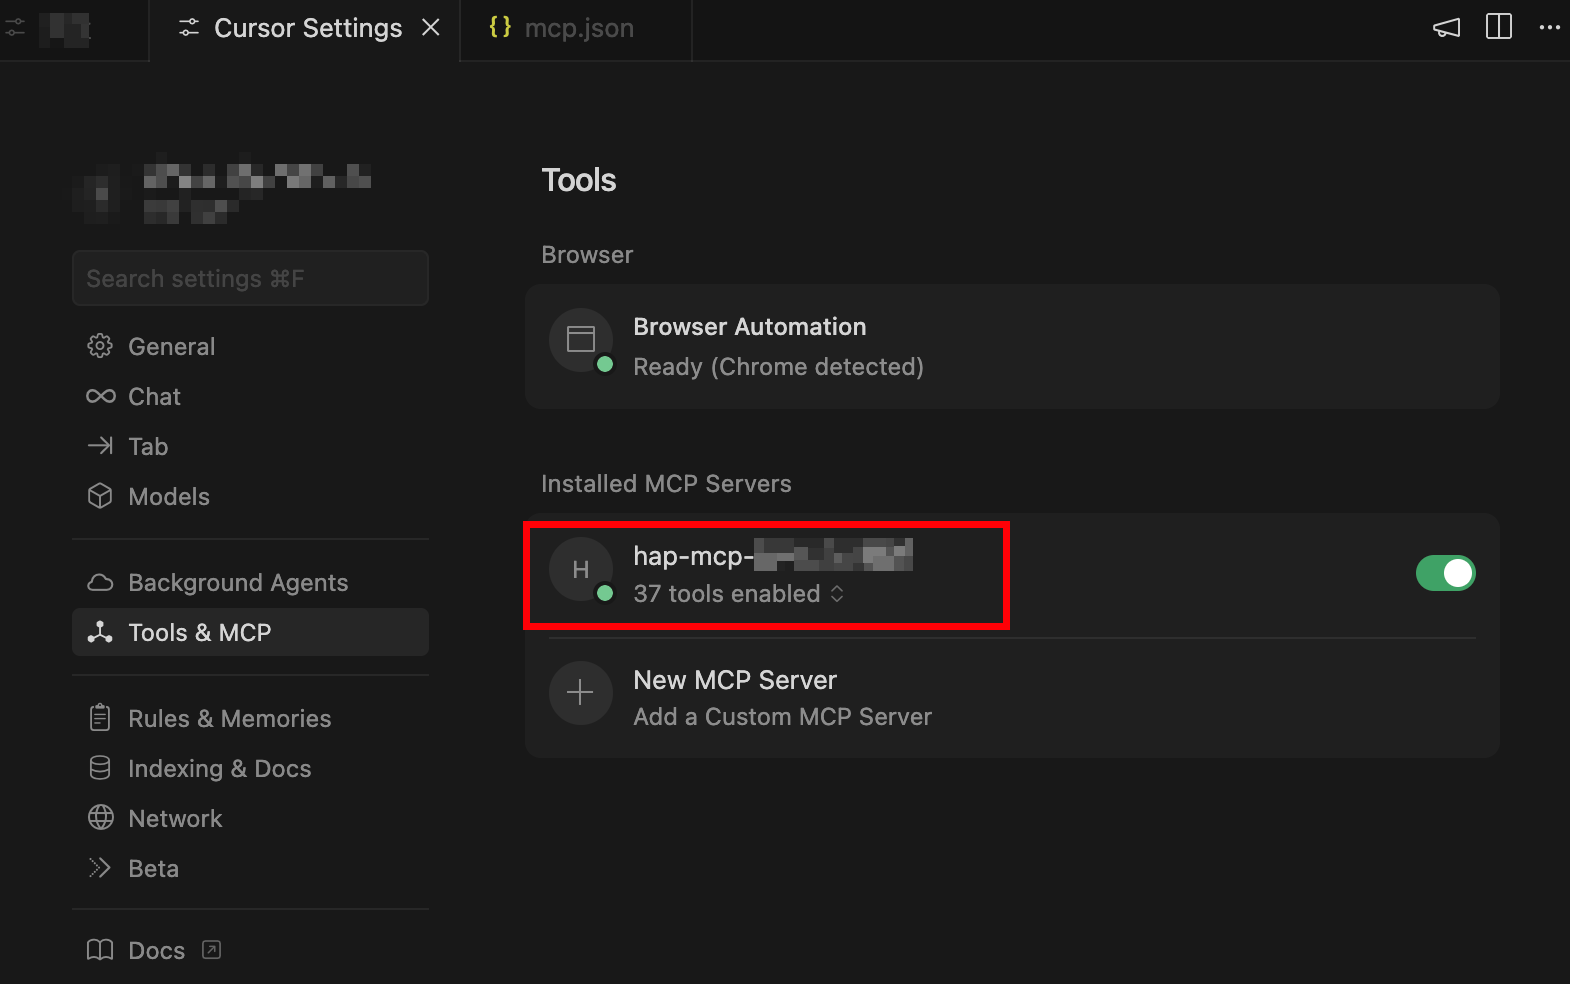
- Once saved, return to the list. A green indicator means the connection is successful.
Dify
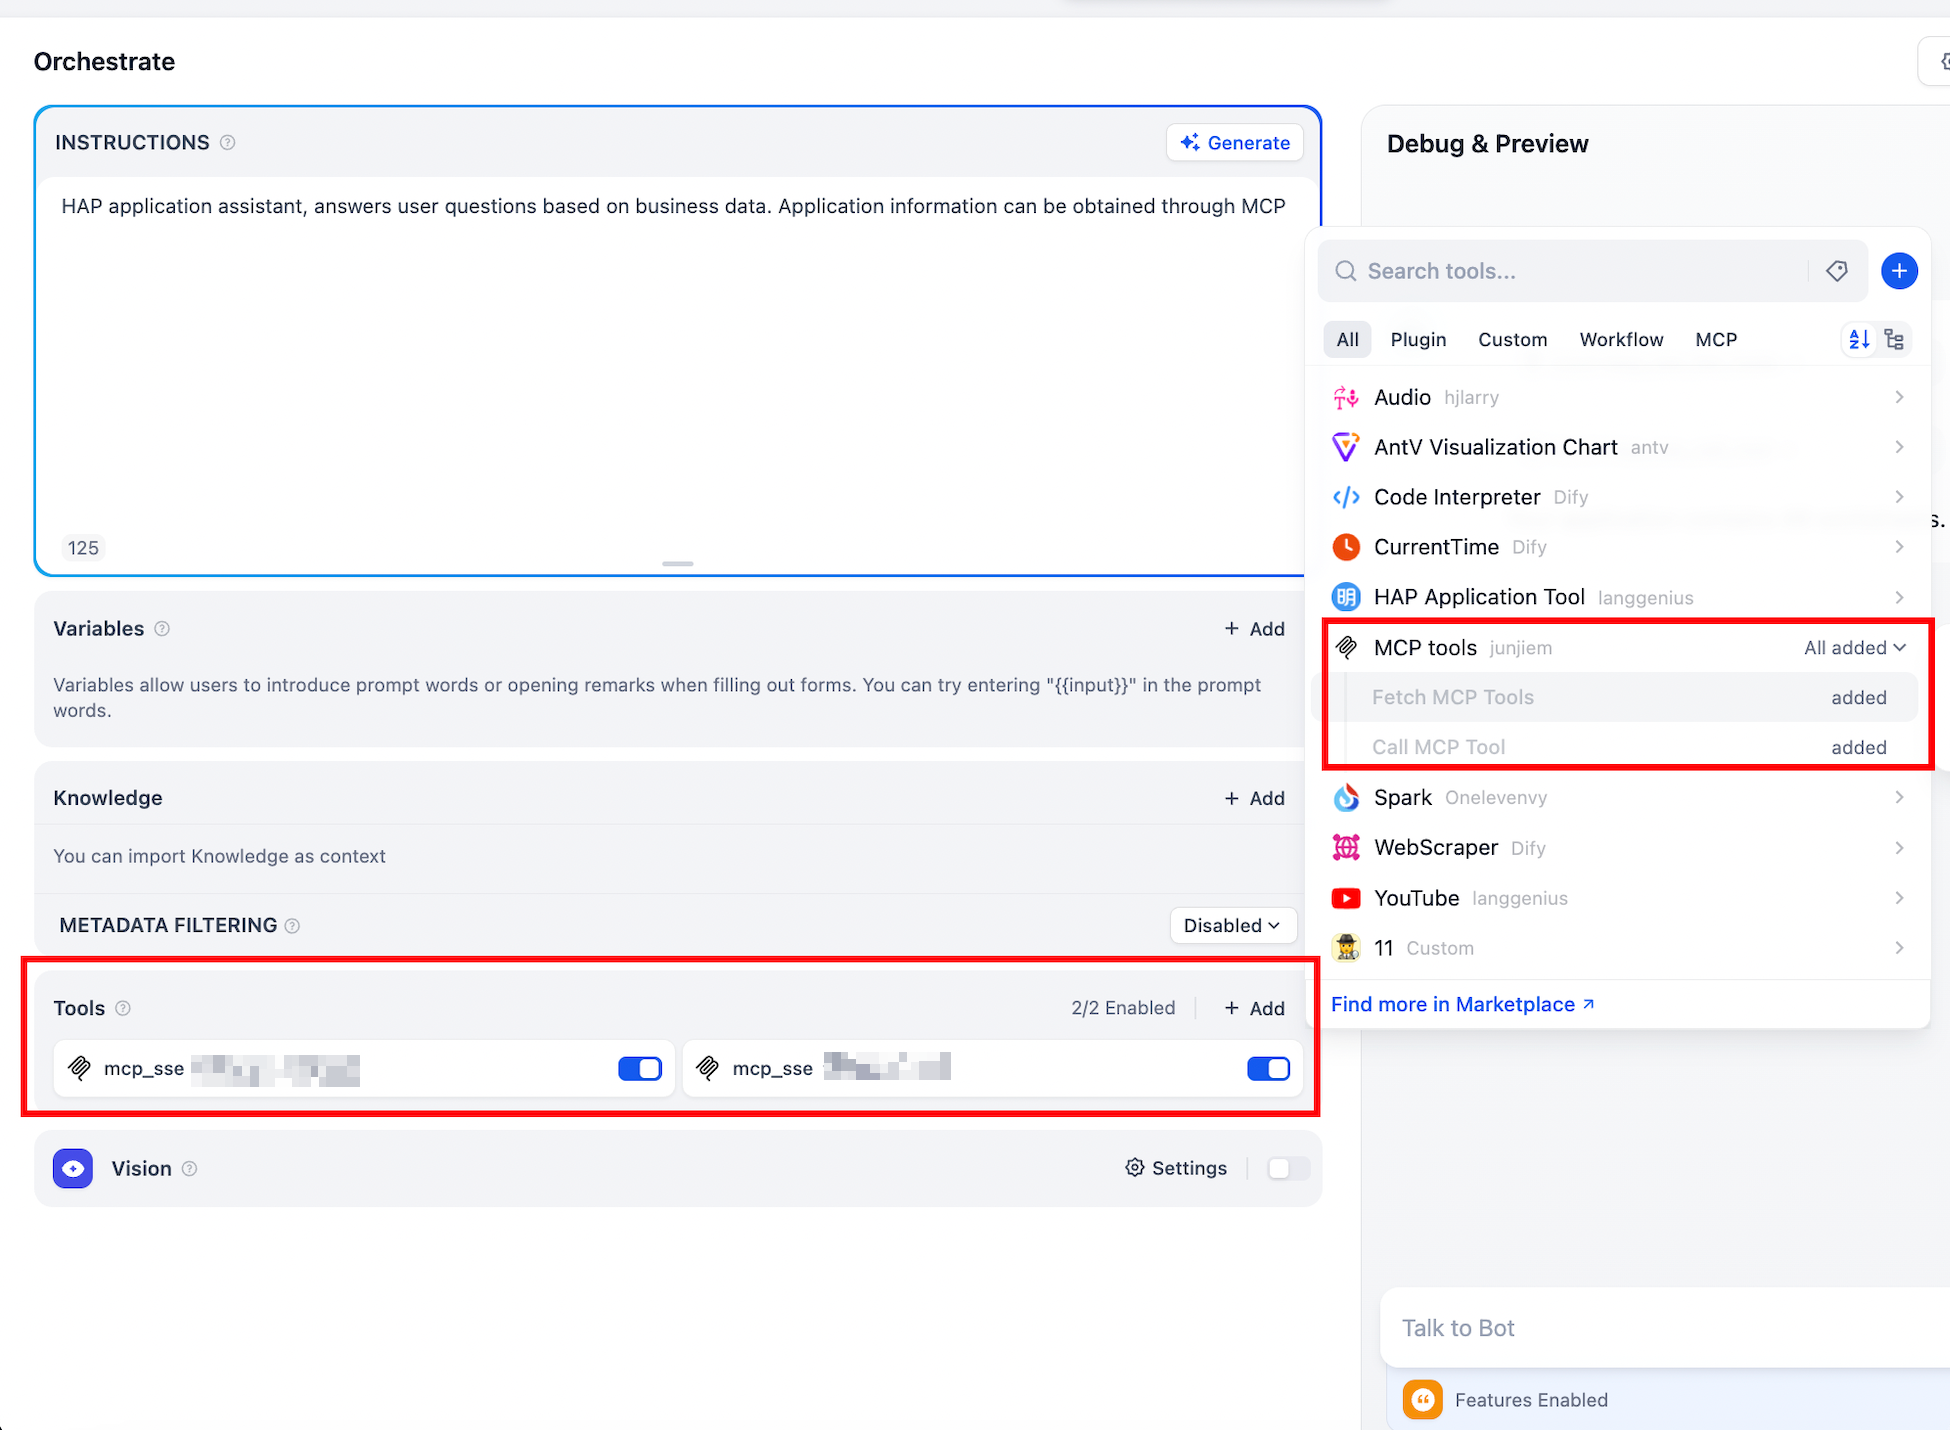
Use MCP in Agent Applications
- Click the Plugins button in the upper-right corner, explore the Marketplace, search for MCP, and locate “MCP SSE / StreamableHTTP”, then click Install.
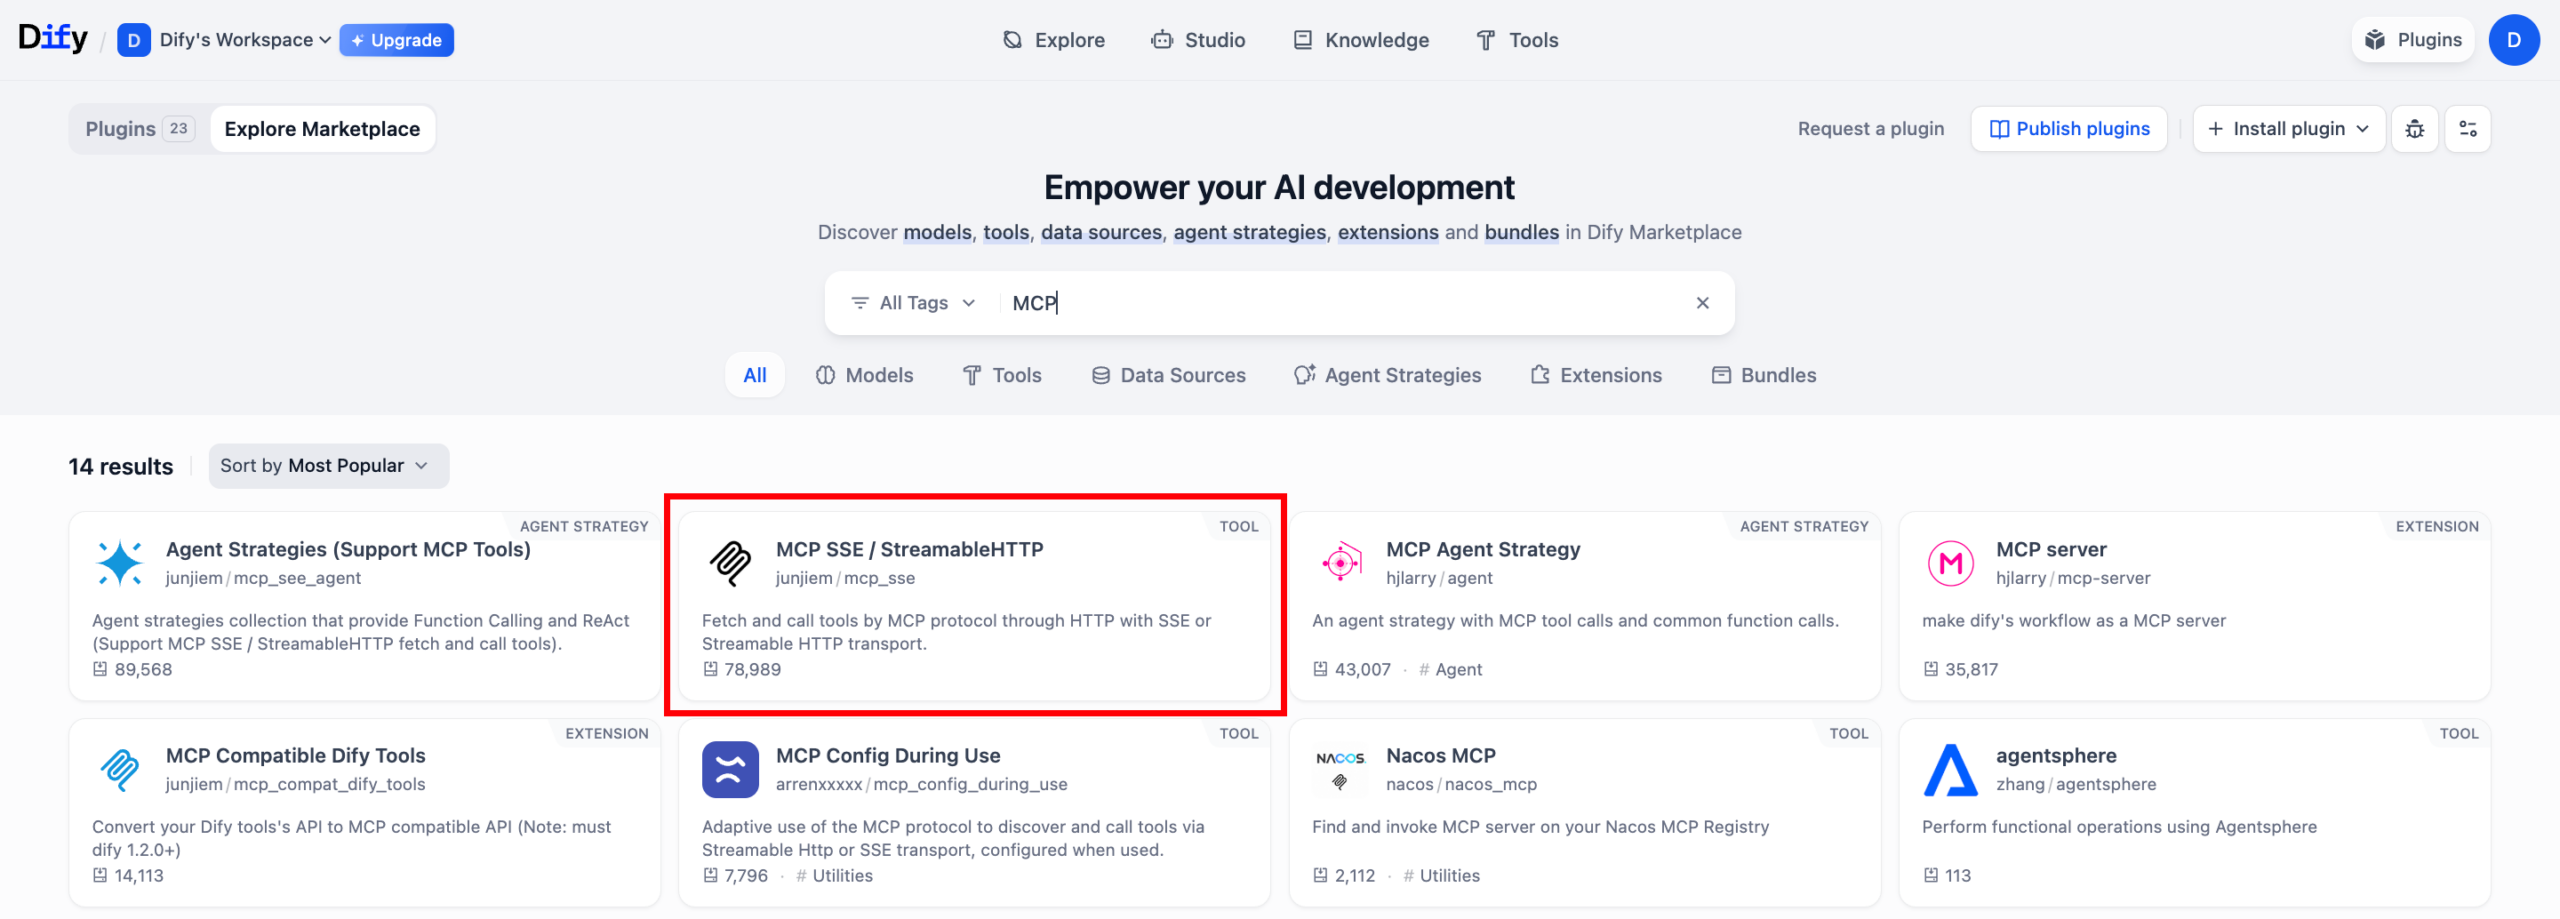
- After installation, locate “MCP SSE / StreamableHTTP” under your installed plugins.
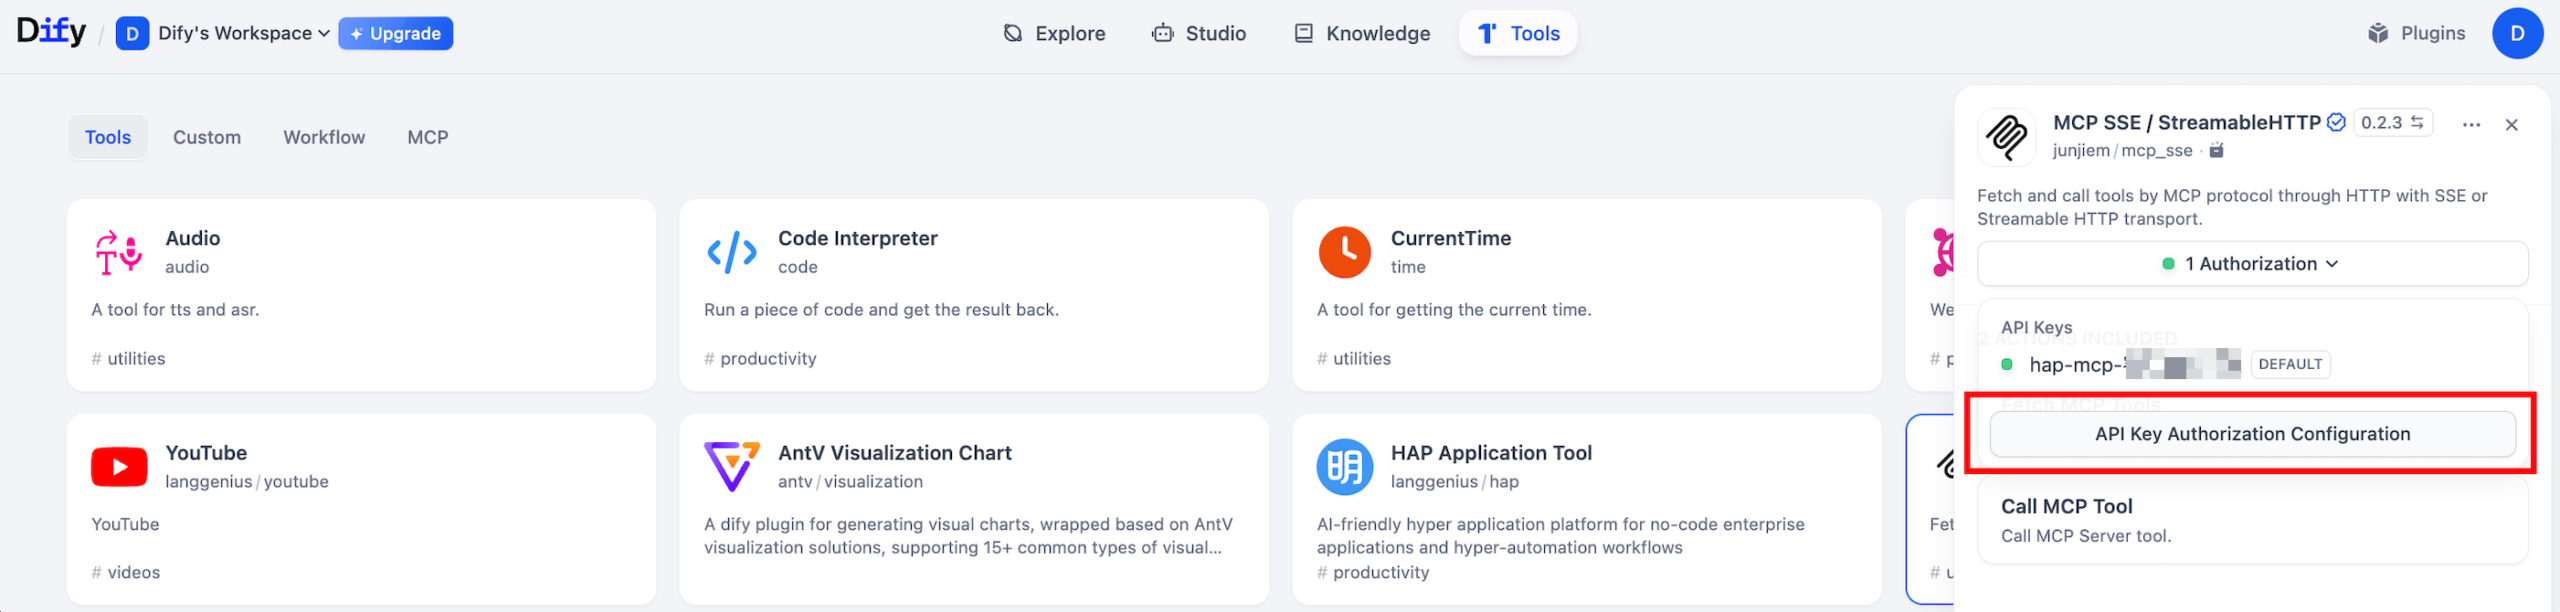
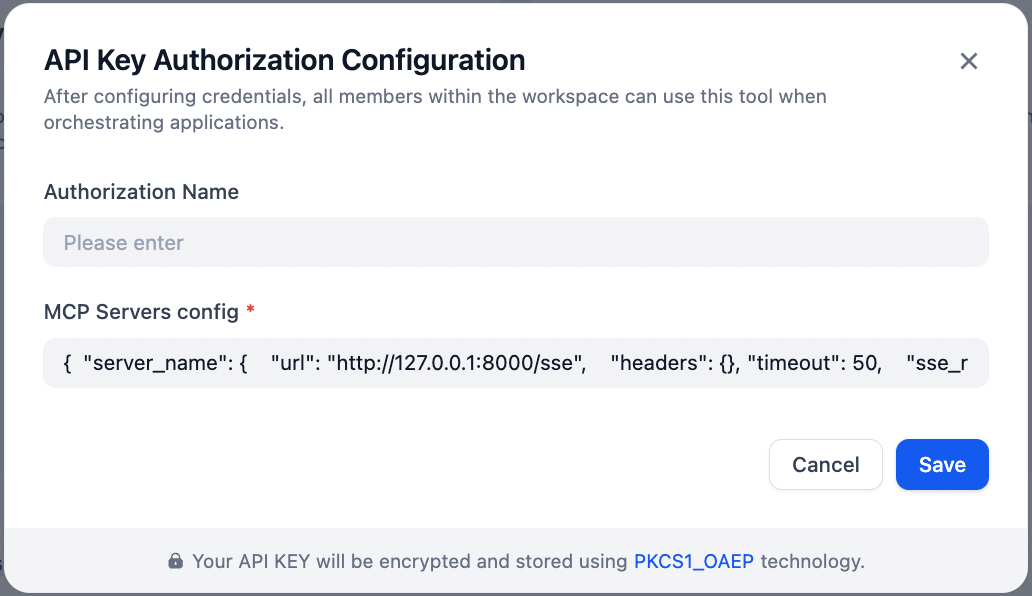
- Example configuration: Enter your MCP config. You can replace “hap-mcp” with any alias name. The url should be the one generated from your application.
- {“hap-mcp”:{“transport”:”streamable_http”,”url”:”your-mcp-url-here”}}
 |
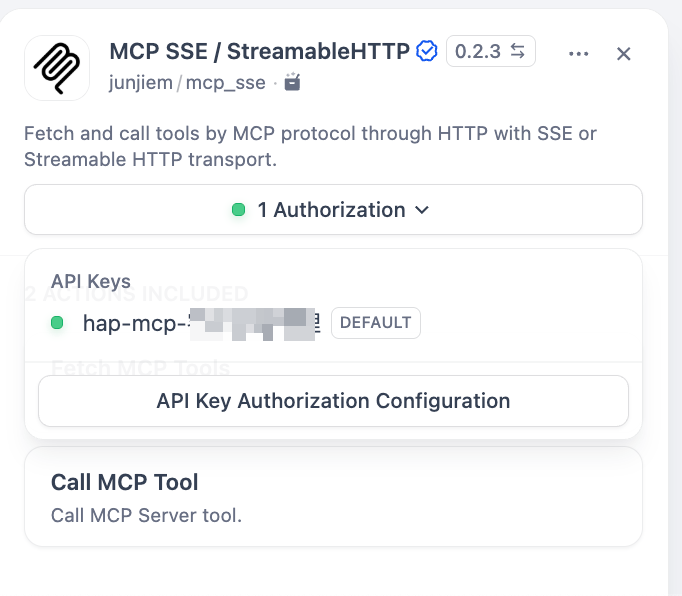 |
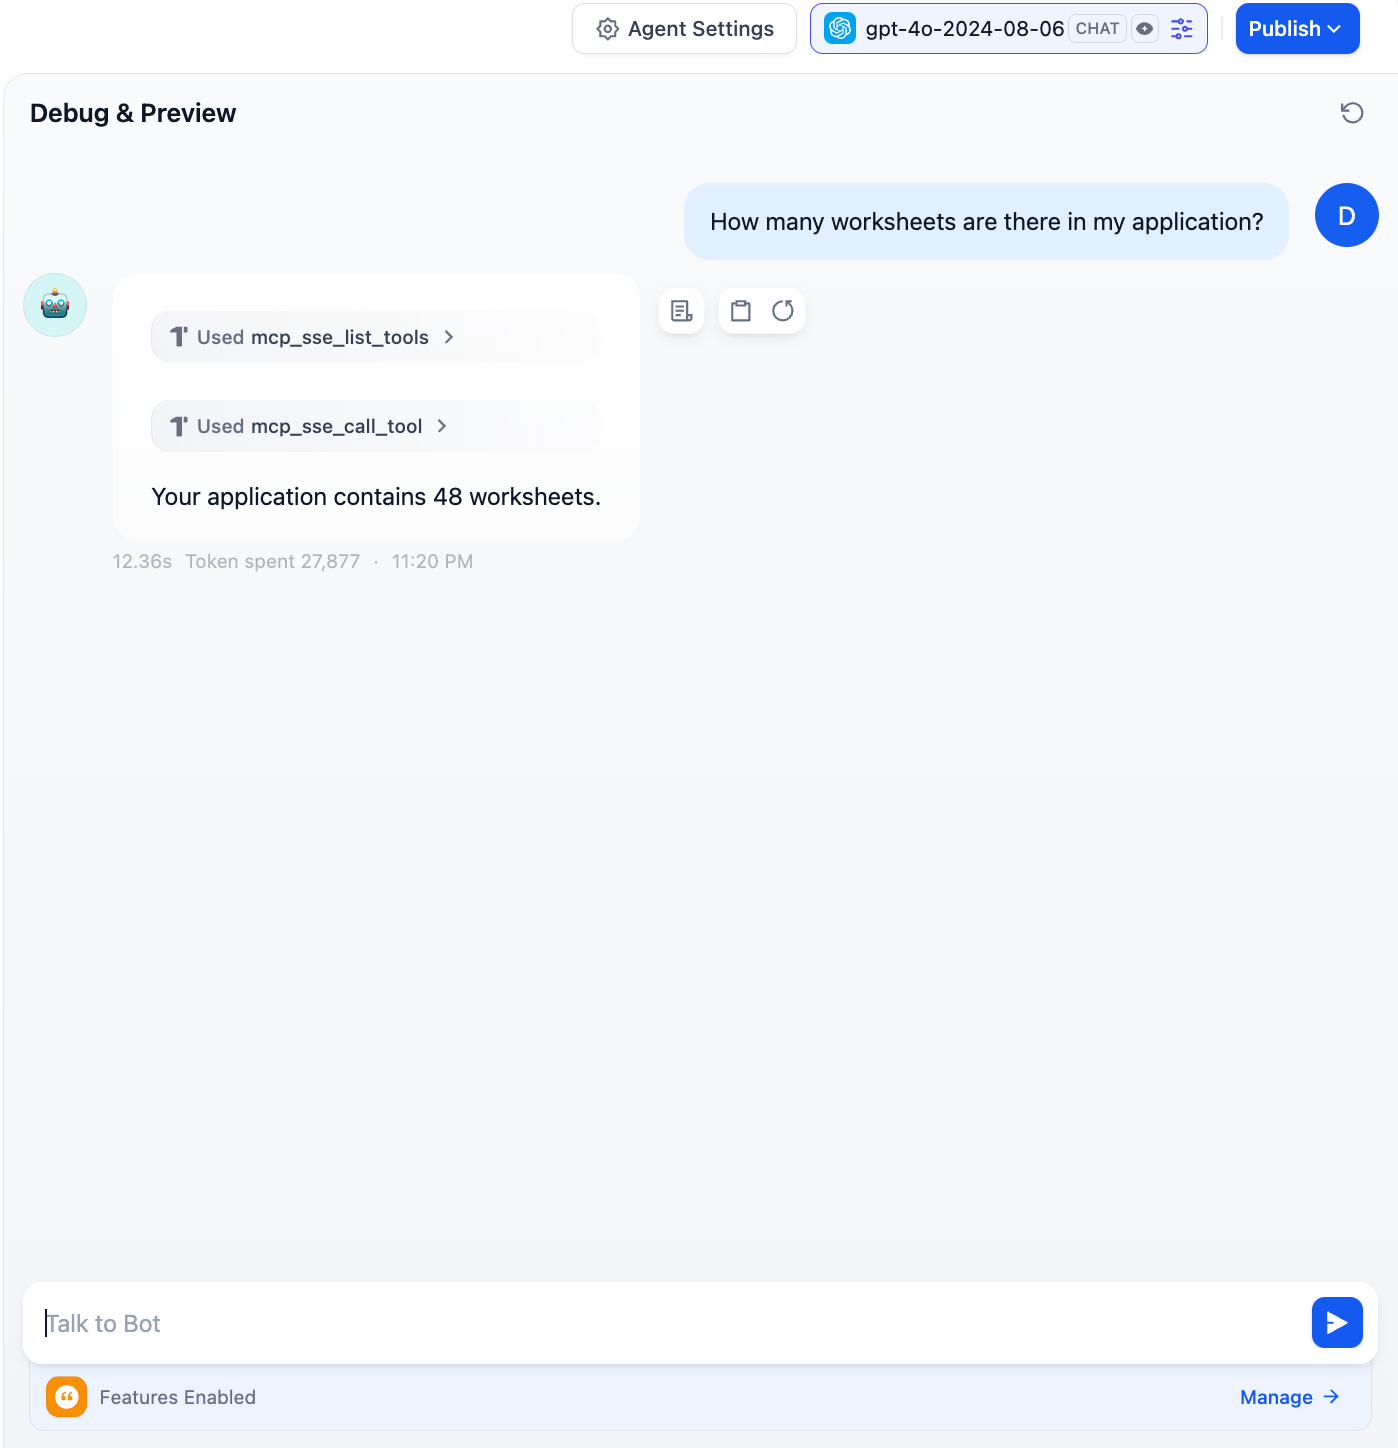
- Add the MCP tool and run a test
 |
 |
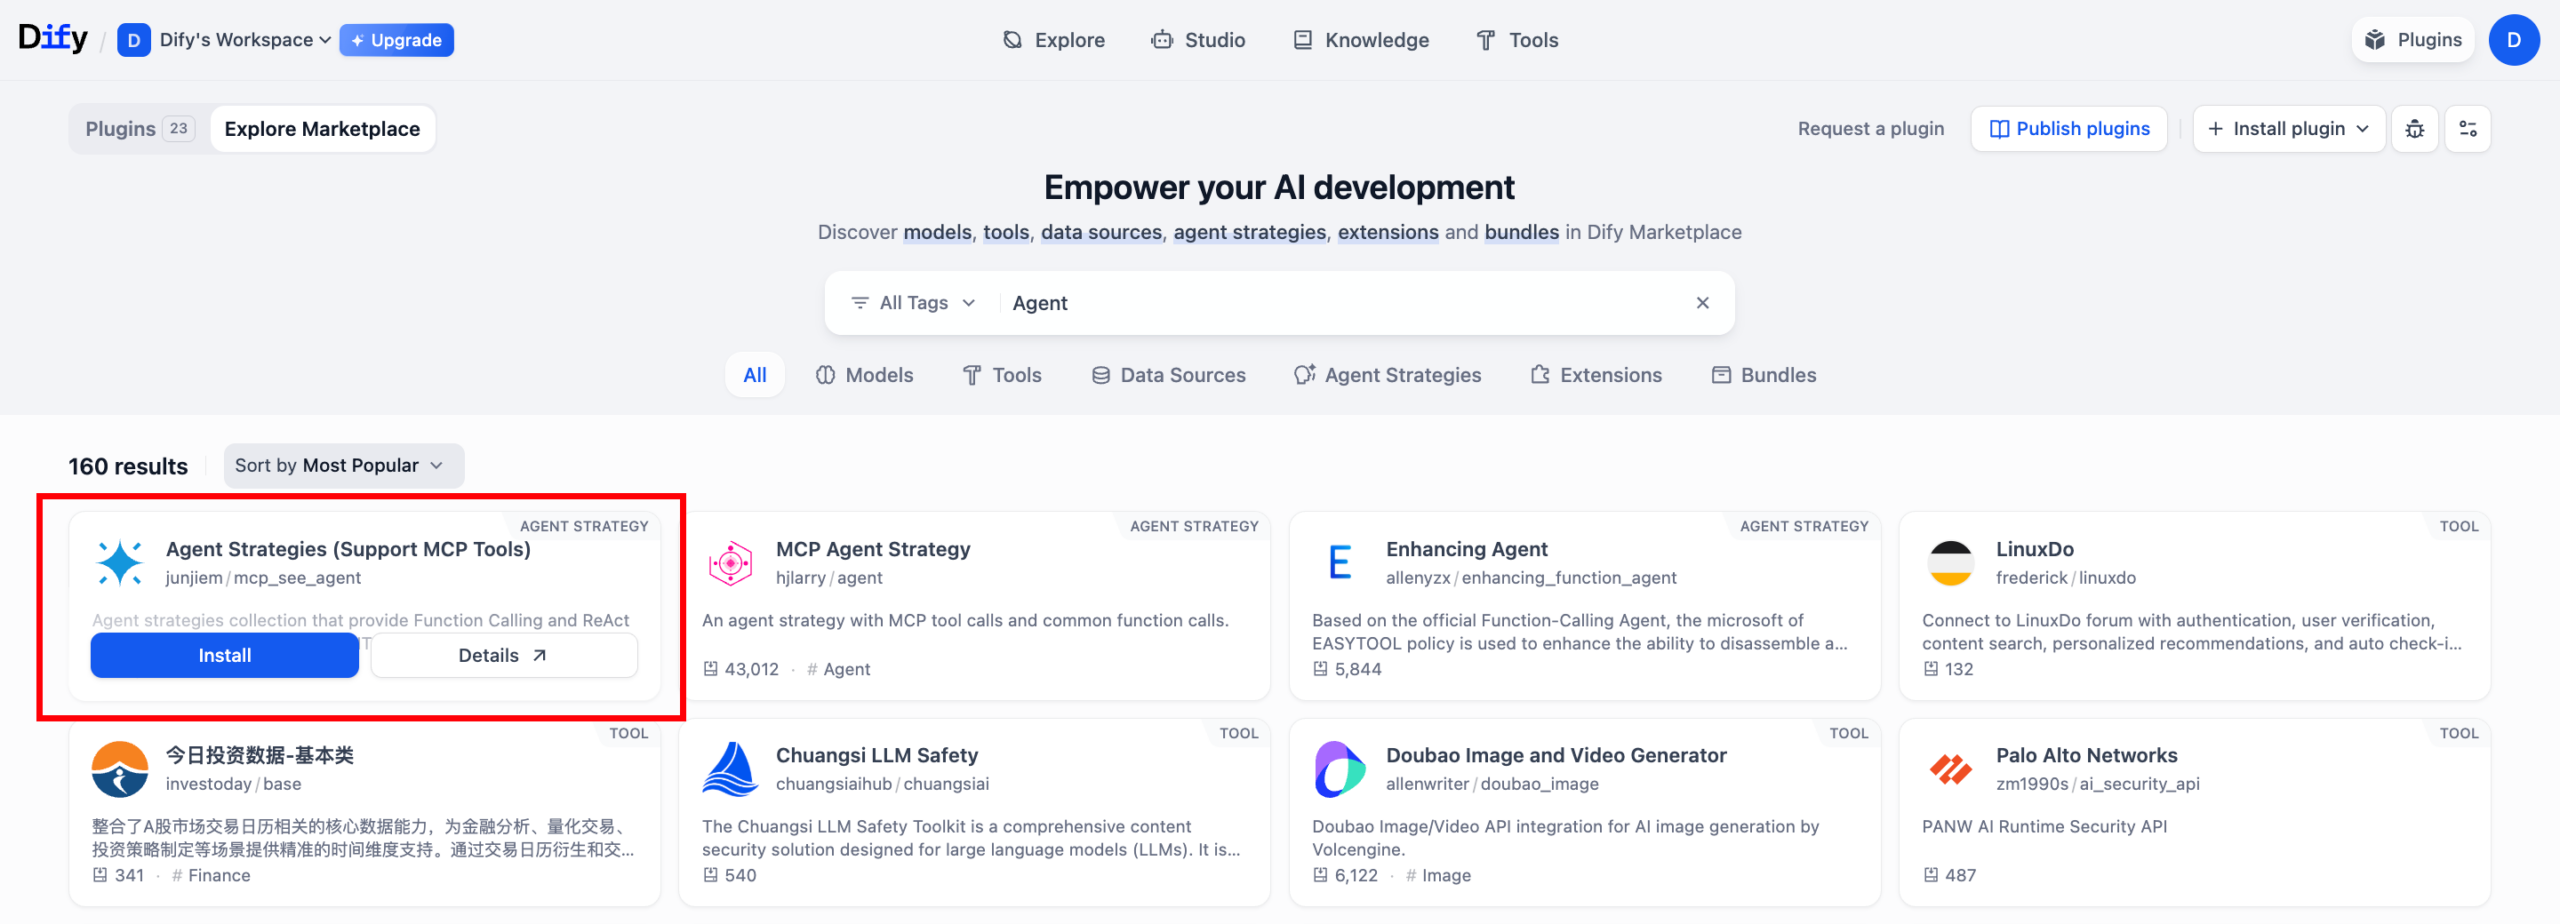
Use MCP in a Workflow
- Click the Plugins button in the upper-right corner. In the Marketplace, search for “Agent Strategy (Support MCP Tools)” and click Install.
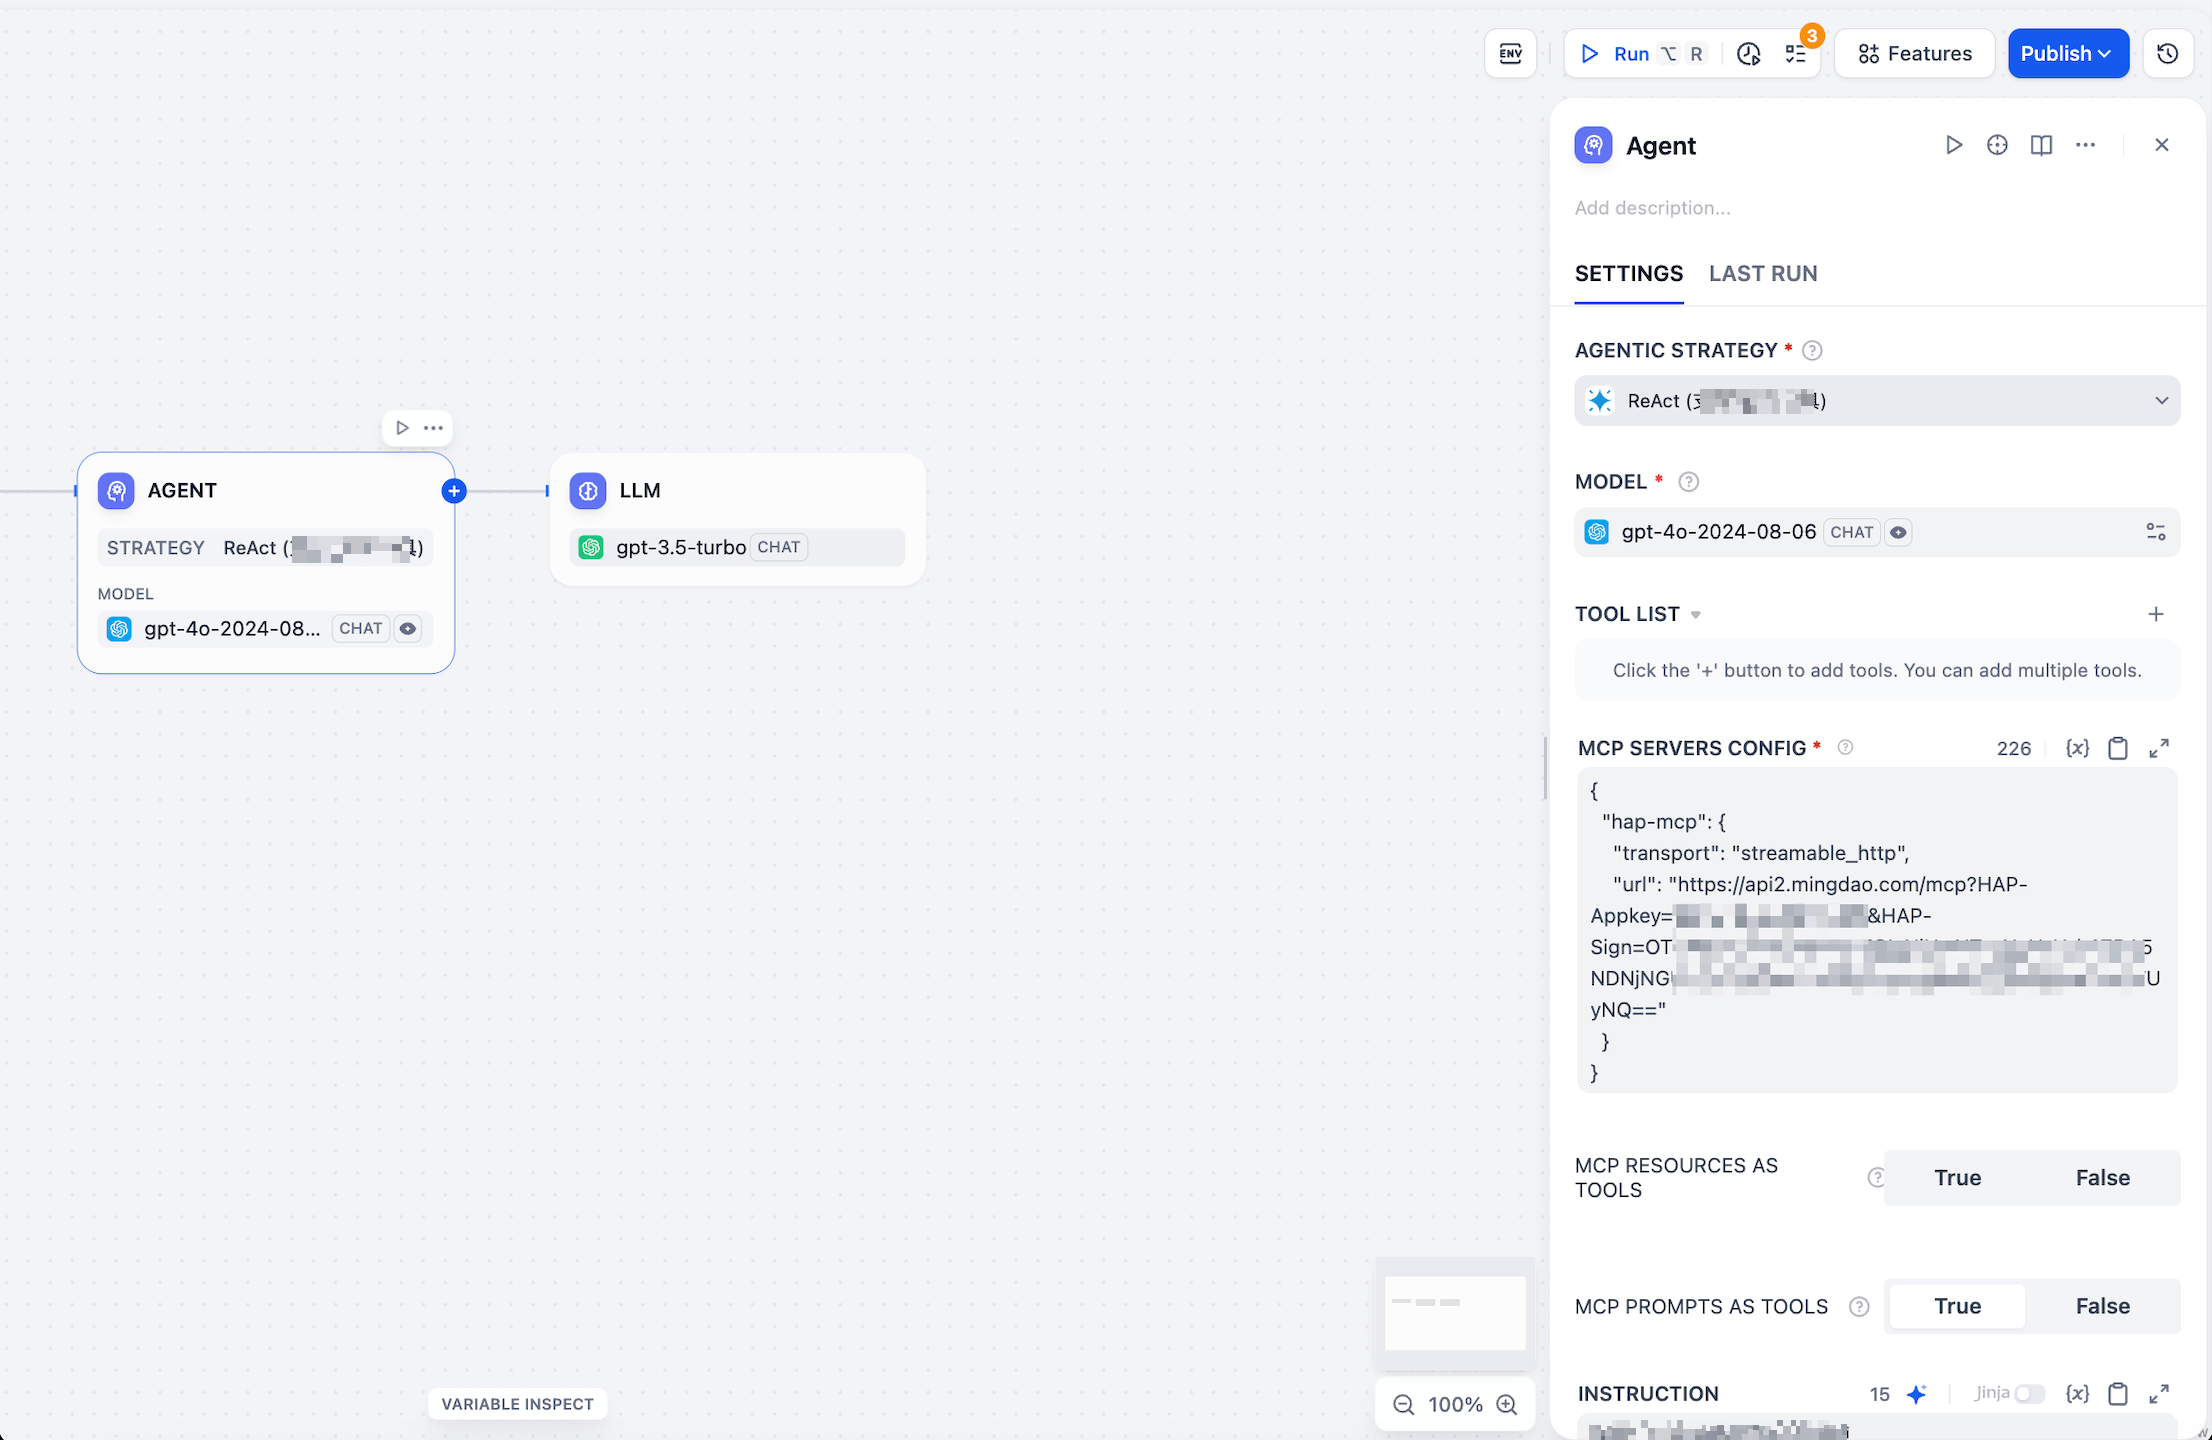
- Example configuration: Enter your MCP config. You can replace “hap-mcp” with any alias name. The url should be the one generated from your application.
- {“hap-mcp”:{“transport”:”streamable_http”,”url”:”your-mcp-url-here”}}
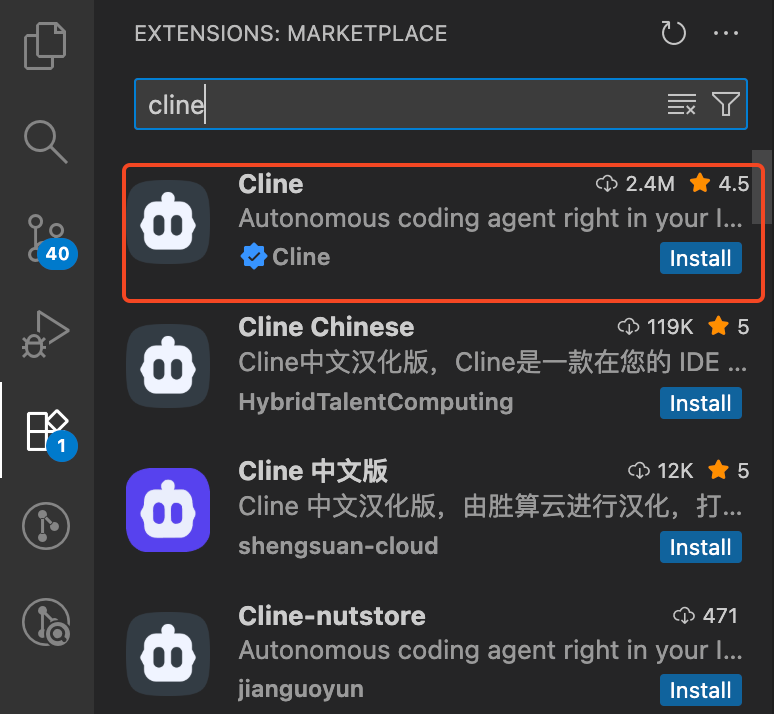
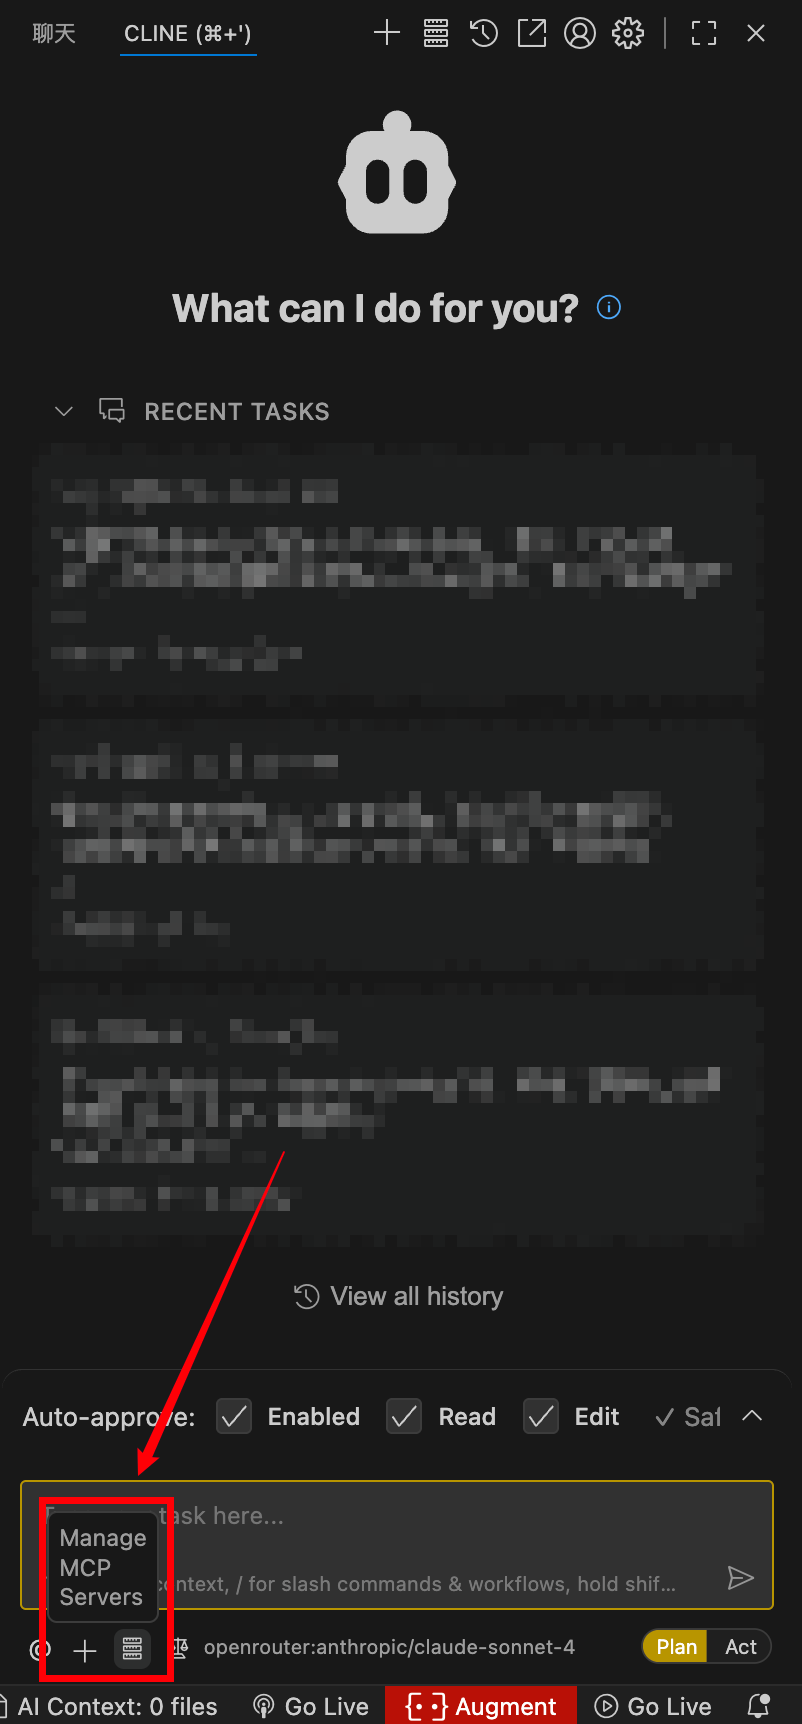
VS Code + Cline Plugin
- Install the Cline plugin
- Click “MCP Servers” in the bottom-right corner to complete configuration
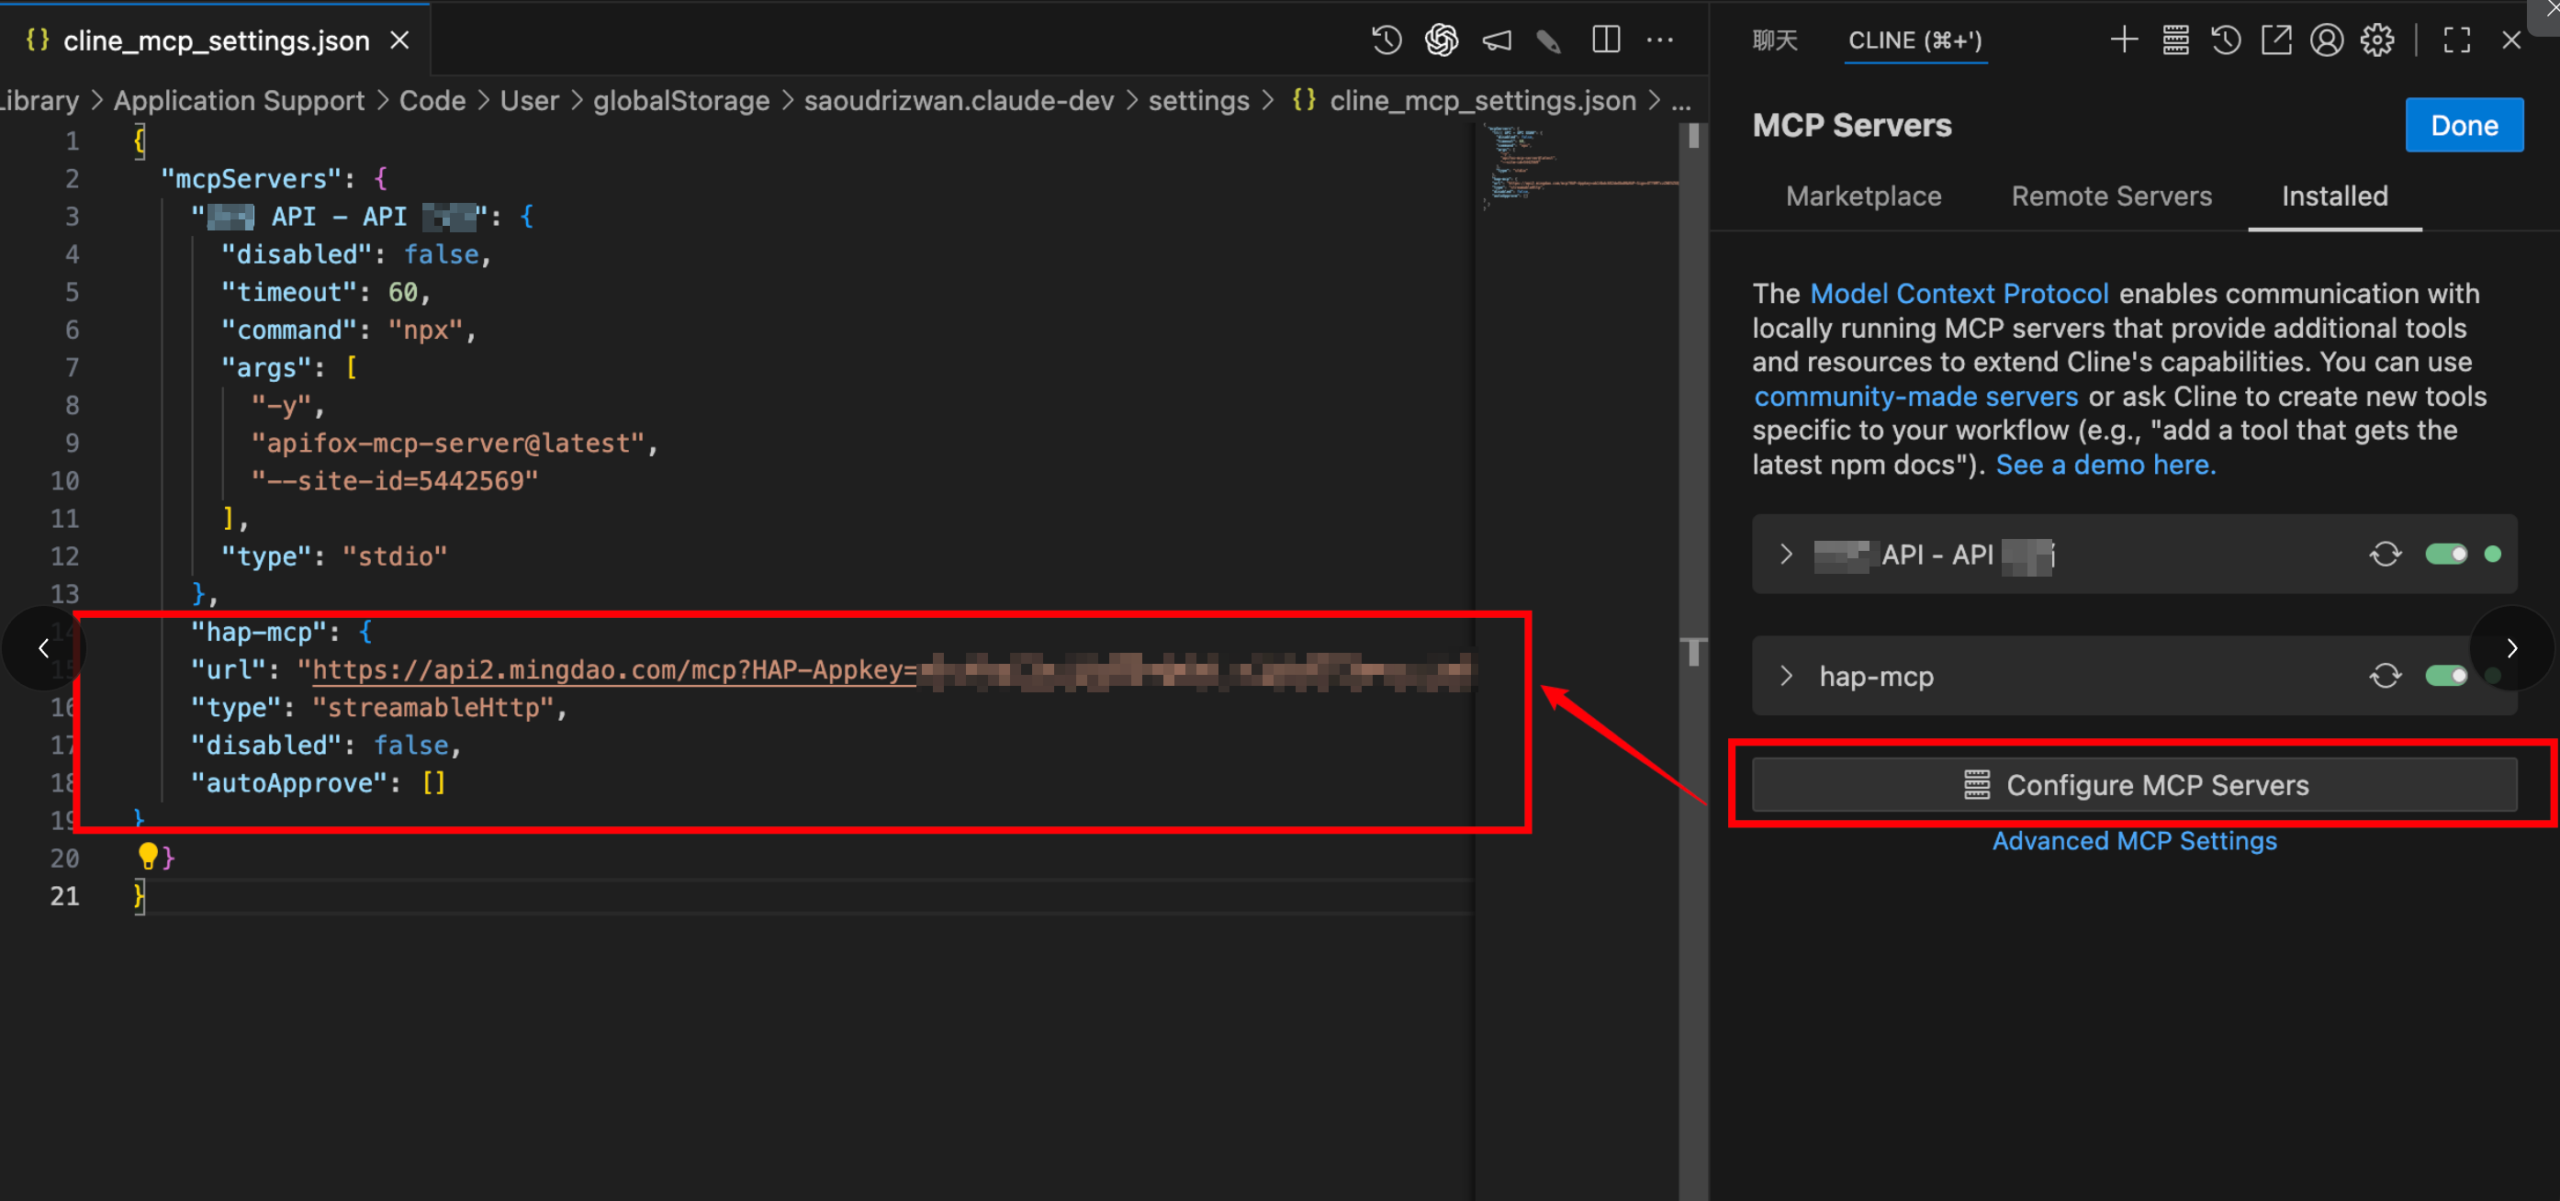
- Example configuration:
- “hap-mcp”: {
- “url”: “your-mcp-url-here”,
- “type”: “streamableHttp”,
- “disabled”: false,
- “autoApprove”: []
- }
Worksheet & Field
Switch Fields Using the Tab Key
In this update, users can now press the Tab key to quickly navigate between editable fields when editing a record on the record detail page, improving efficiency for data entry and form operations.
Tab key navigation is supported for basic fields. Relationship fields and subform fields will be supported in future versions.
- Navigation Order: Fields follow the visual layout of the form, switching from top to bottom, left to right.
- Loop Navigation: Pressing Tab on the last field will return focus to the first editable field.

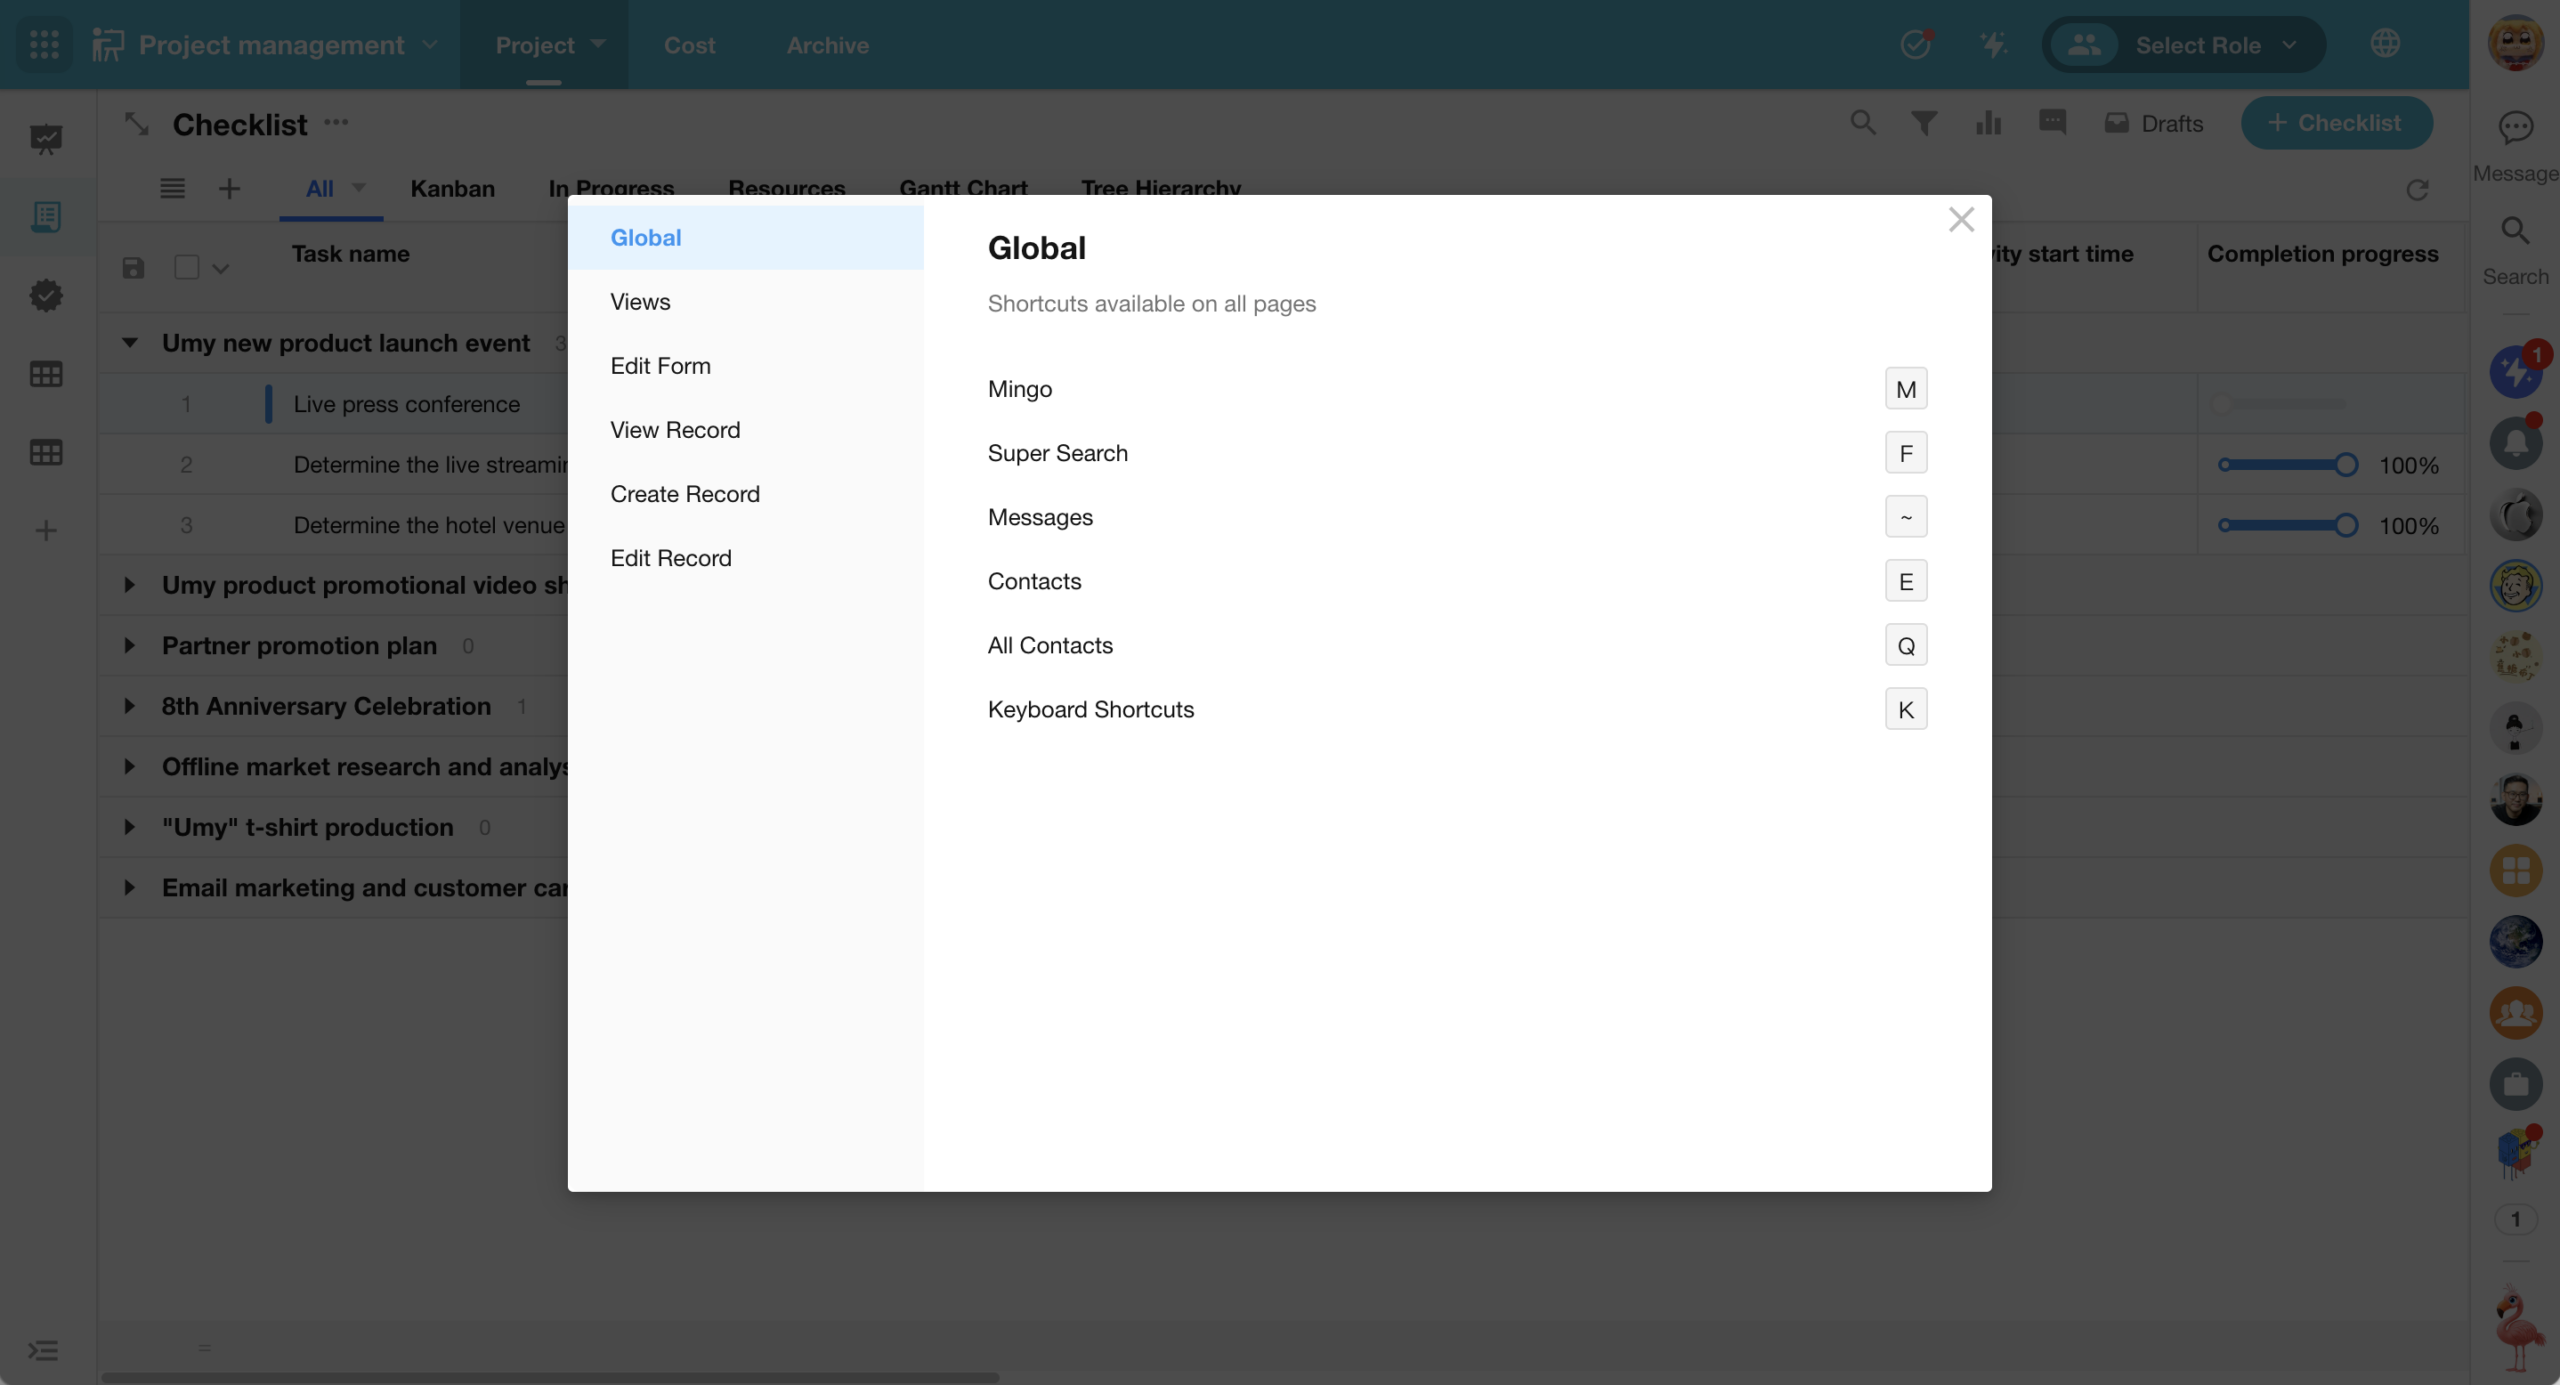
Keyboard Shortcuts Guide
A new keyboard shortcuts guide has been added.
On any page within the platform, press K to view the full list of available keyboard shortcuts. These shortcuts cover actions like view operations, record viewing, and editing, helping users reduce reliance on the mouse and perform actions more efficiently.
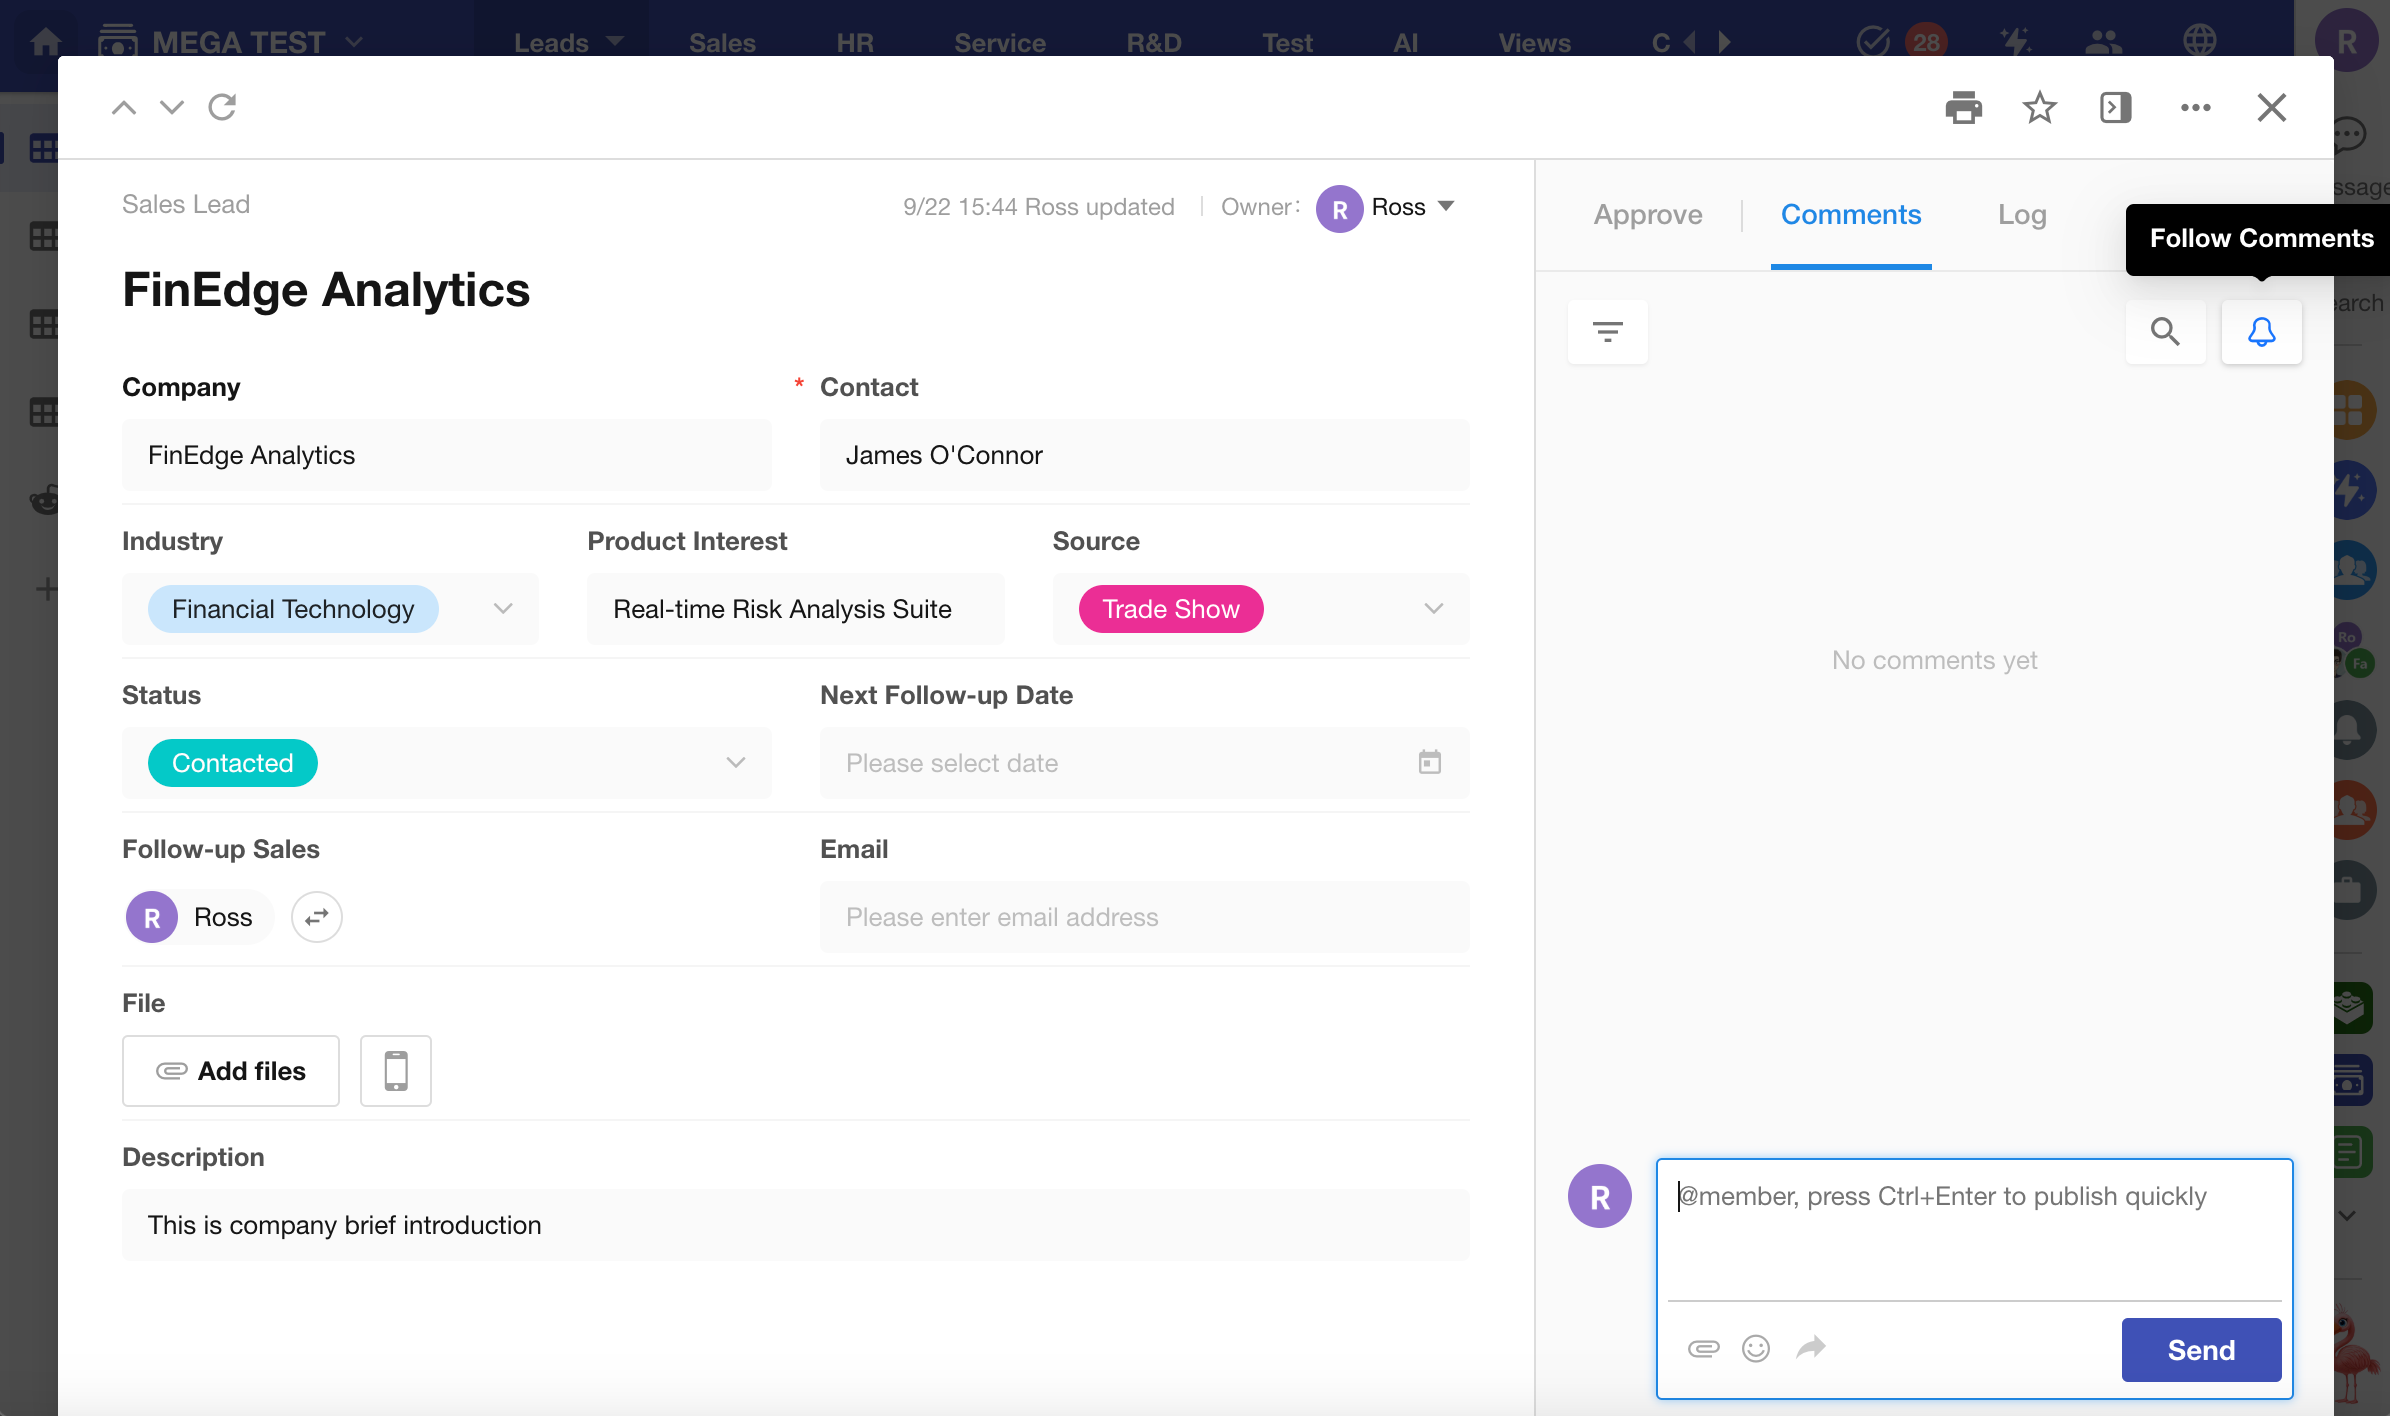
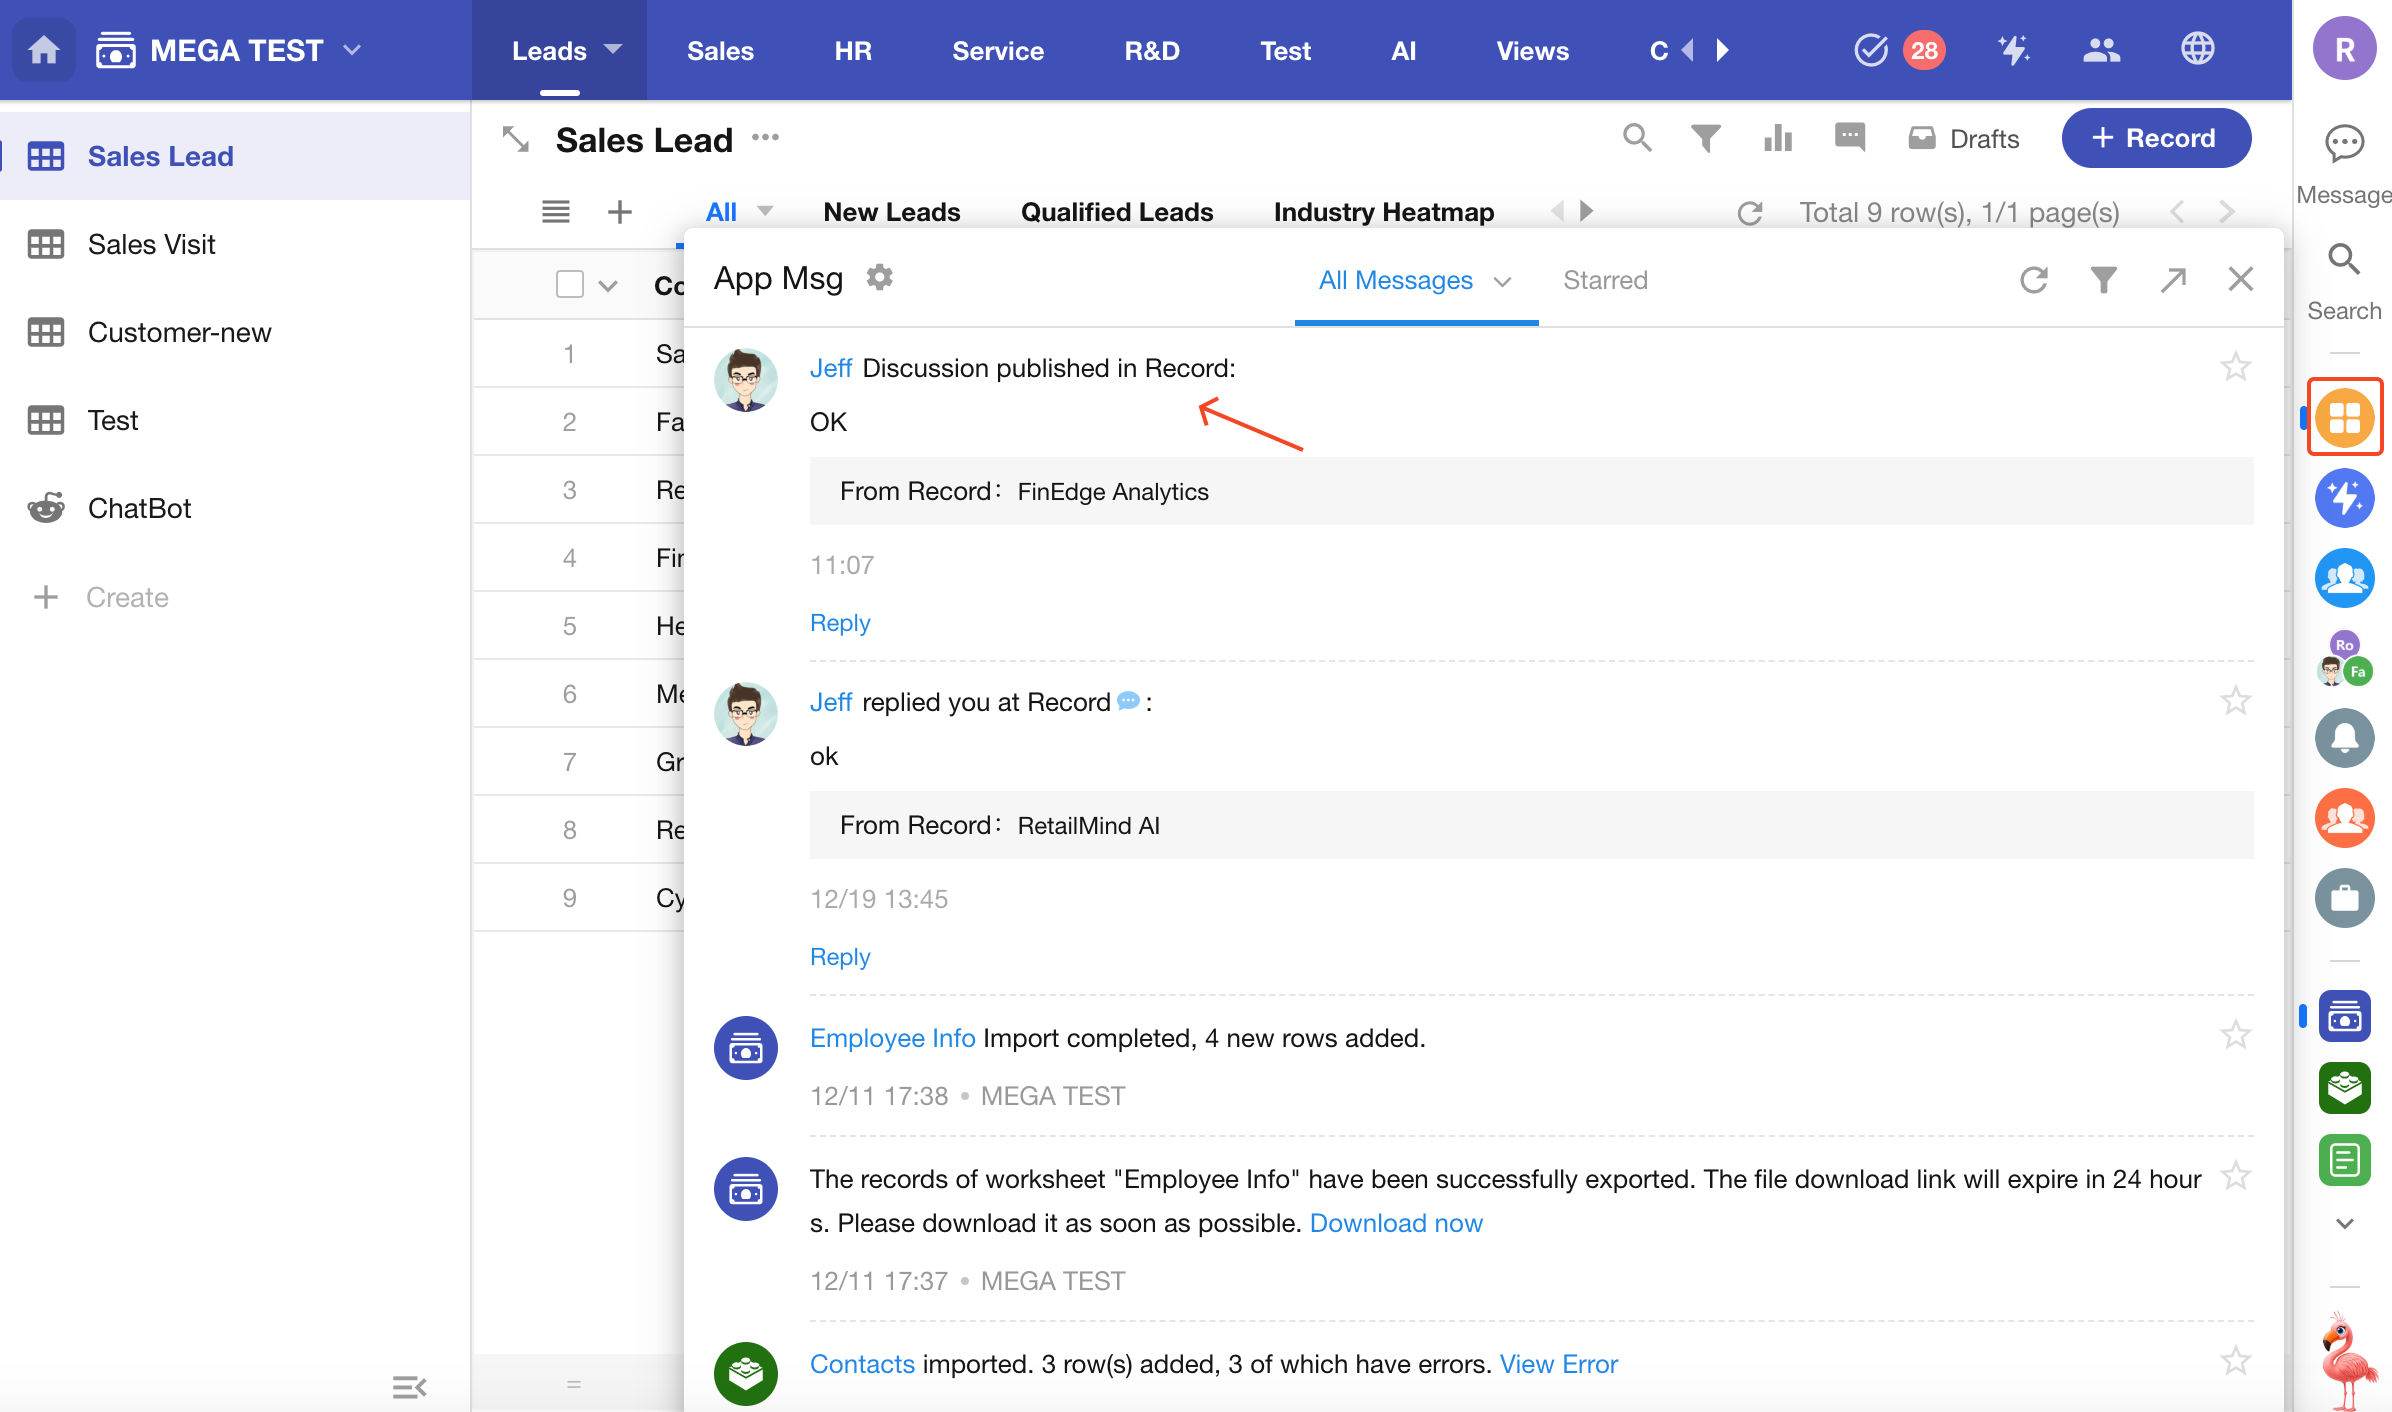
Follow Records
Users can now manually follow any record they have permission to view.
Once a followed record receives new comments or discussions, the system will automatically send a notification—ensuring followers stay informed and can respond promptly.
Users can now customize the card appearance of view and record share links when sharing to platforms like WeChat.
View Sharing:
- Title: Default: Worksheet Name – View Name
- Description: Supports manual input of static text only
- Icon: Default: Icon of the view, option to upload a custom icon
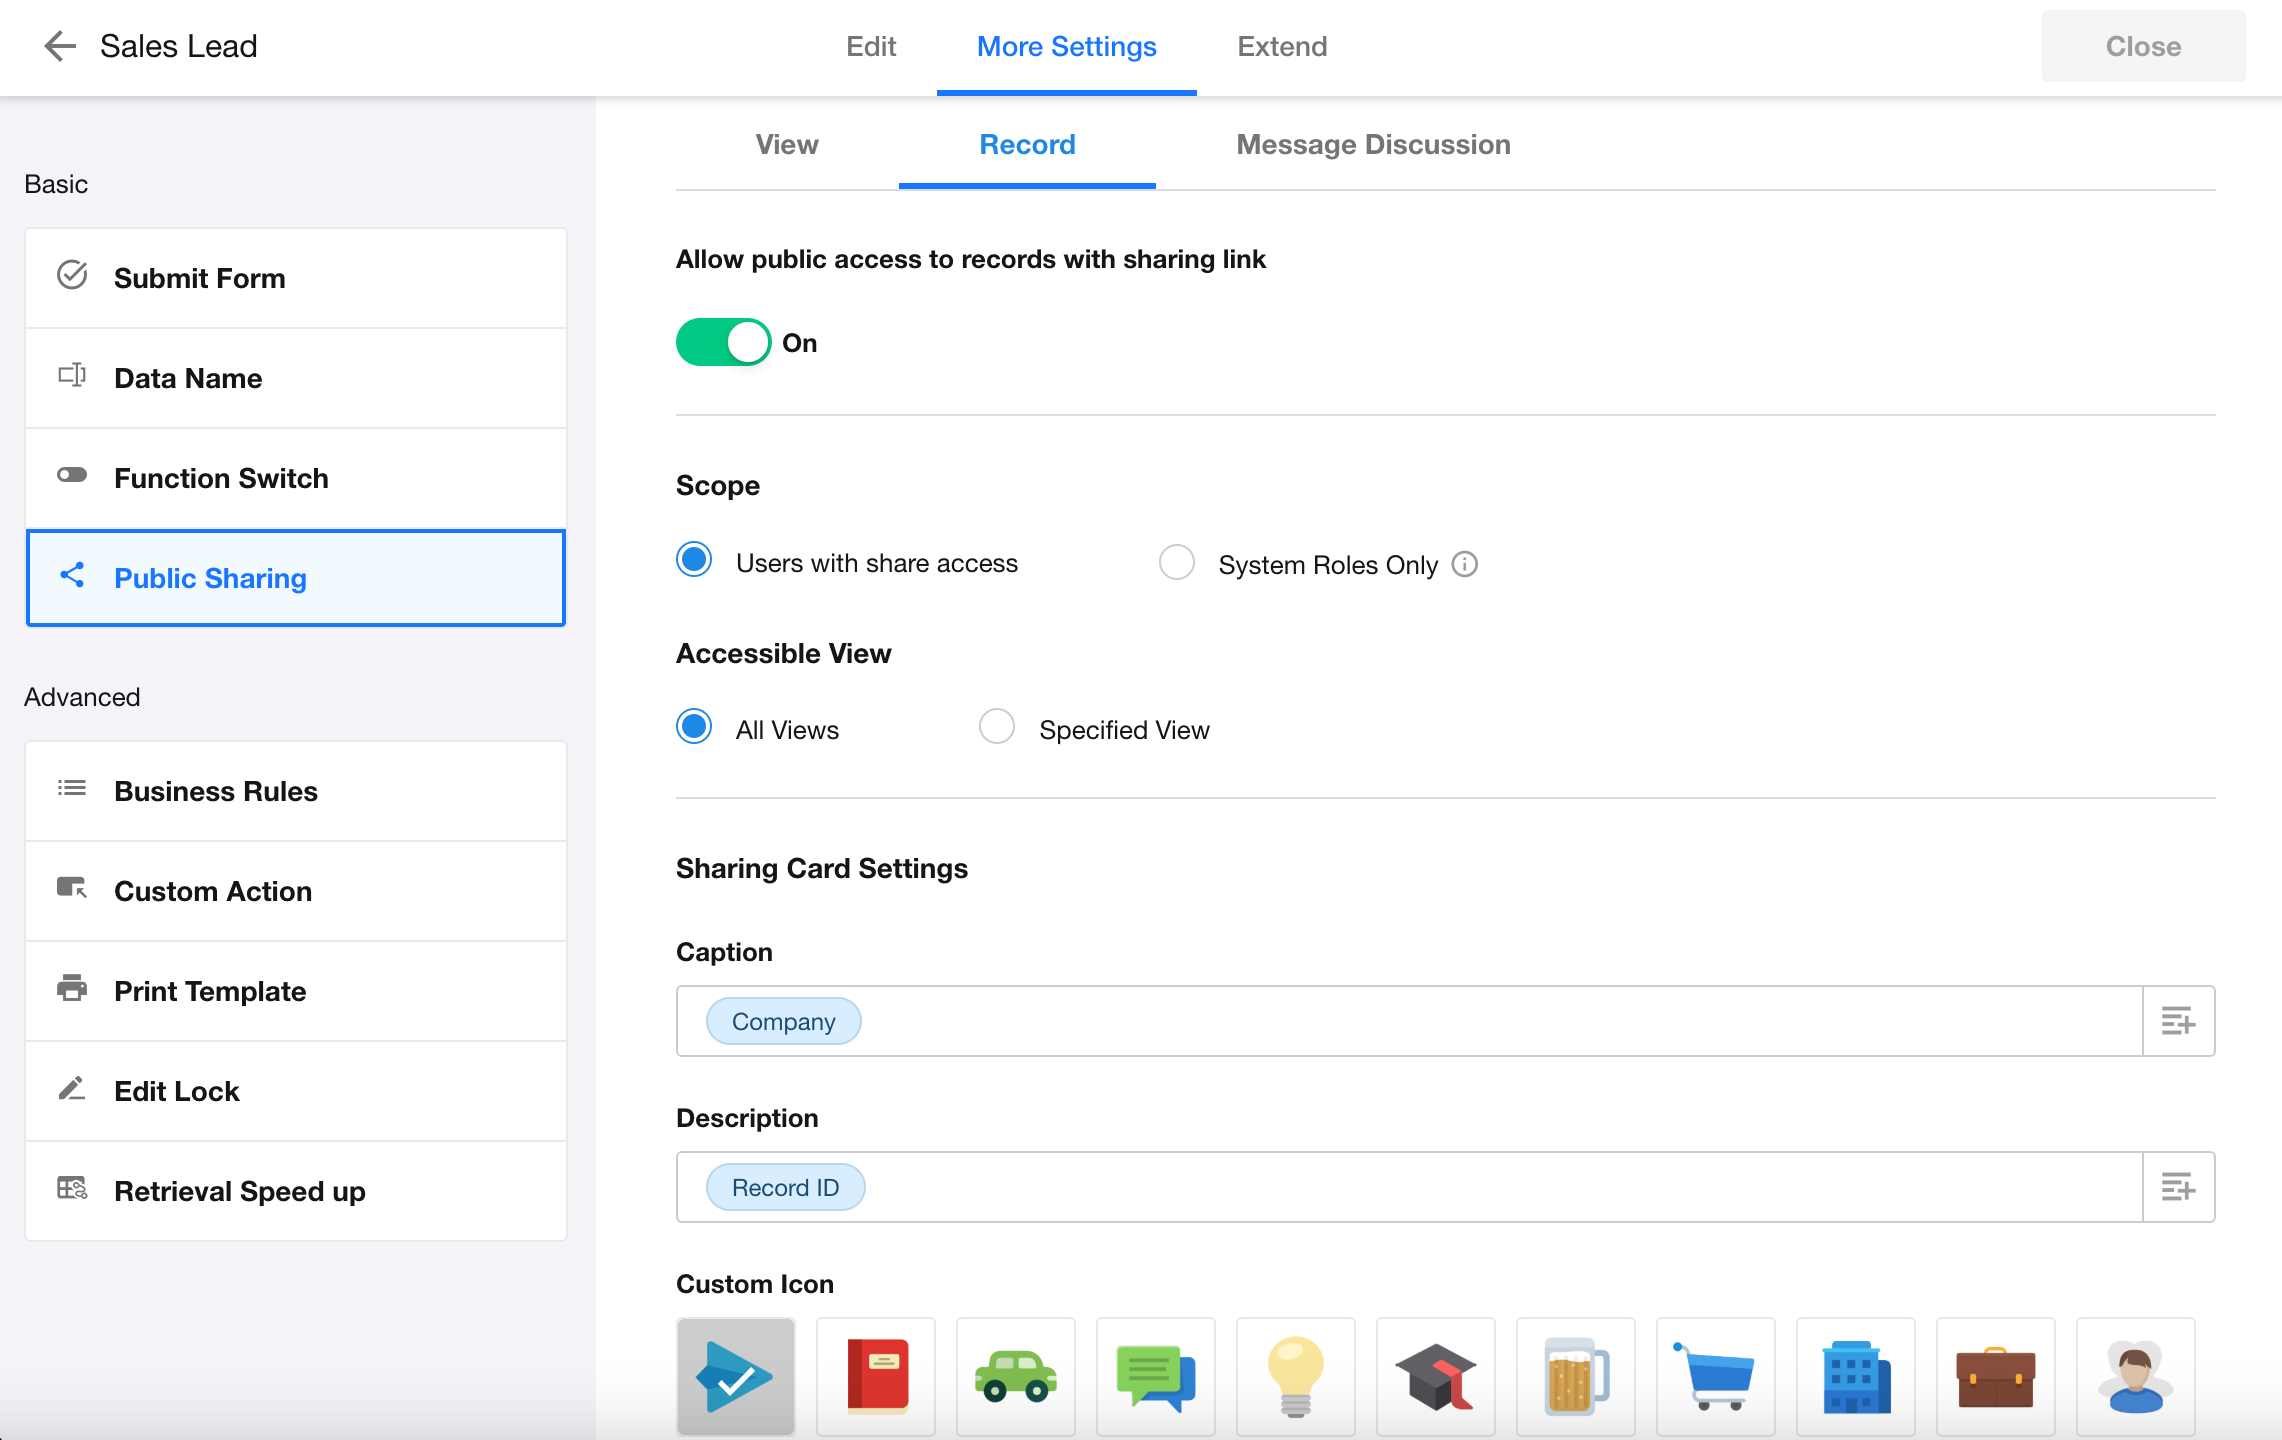
Record Sharing:
- Title:
- Default: Record title
- Supports manual input and dynamic values
- Supported dynamic fields: Text, Number, Currency, Email, Concat
- Description:
- Supports manual input and dynamic values
- Supported dynamic fields: Text, Number, Currency, Email, Concat
- Icon:
- Choose from system preset icons or upload a custom one
Business Rule: Set Field Values via Interactive Actions
When users fill out a form, if specific filter conditions are met, system actions can now automatically assign values to designated fields.
Supported actions include: Set static value, Clear field value, Set value from another field, Query worksheet, Function calculation

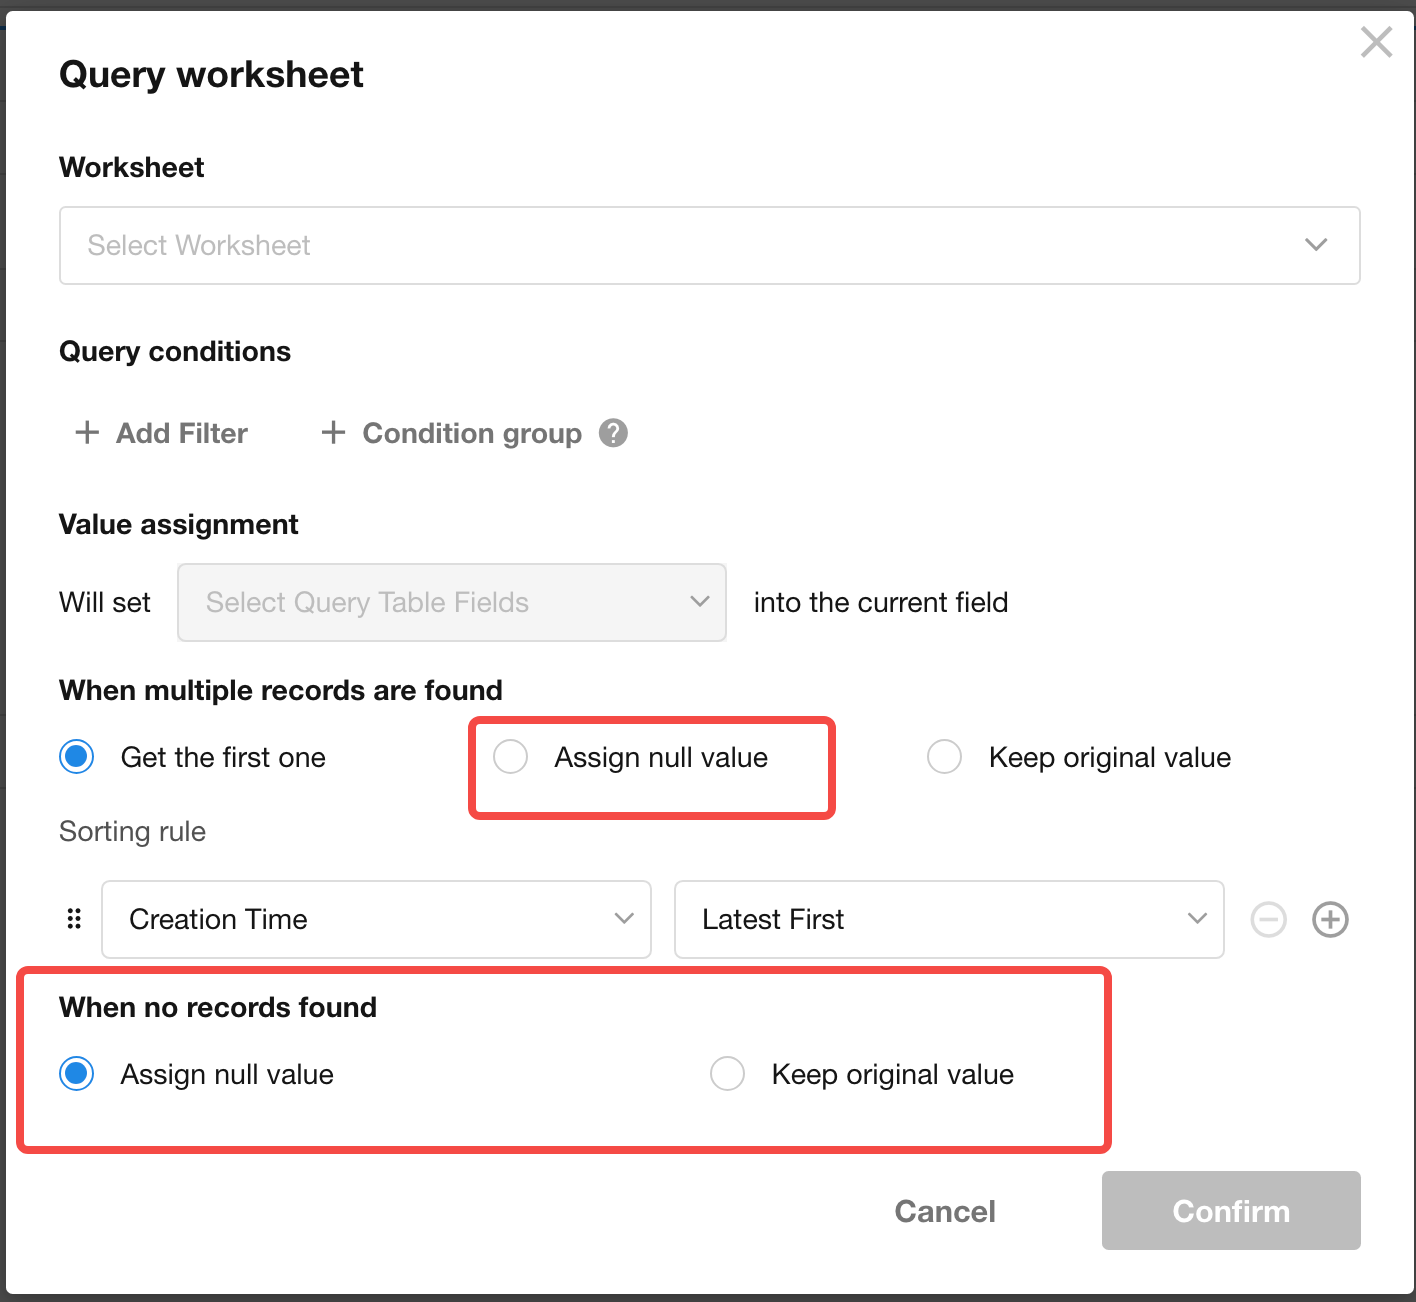
Default Values from Worksheet Queries: Handle “No Matching Records” Scenarios
When setting default field values via worksheet queries, new options have been added:
- For non-relationship (multi-record) fields or subform fields:
- If multiple records are returned, you can now choose to clear the field value
- When no matching records are found:
- New configuration allows you to define whether to:
- Clear the field value, or
- Keep the original value
- New configuration allows you to define whether to:
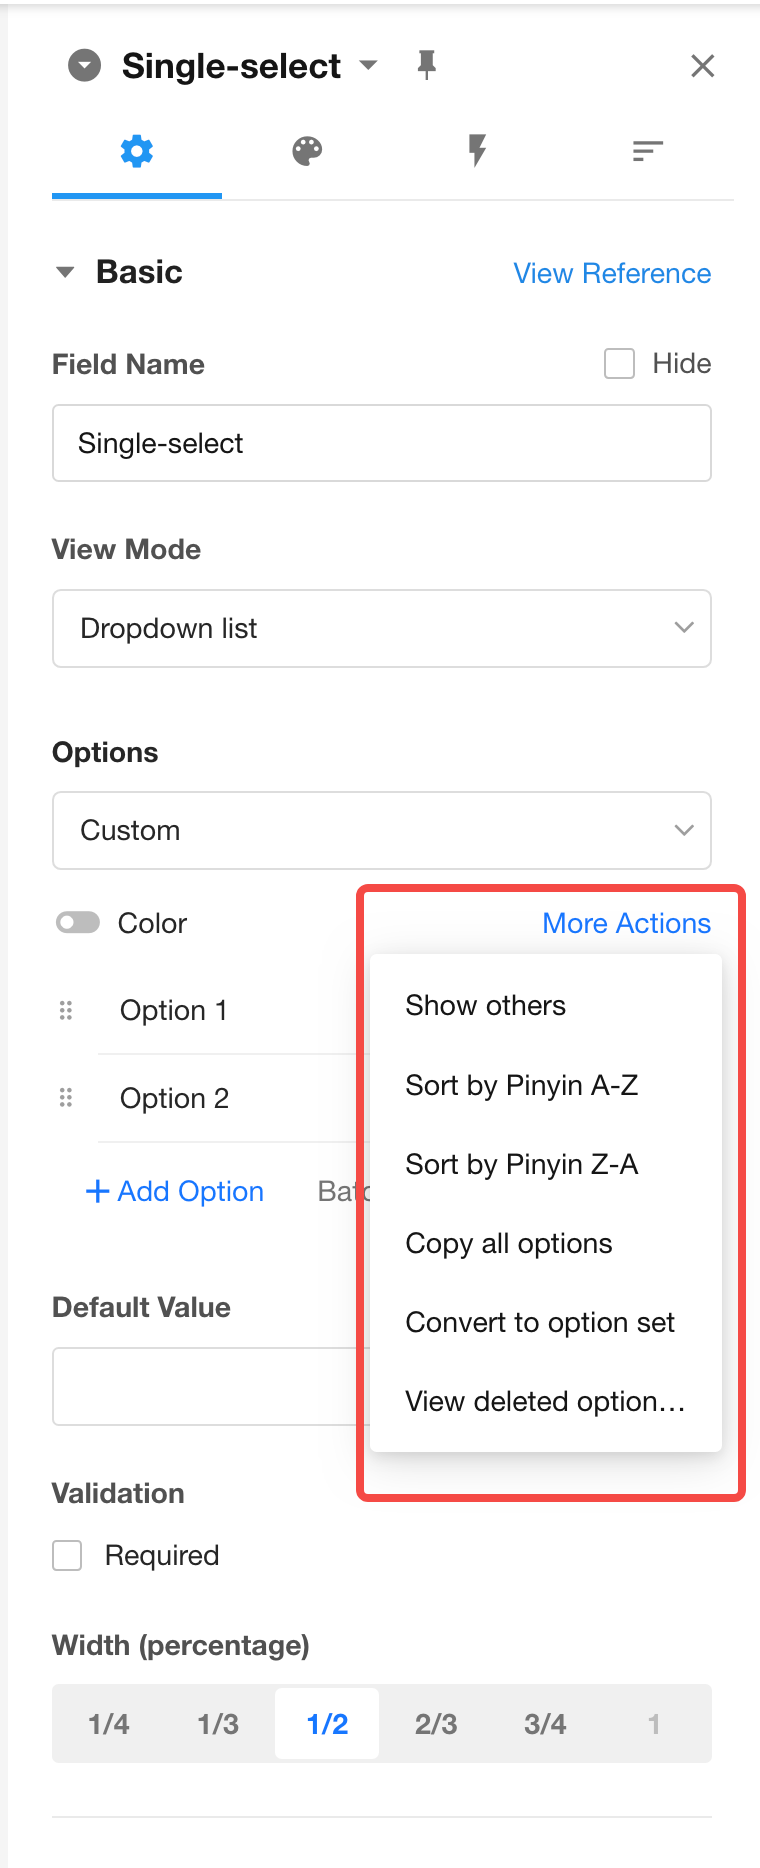
Option-Type Field: Improved Behavior for Duplicate Option Entries
- When adding a duplicate option:
a. If the entered option matches one previously deleted (i.e., in the recycle bin), it will be automatically restored when the input field loses focus.
b. When bulk adding options, if any match previously deleted options, they will be automatically restored upon saving.
- A new setting for option sorting has been added in the field configuration panel for option-type fields.
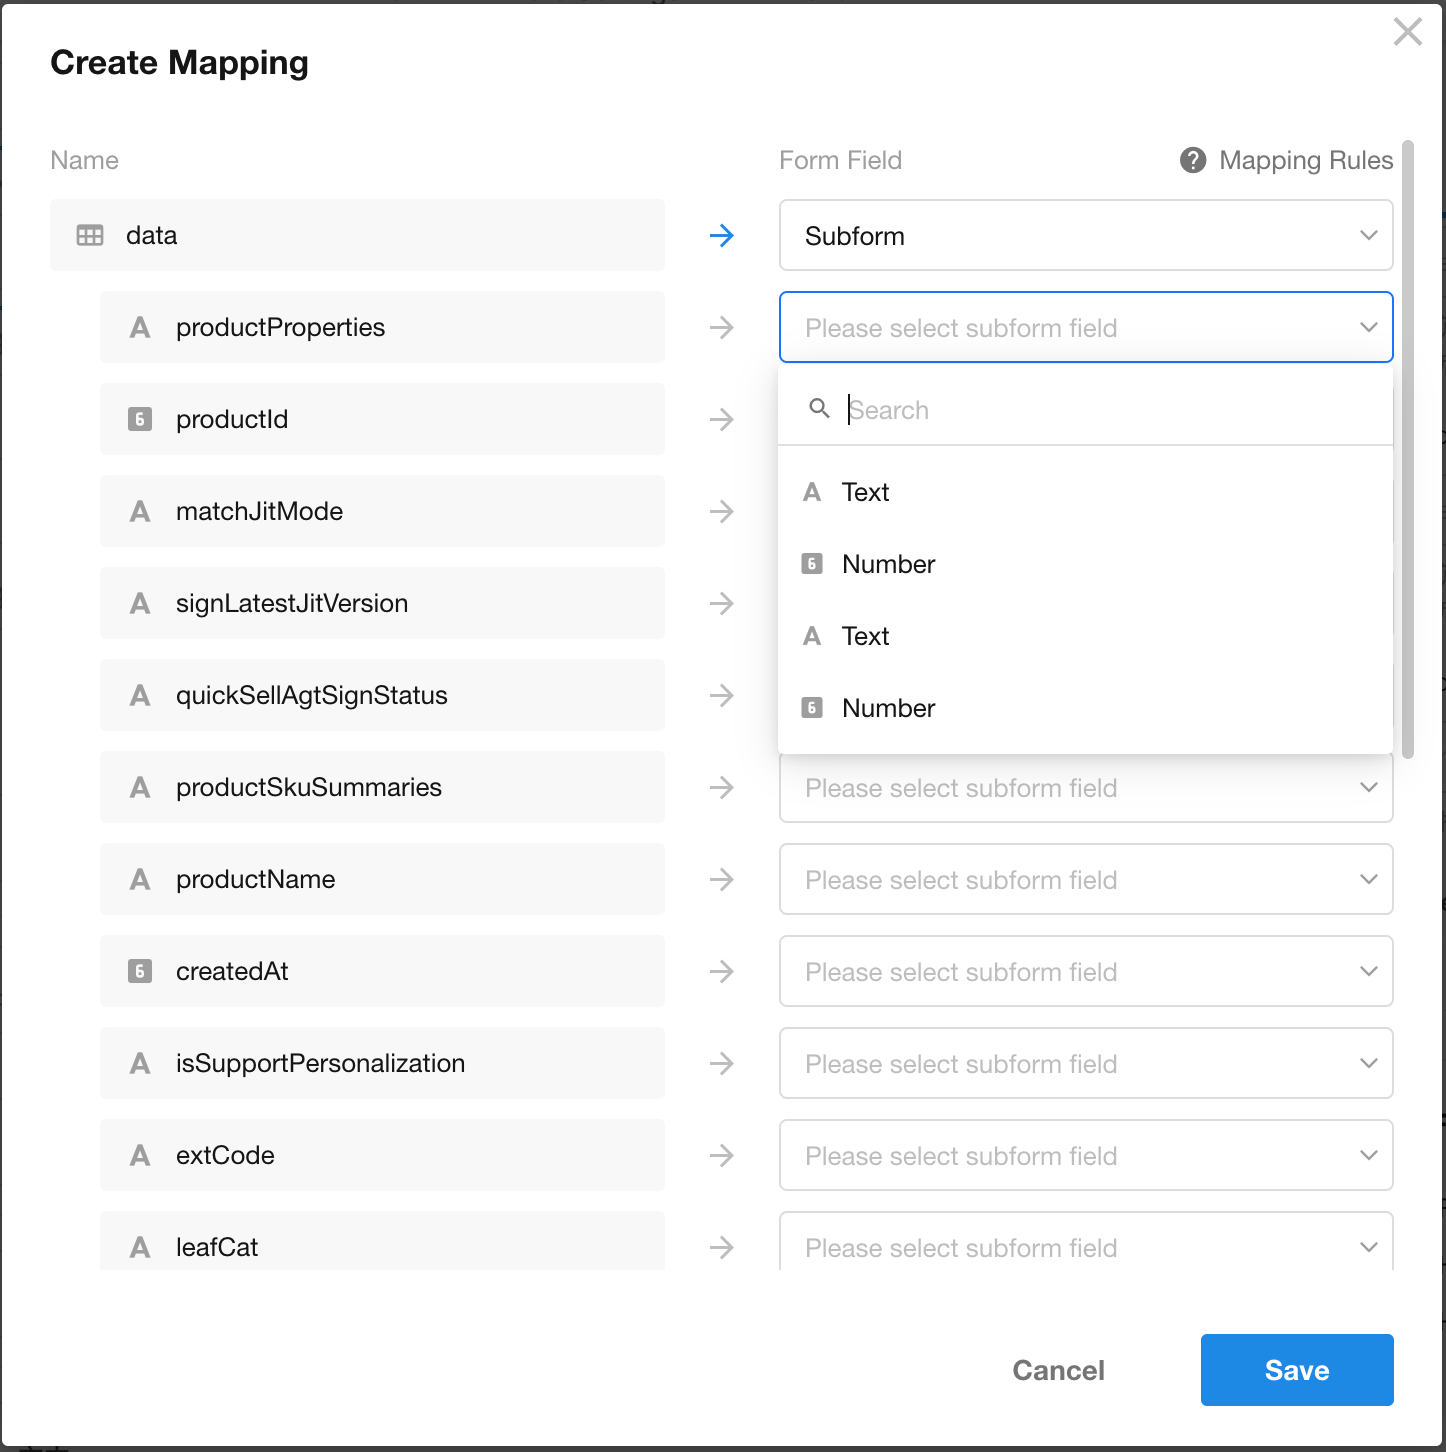
API Query Field: Support Writing to Text Fields from Numeric Fields
You can now write values from numeric-type fields into text fields, improving compatibility and flexibility in data mapping.
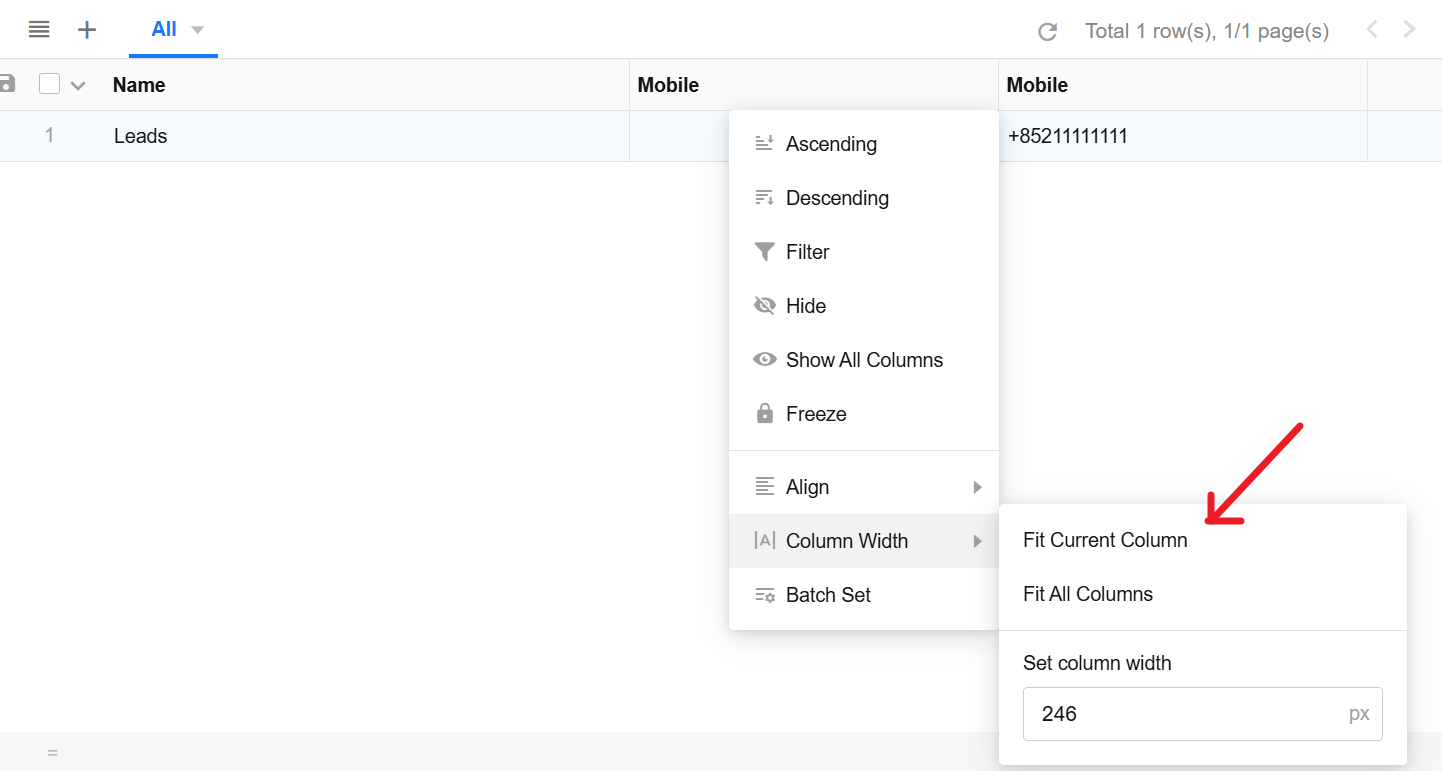
Column Operation: “Fit Column Width” for All Columns
This update improves the user workflow for adjusting column widths in table view.
Users can now quickly apply “Fit Column Width” for all columns directly from the column operations menu, without needing to go through “View Configuration → Display Column → Edit Column Style”. This makes column resizing more intuitive and efficient.
Embed Field: New Filter Configuration Option — “When Dynamic Field Value Is Empty”
A new configuration option “When dynamic field value is empty” has been added to the filter configuration for embedded fields used in charts or views.
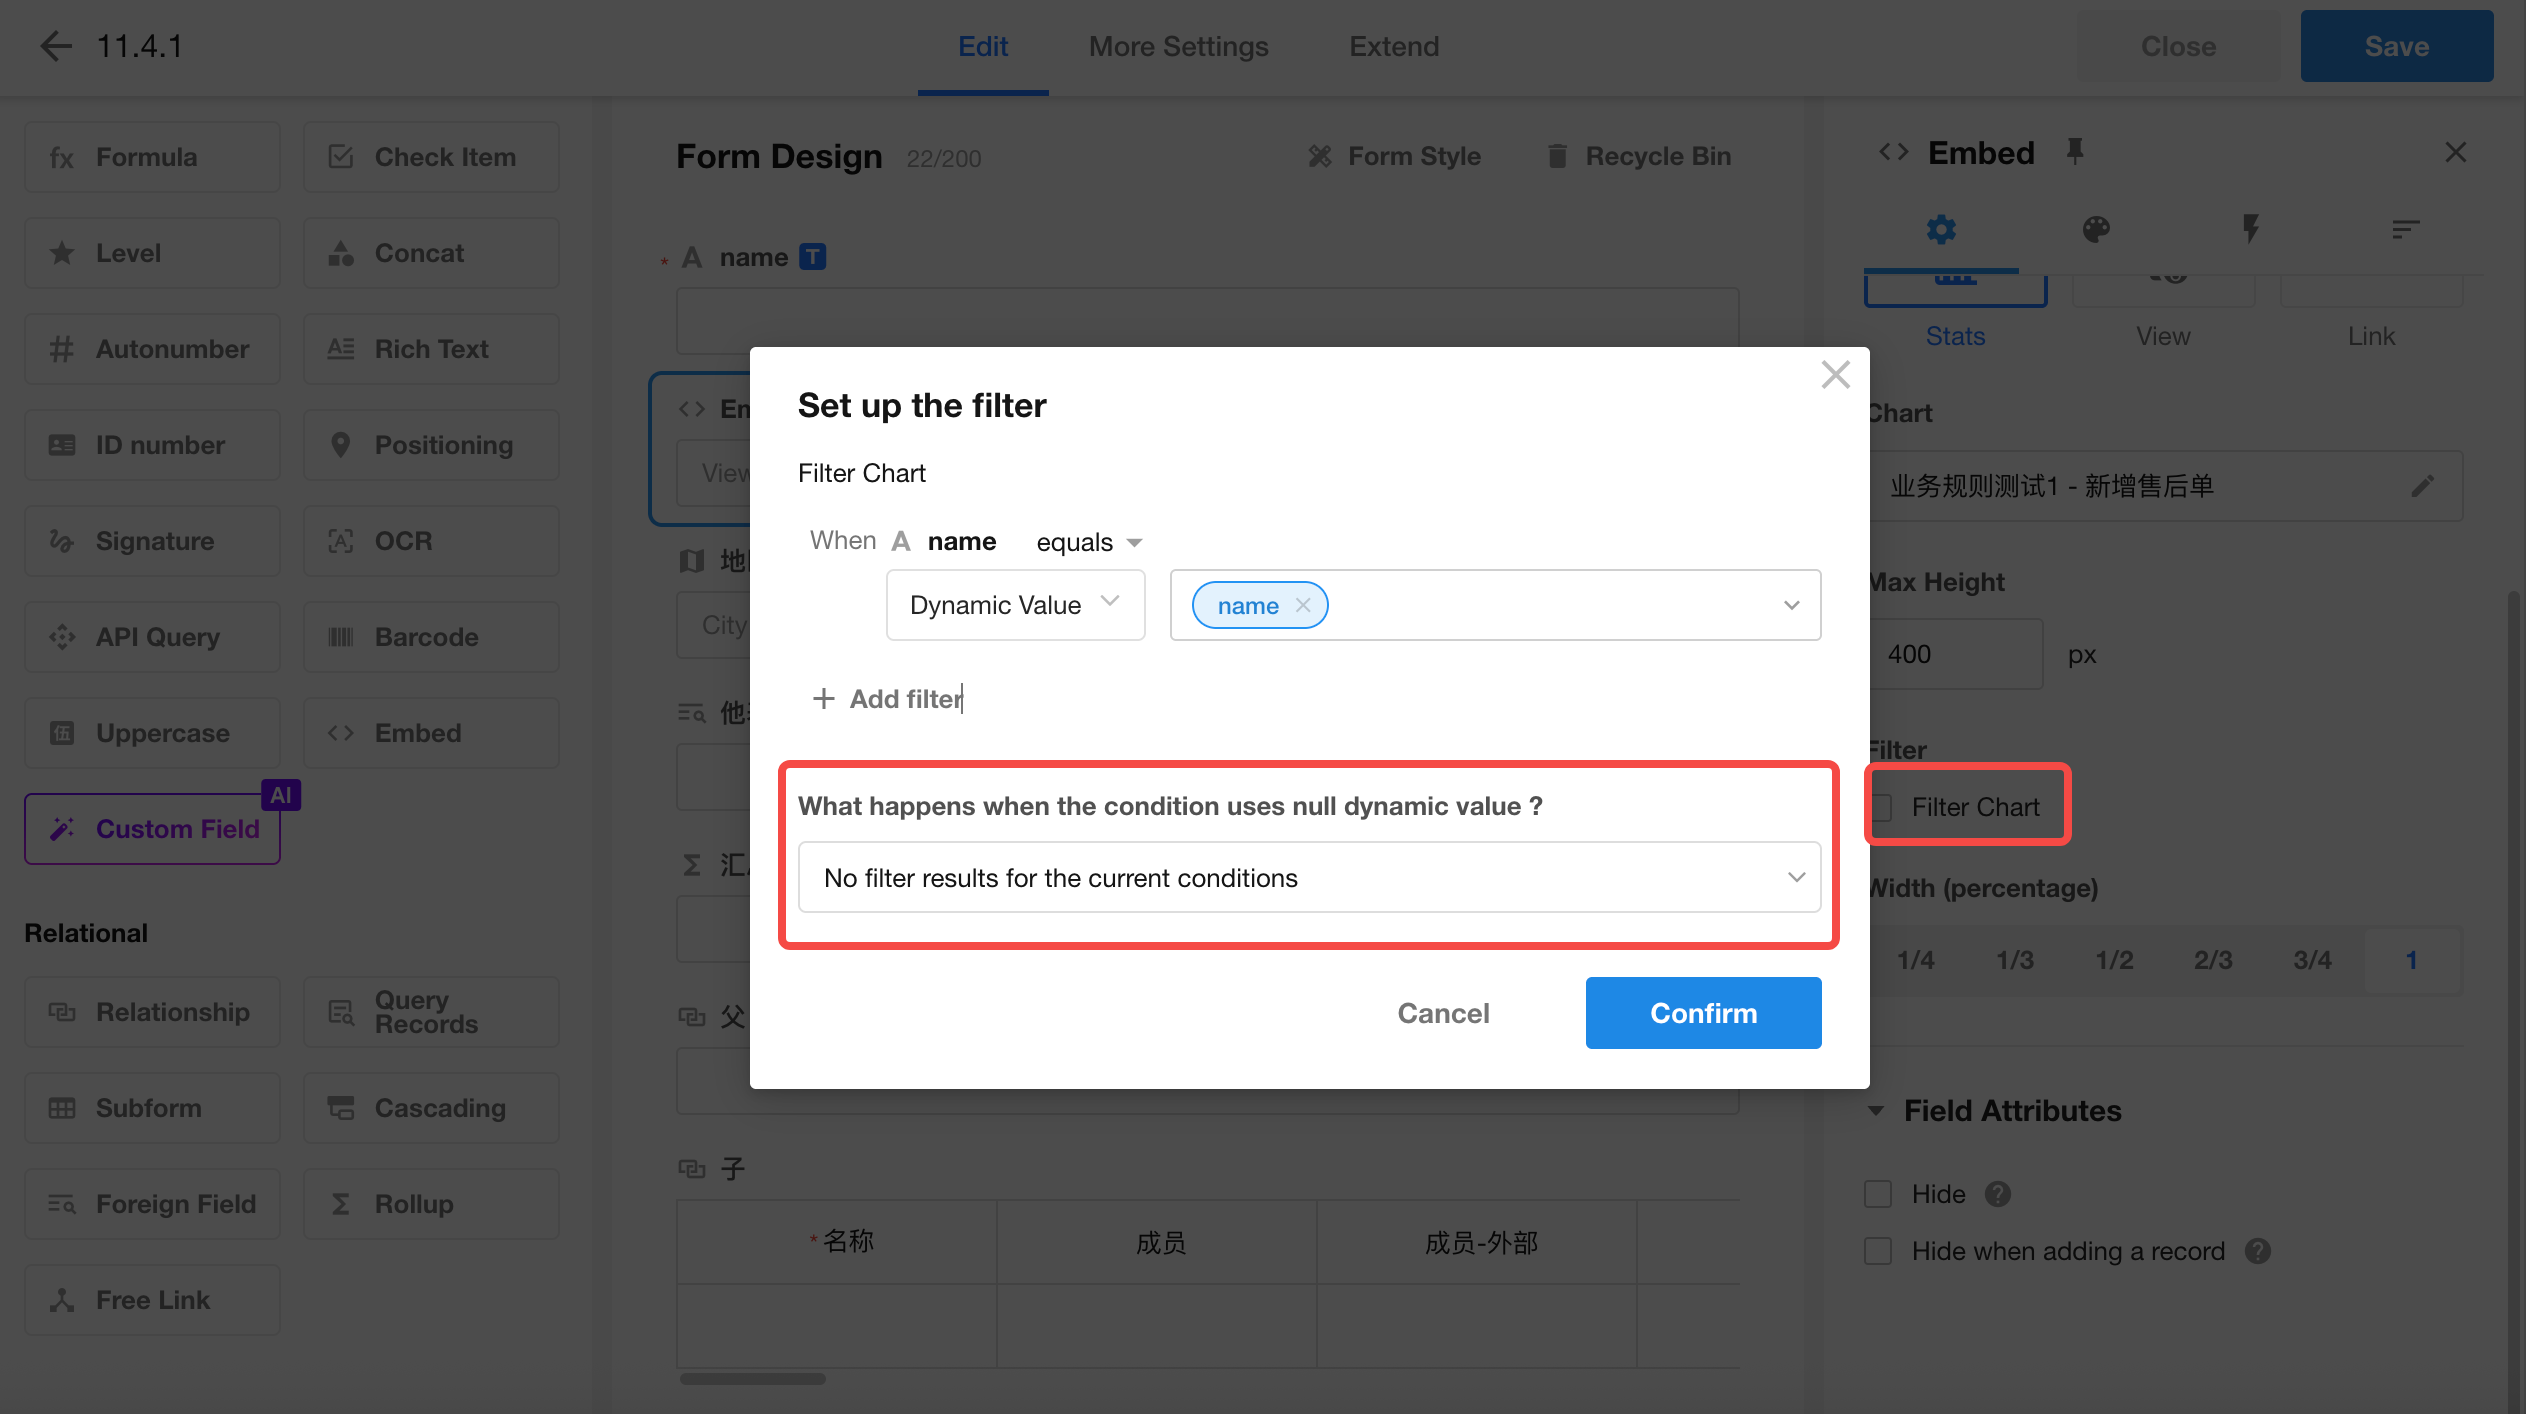
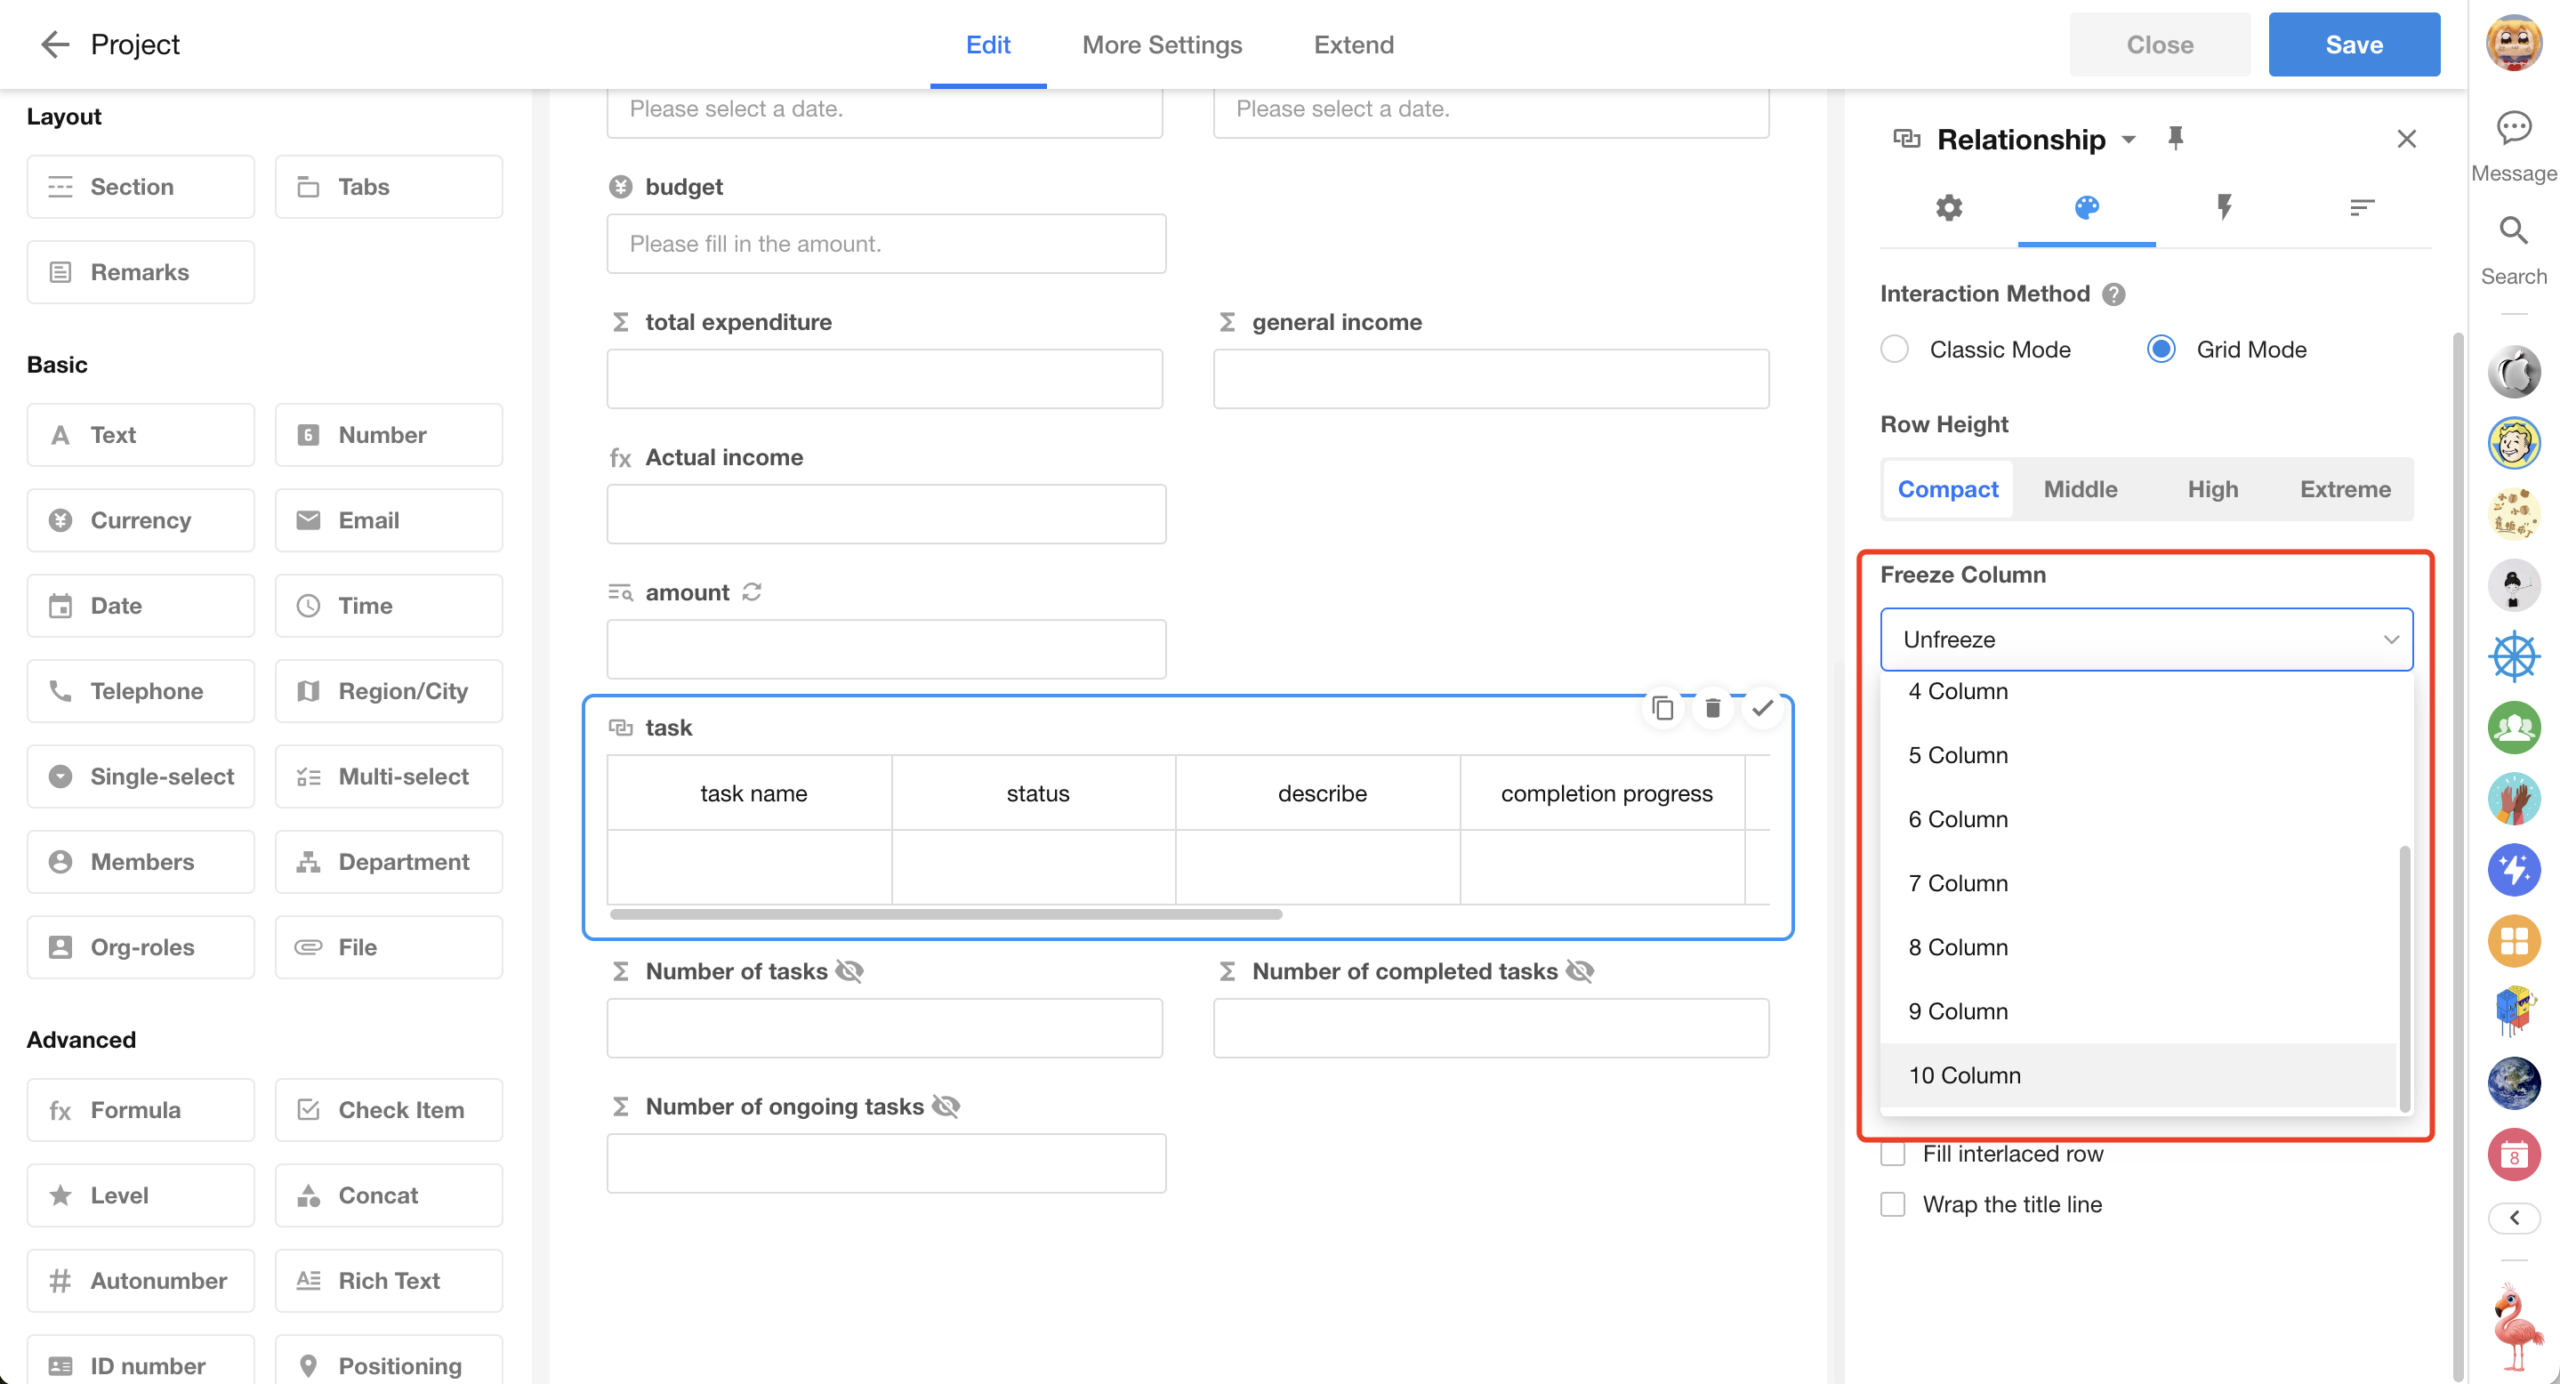
Table-Type Fields: Increased Freeze Limit to 10 Columns
To support more complex use cases, the maximum number of frozen columns for table-type fields has been increased to 10.
This applies to subform fields, relationship fields (table / tab table), and query records fields (table / tab table)
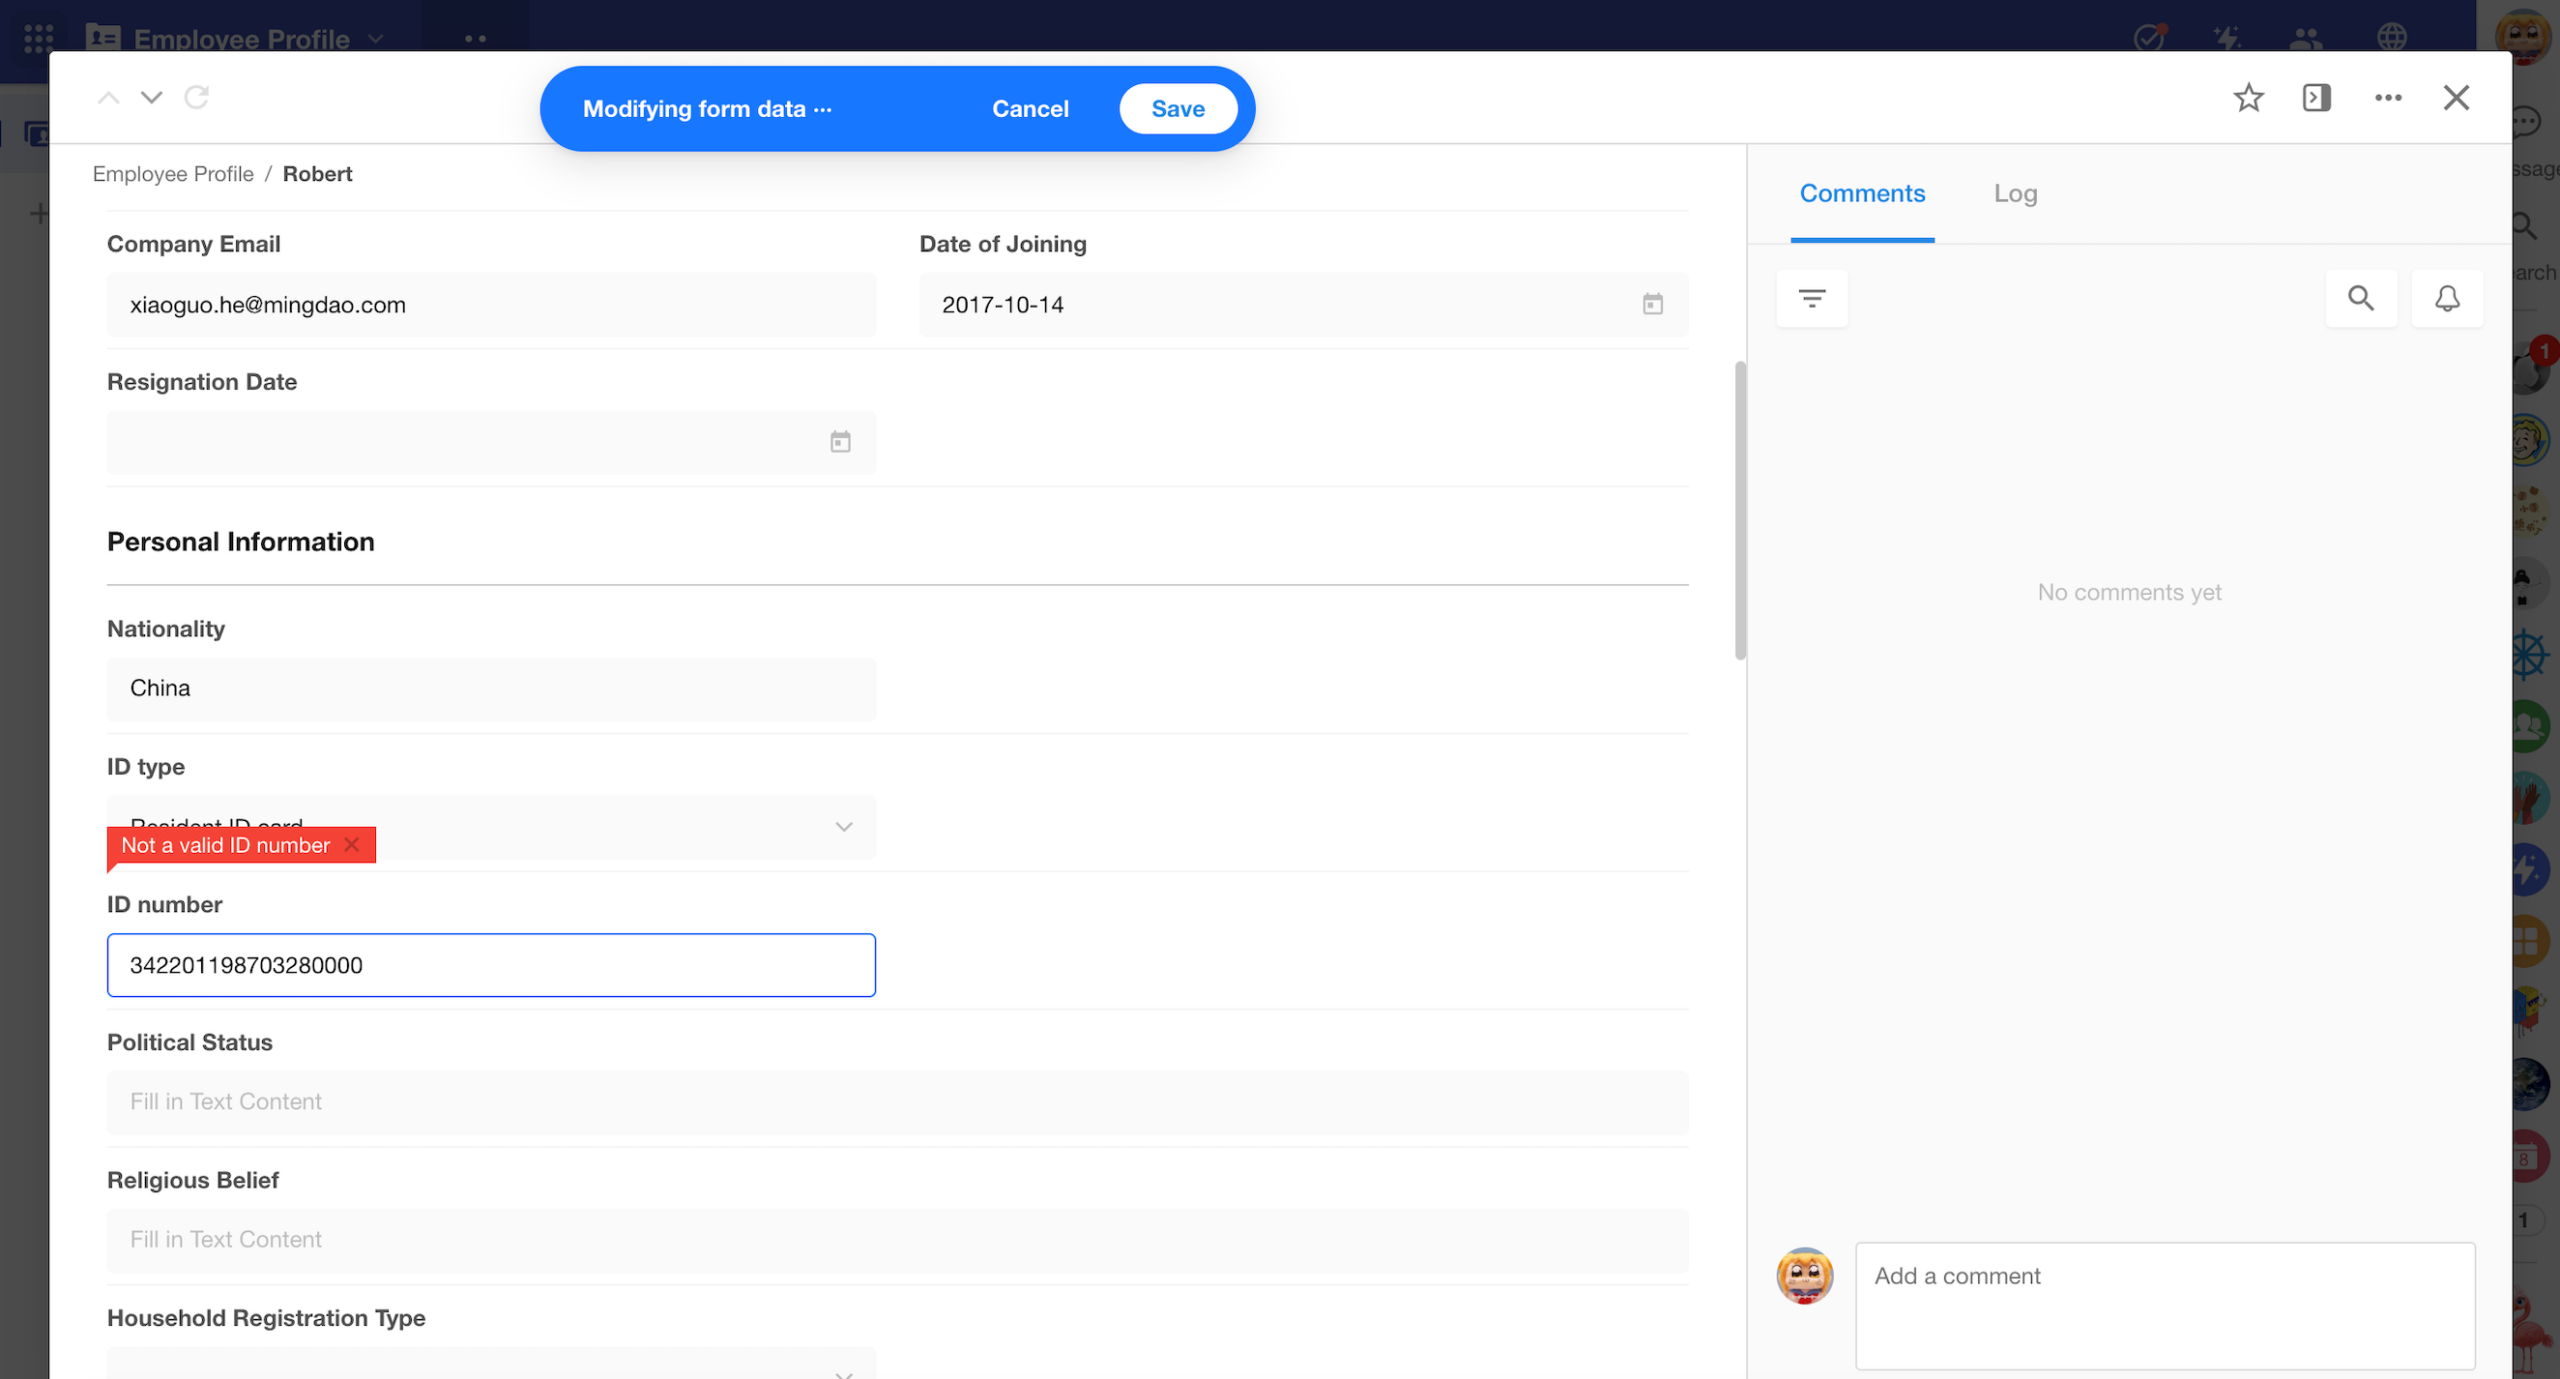
ID Number Field: Enhanced Validation for Chinese ID Card Numbers
The validation logic for Chinese ID card numbers has been upgraded from basic format checking to strict compliance with national standards, improving accuracy in real-name verification scenarios.
Key changes include:
- 15-digit ID support removed: Only 18-digit second-generation ID formats are now accepted
- Strict structural validation, including:
- Validity and existence of the first two digits (region code)
- Valid birth date not later than today
- IDs ending with “0000” are considered invalid formats
This upgrade helps reduce data entry errors and downstream troubleshooting costs in compliance-sensitive environments.
Custom Page & Chart
New Chart Type: World Map
A new “World Map” chart type has been added to the chart module.
This chart allows you to visualize global distribution data based on regions or geolocations.
Data differences across countries or regions can be displayed using color gradients or bubble sizes, offering an intuitive overview of global trends and patterns.

Dual-Axis Chart Enhancements
New configuration options have been added and improved for dual-axis charts, enabling Pareto chart visualization.
- Automatically sort by value
- Automatically calculate cumulative percentage
- Achieving the combined bar-and-line 80/20 analysis view
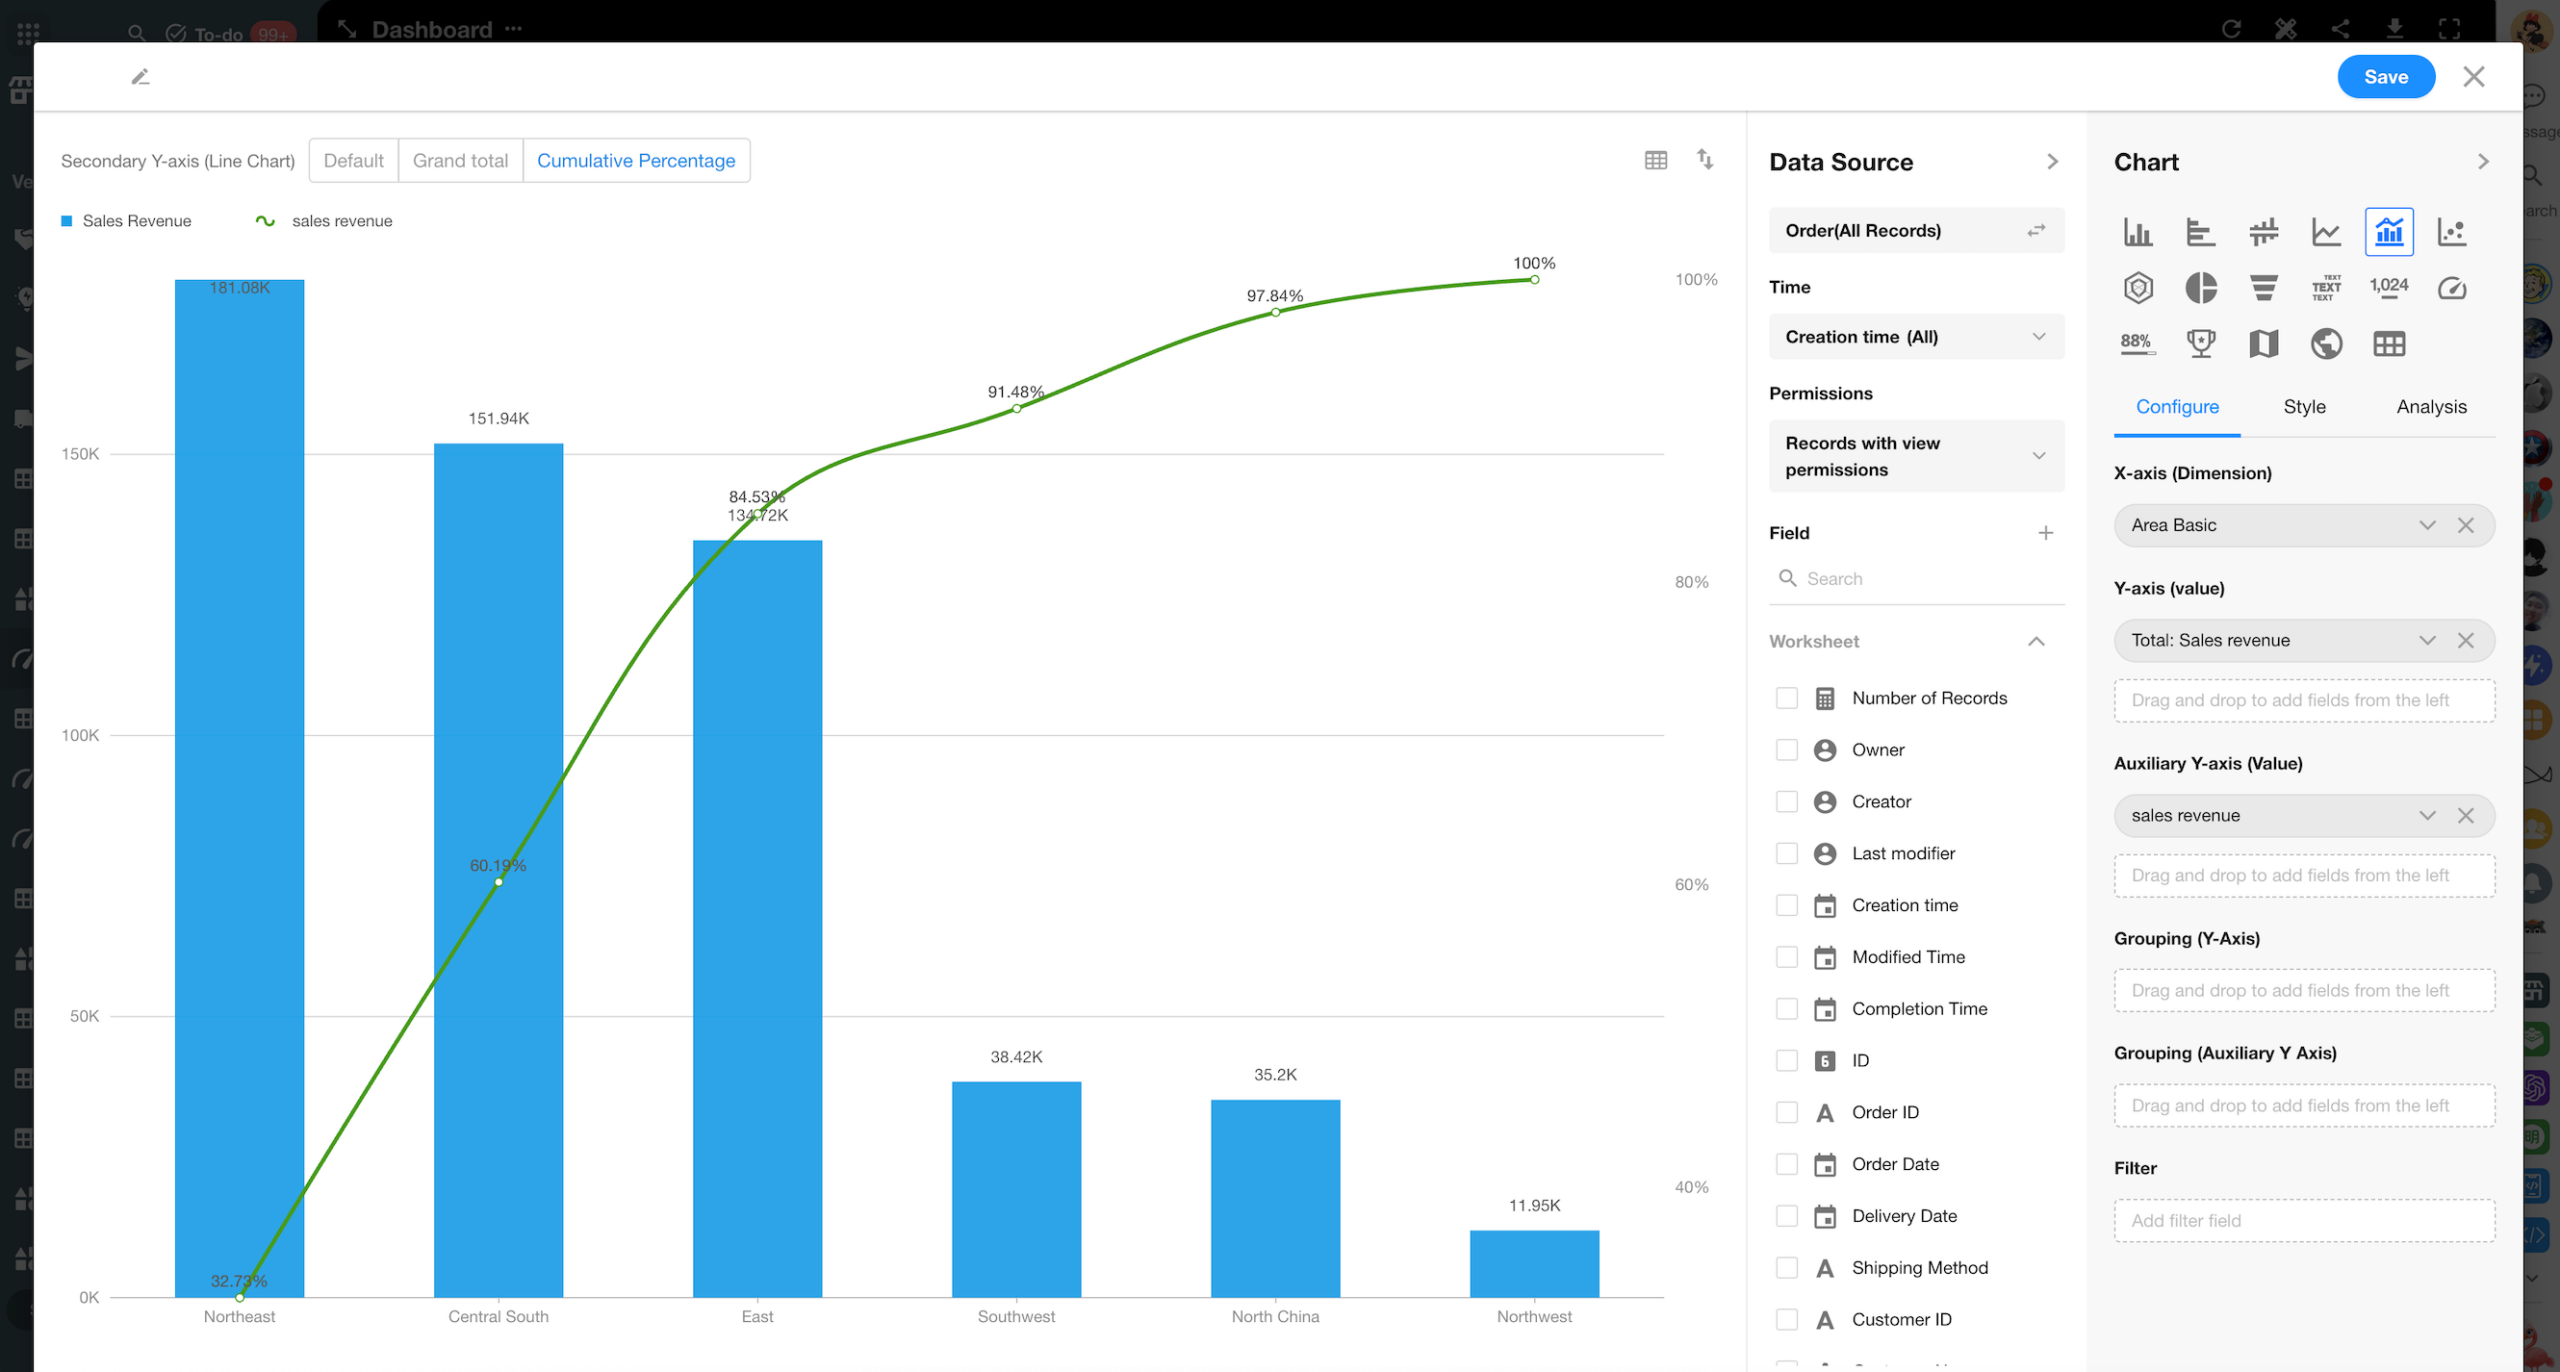
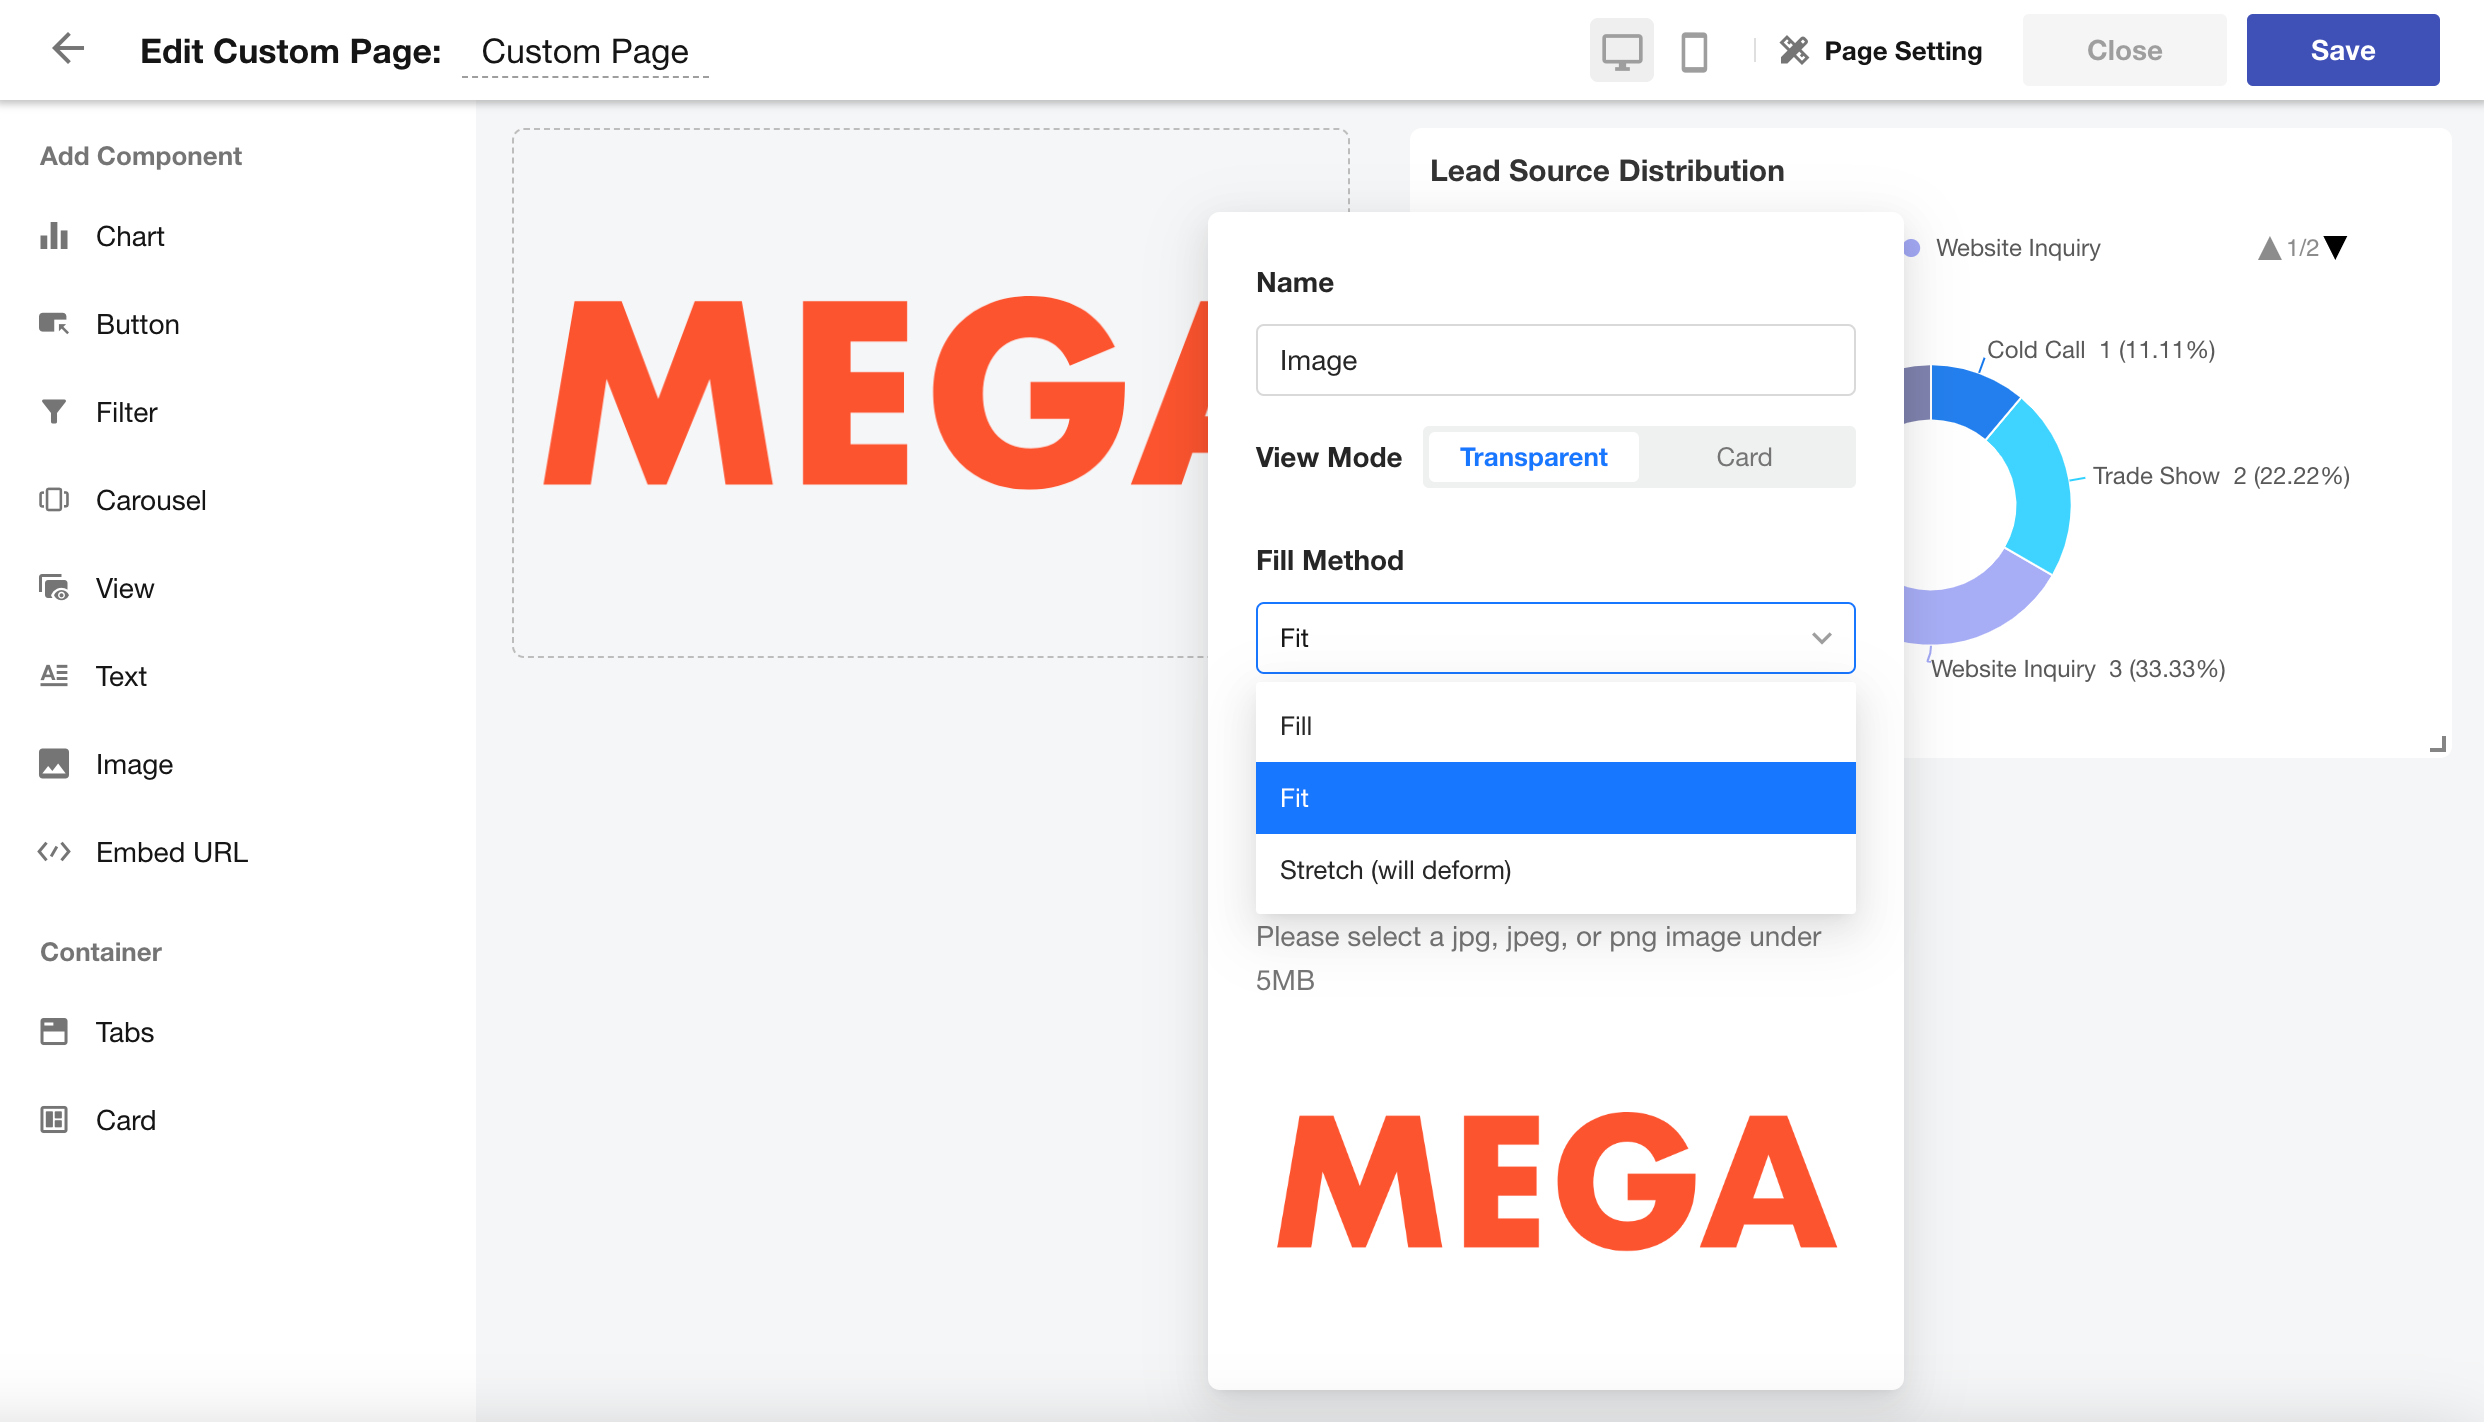
Image Component: New Fill Modes
A new setting has been added to the image component:
Users can now choose different image fill modes to better adapt image display to the layout needs of their dashboards or pages.
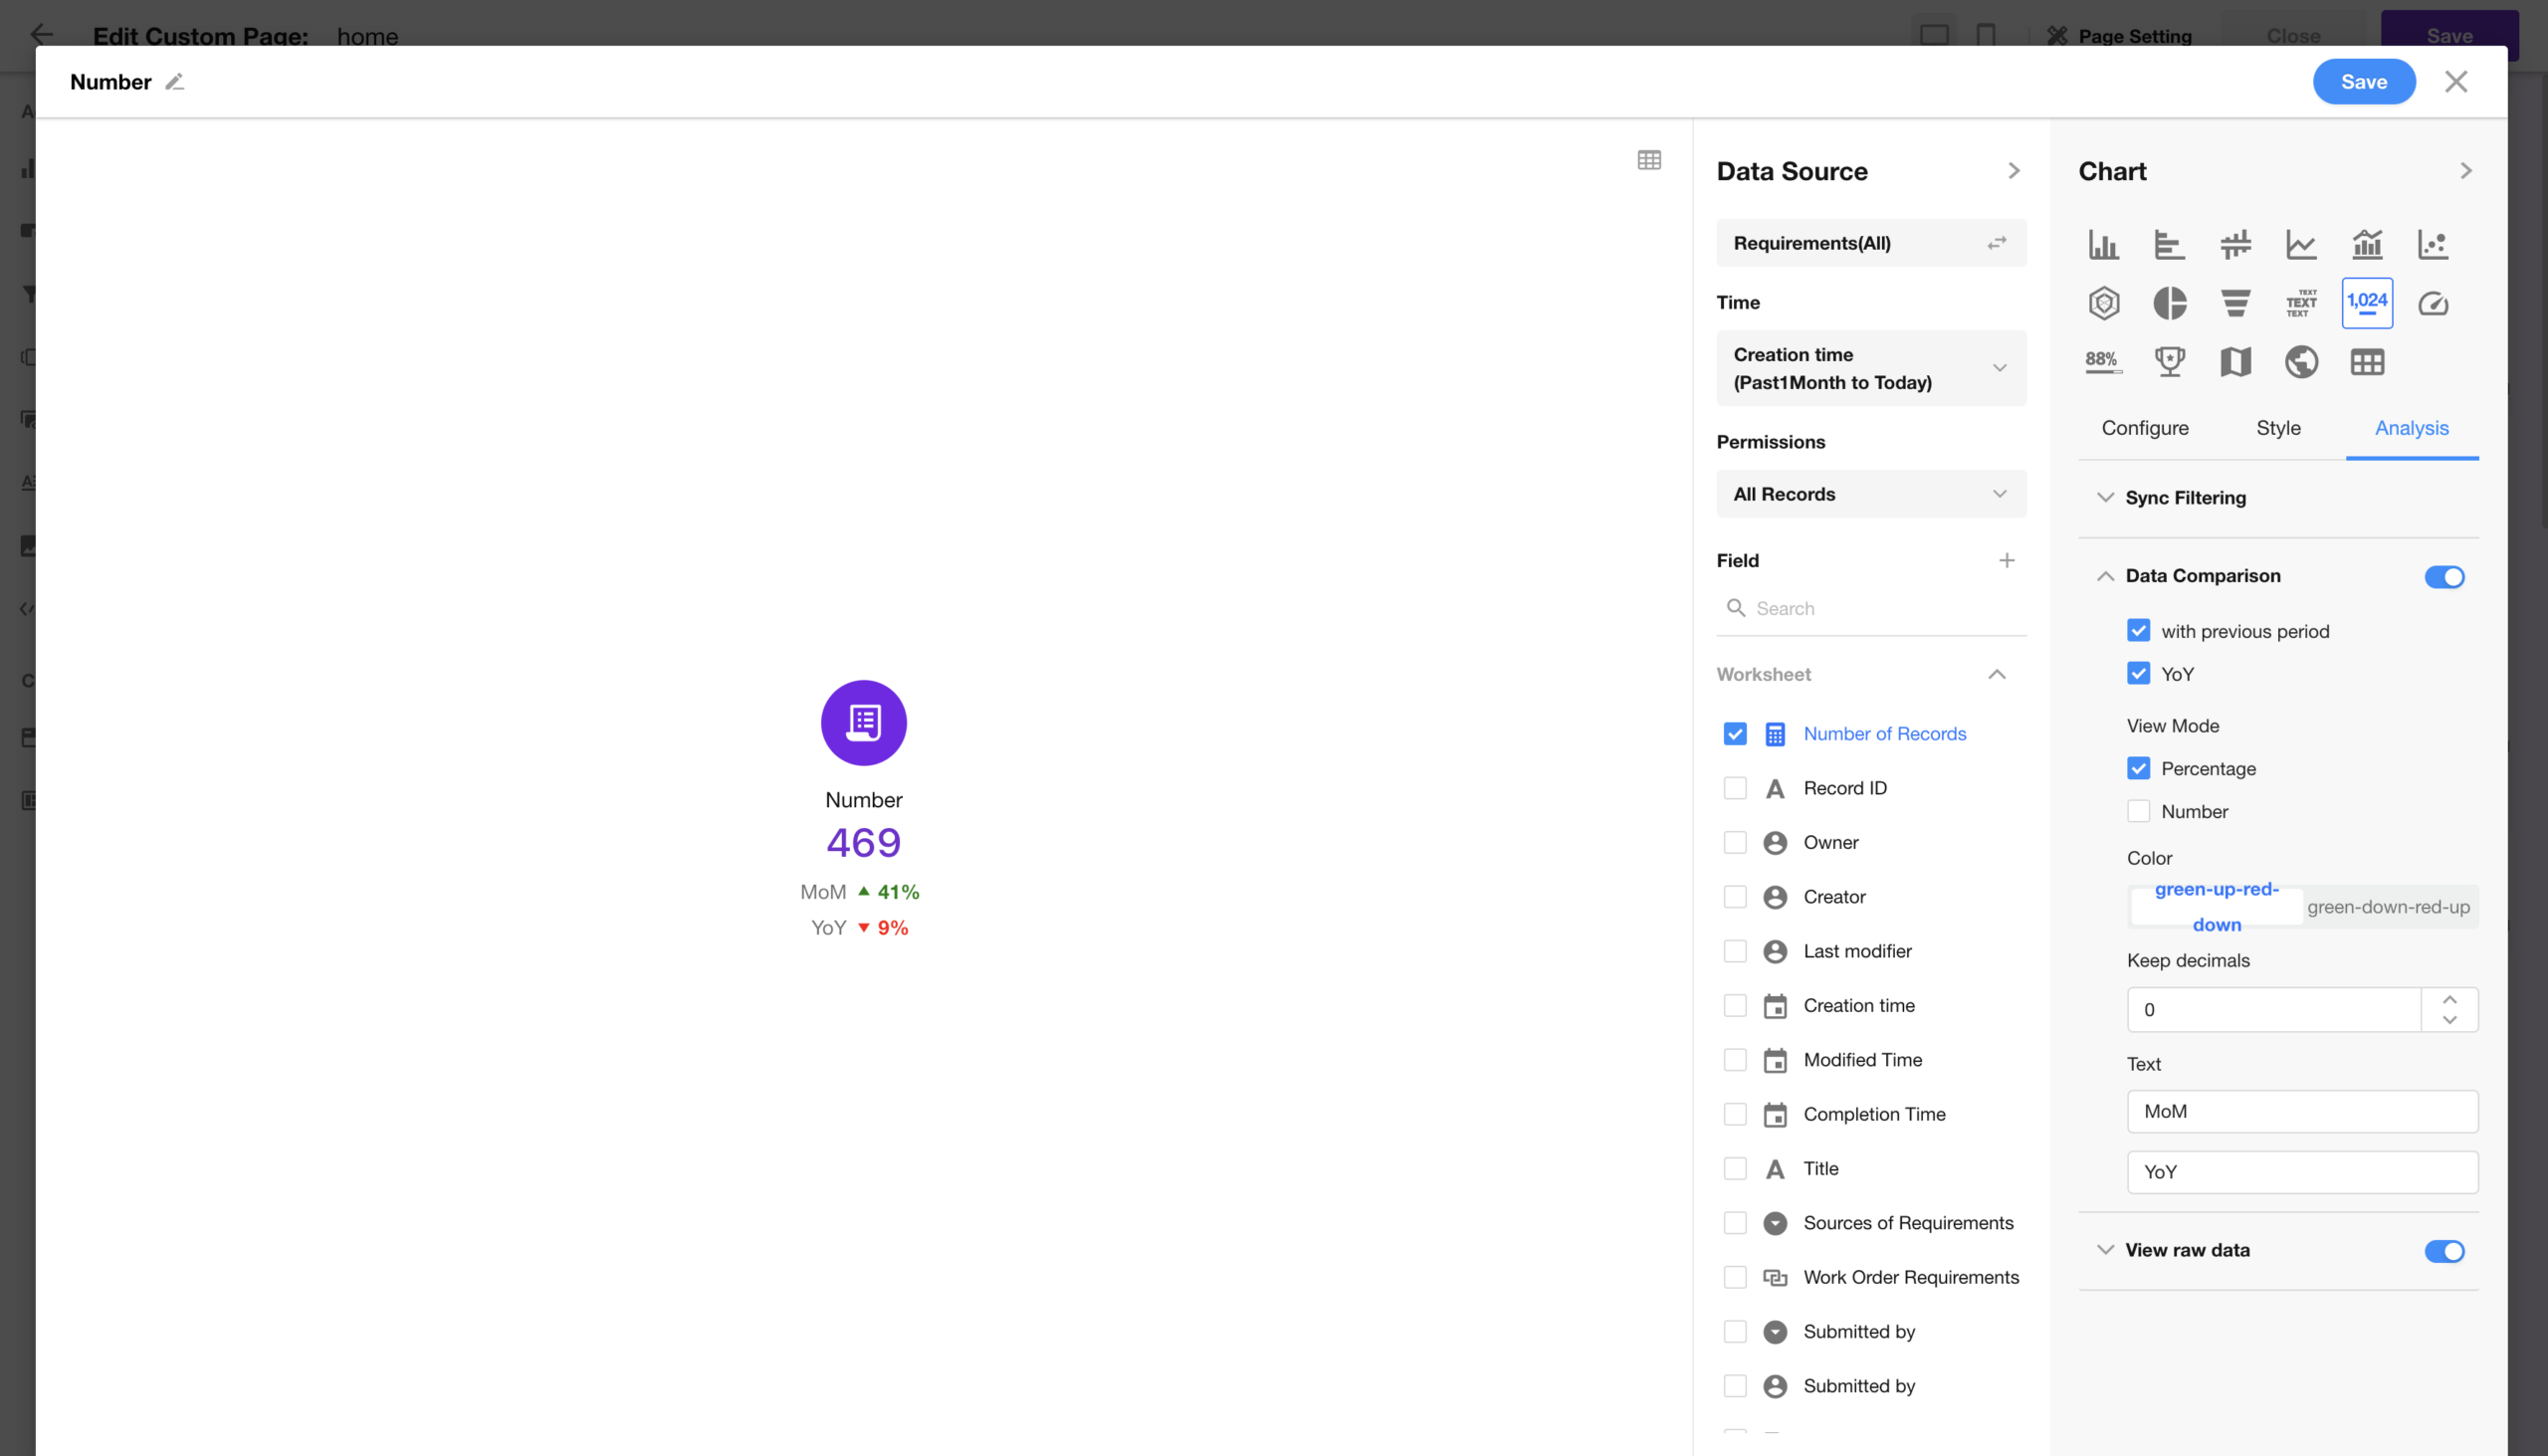
YoY Comparison in Number Chart
For number charts using the time range “Past N periods up to today”, a new feature now supports year-over-year (YoY) comparison.
This allows users to more clearly see changes in key metrics over equivalent time periods—enhancing data interpretation and trend analysis.
Workflow
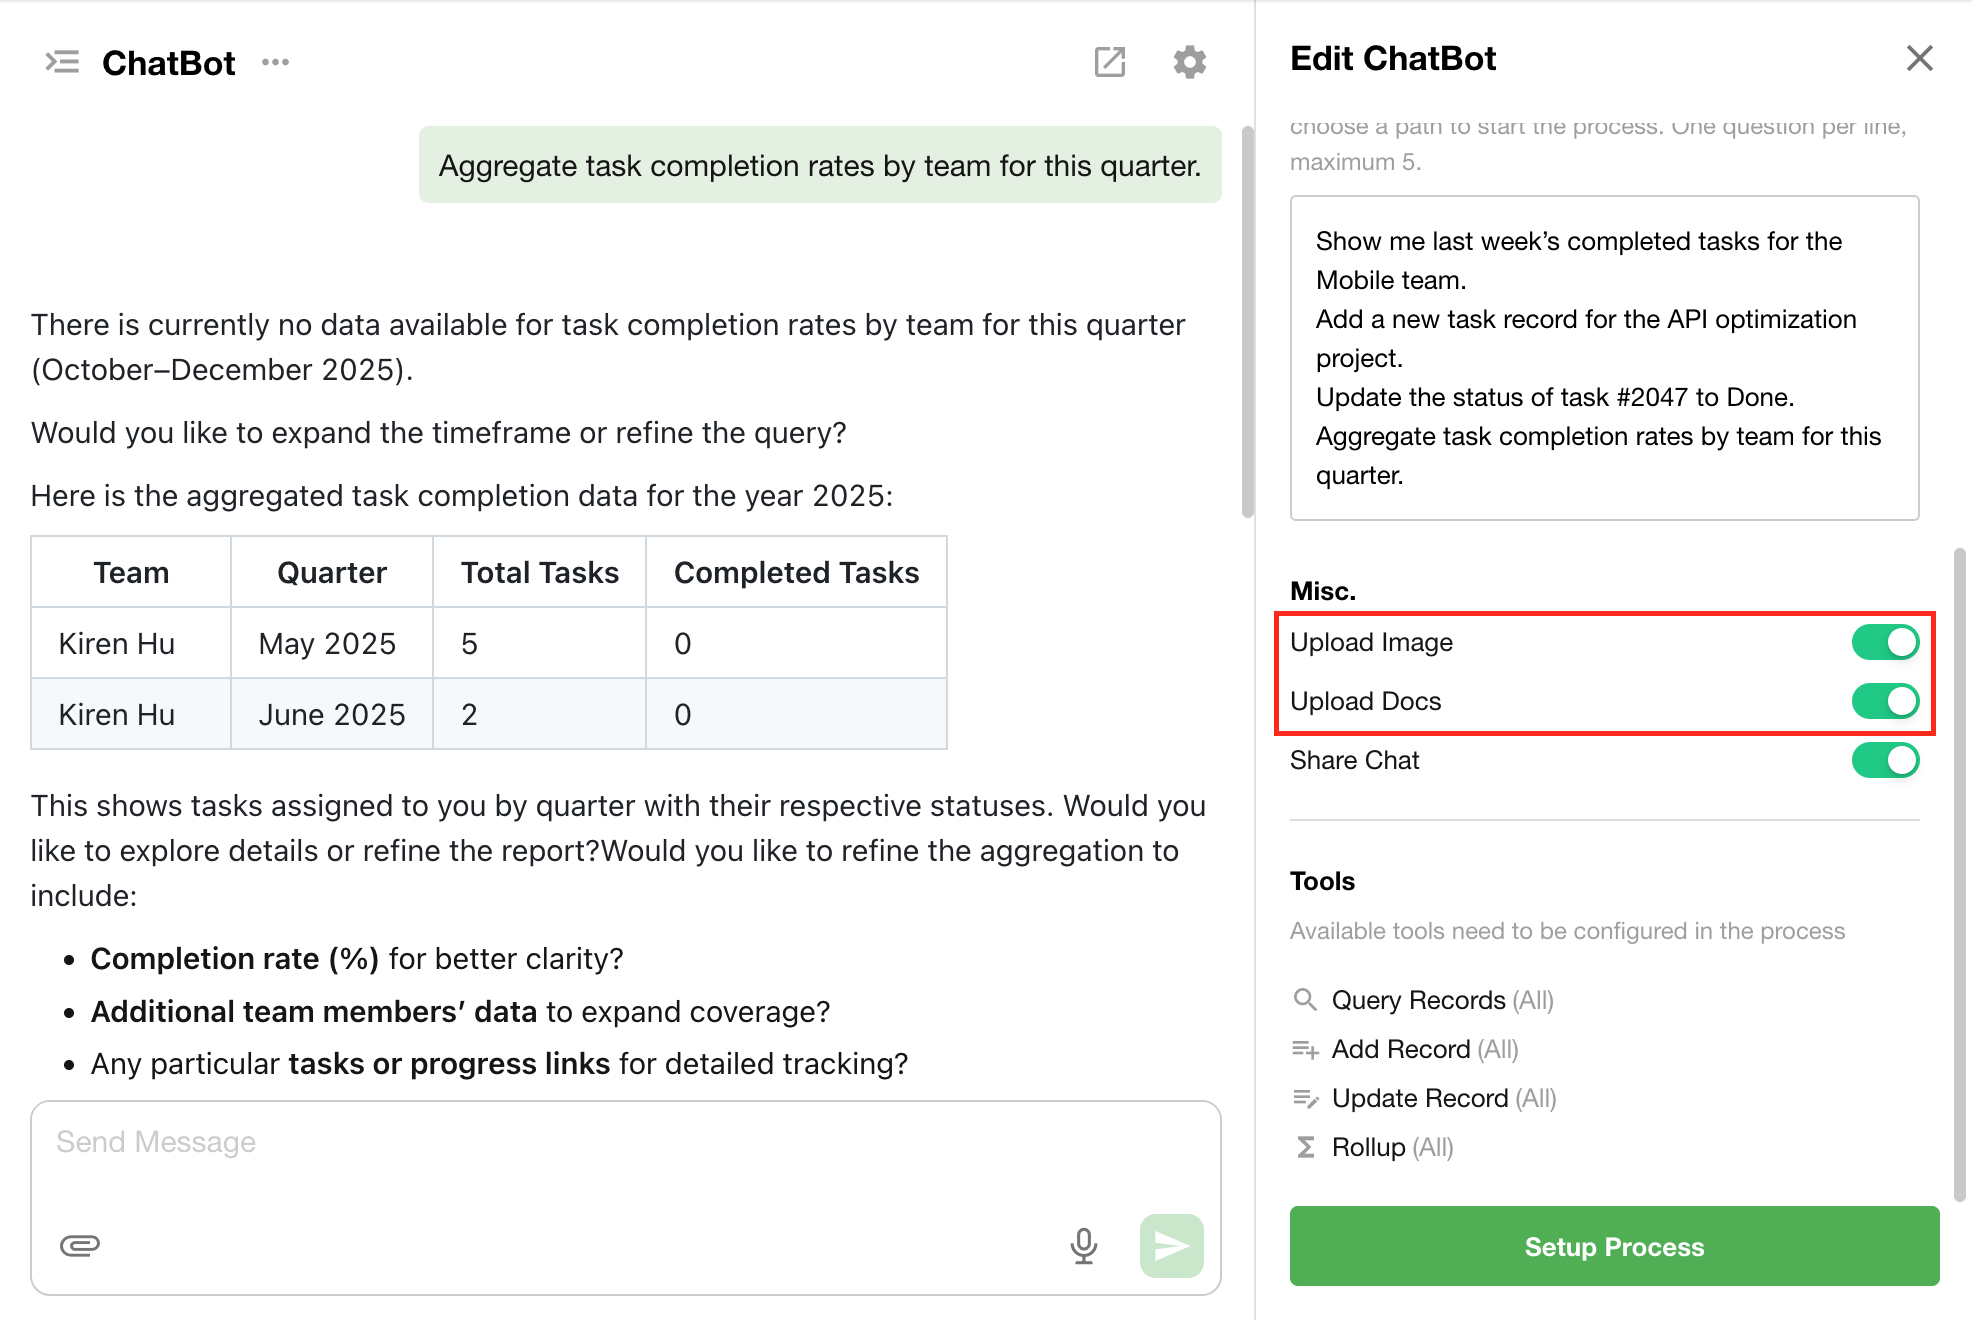
AI Agent Node: Attachment Upload Configuration
The attachment parsing service in the AI Agent node is now free of charge.
In the ChatBot configuration page, the previous setting “Upload Attachment” has been split into two separate toggles:
- Upload Image
- Upload Document
This allows for more granular control over the types of files users can upload during conversations.
Searchable Options in Node Configuration
The option-type fields within node configuration panels now support search functionality, making it easier to locate and select values, especially in long lists.
External User Information Can Be Added to the “User ID” System Field
In workflows, external user information can now be written to the system-level “User ID” field. This enhancement supports business scenarios where linking external users to internal system records is required.
Organization Management
Organization Account Balance Updated to Credits
The organization account balance has been fully upgraded to use credits.
- Historical balances are automatically converted at a 1:1 ratio
- All previous references to “account balance” are now displayed as “credits”, including deductions and usage
- Future recharges will also follow a 1:1 conversion rate to credits
- All auto-billing features now display and deduct charges in credits
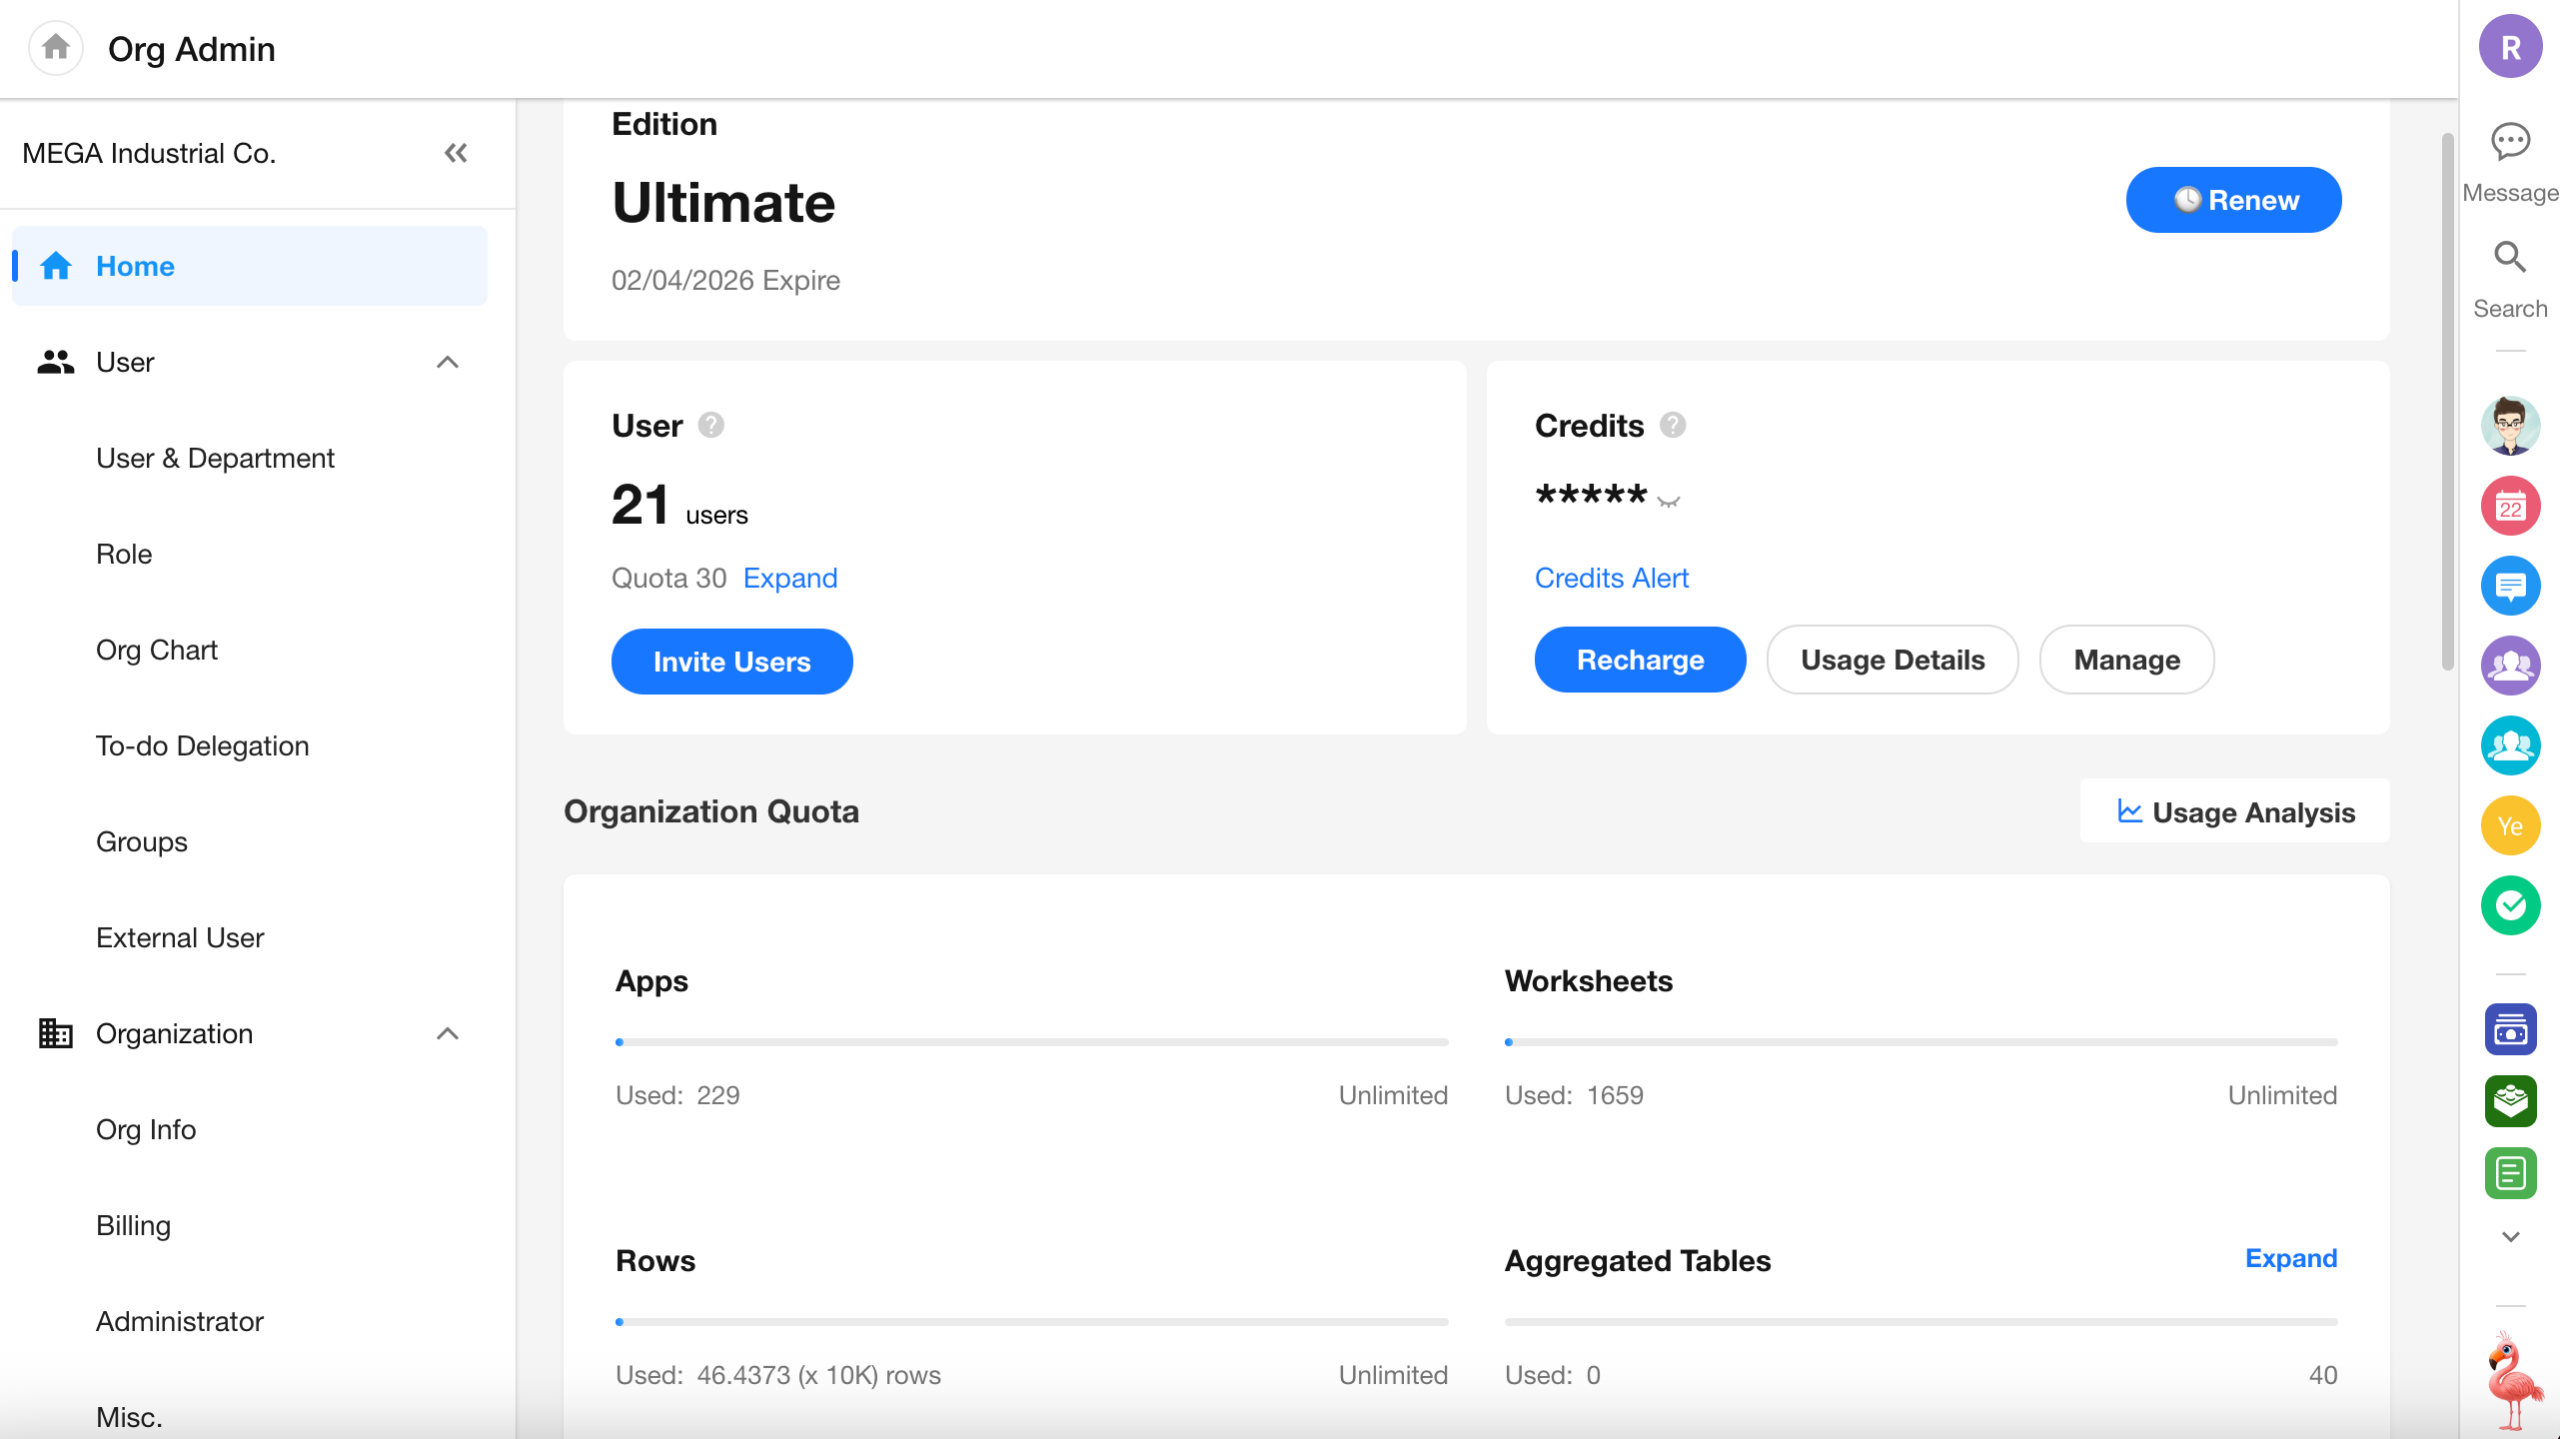
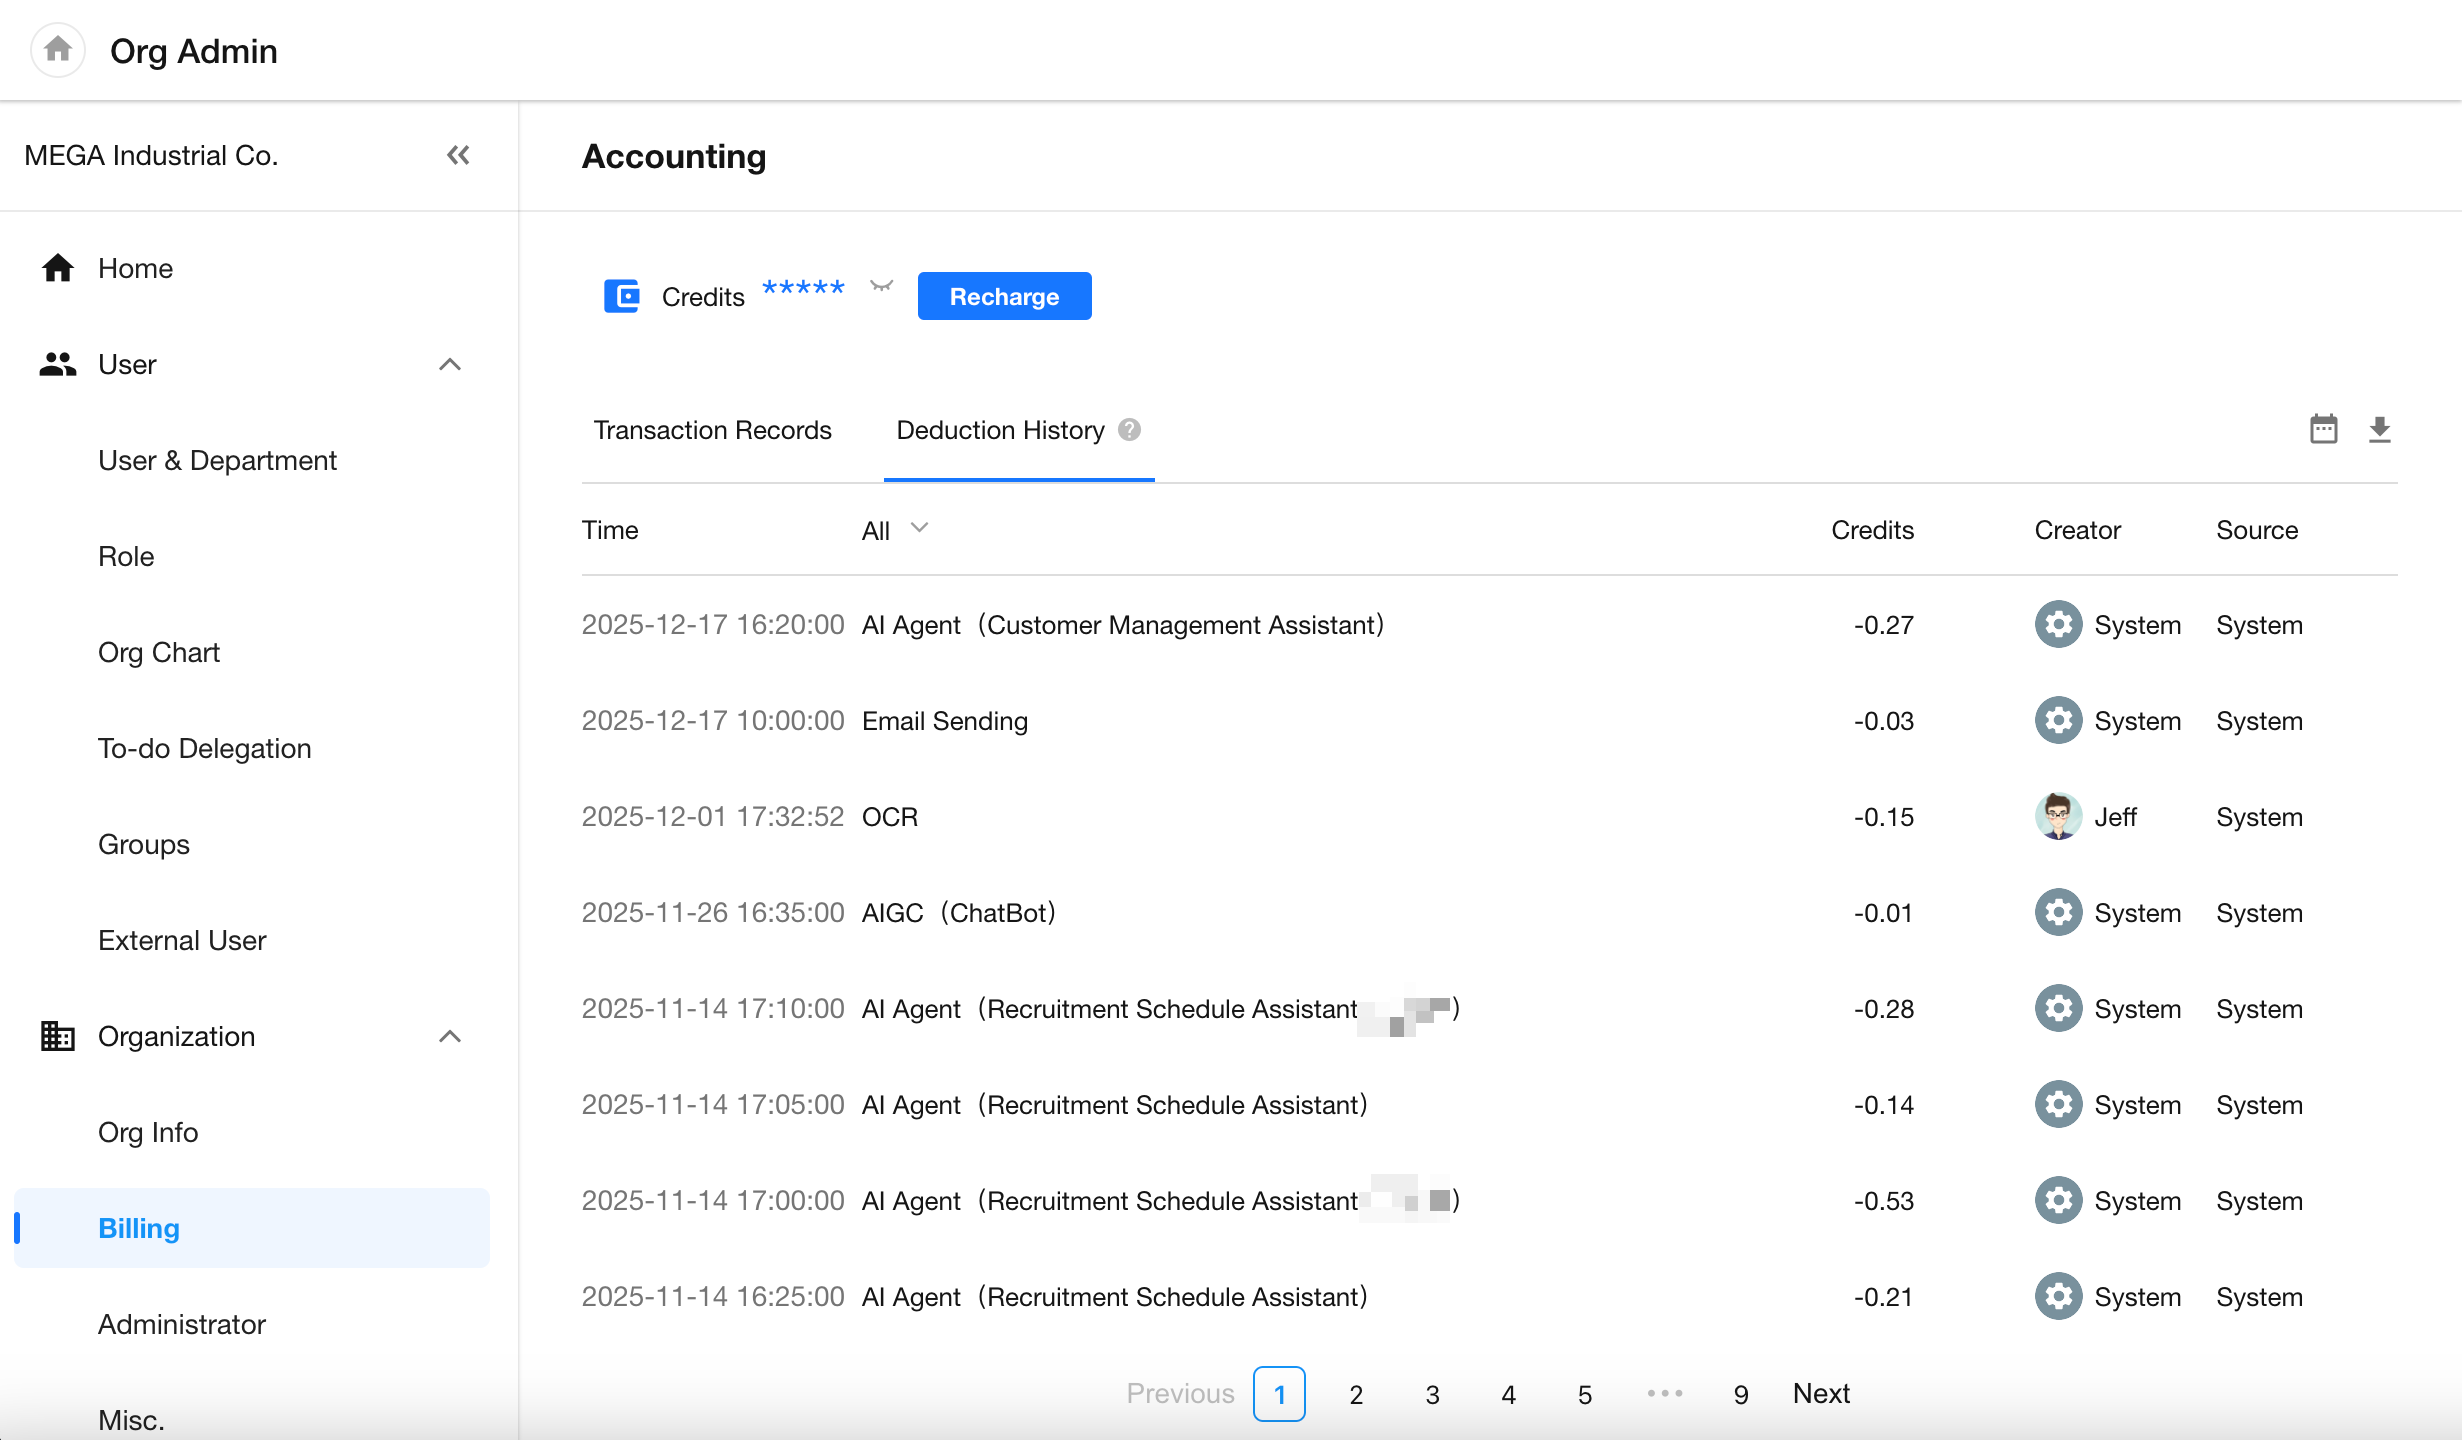
The billing page has been updated to show all deduction records in credits as well.
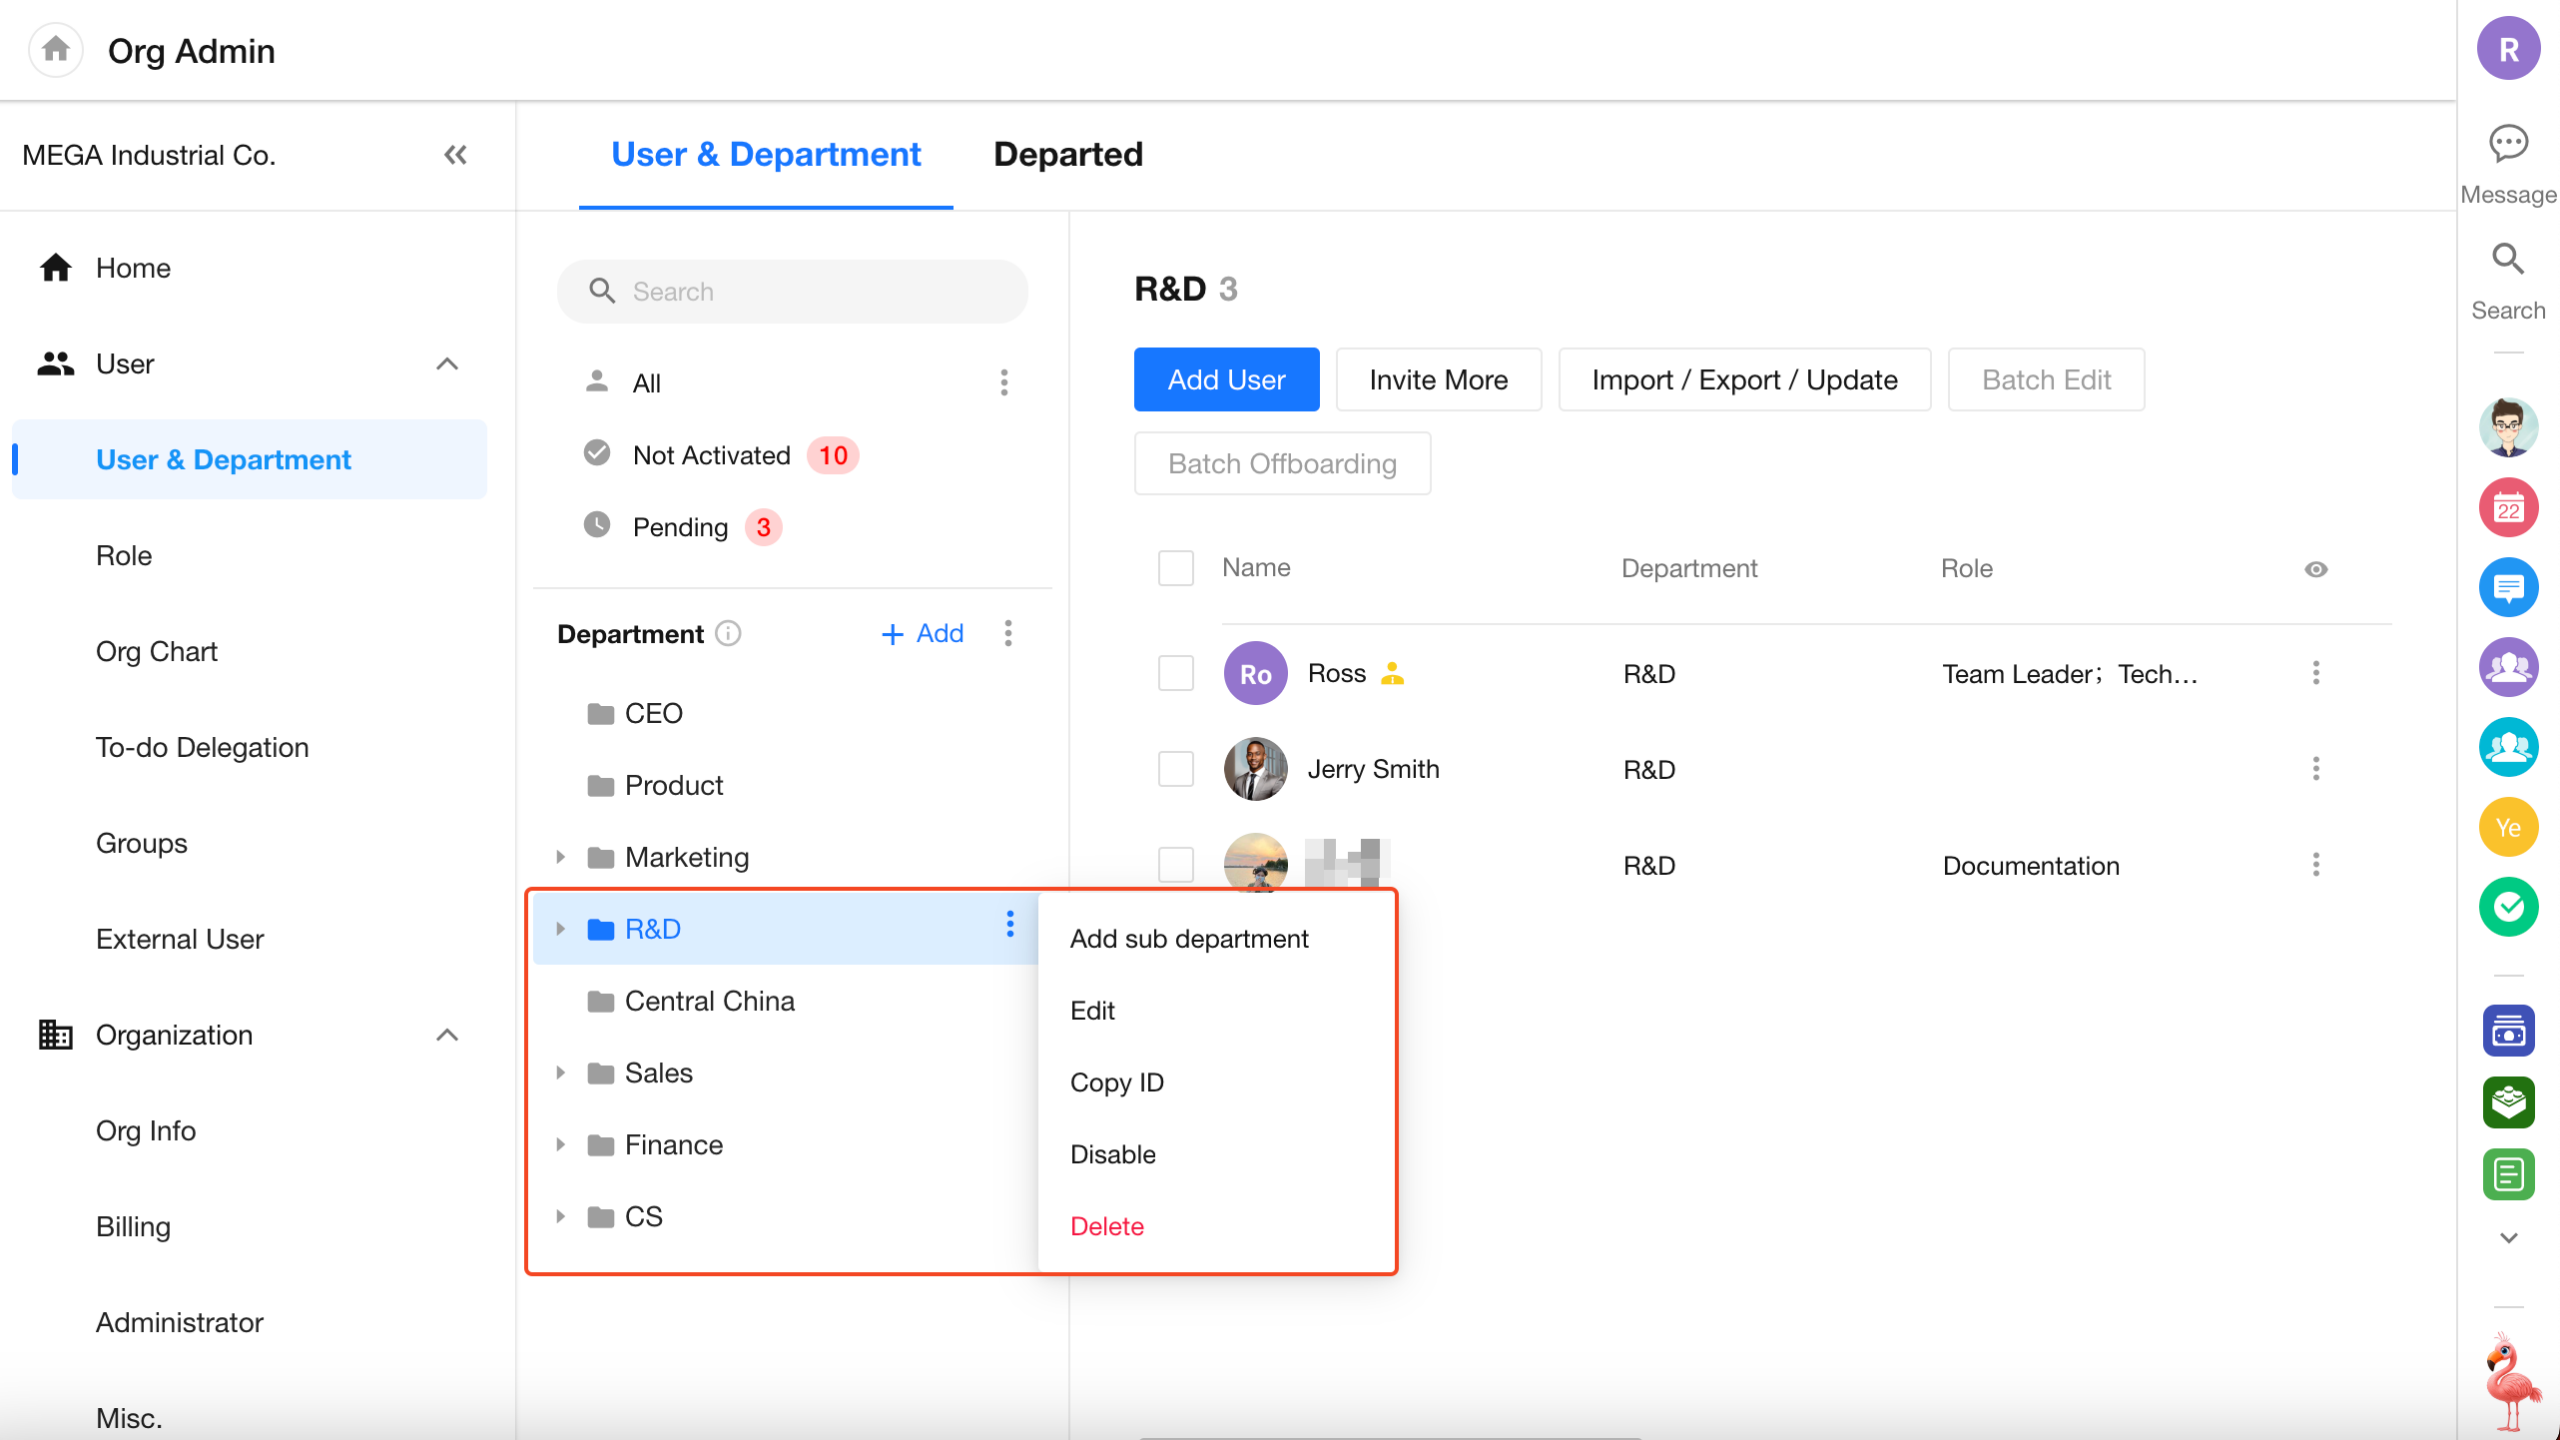
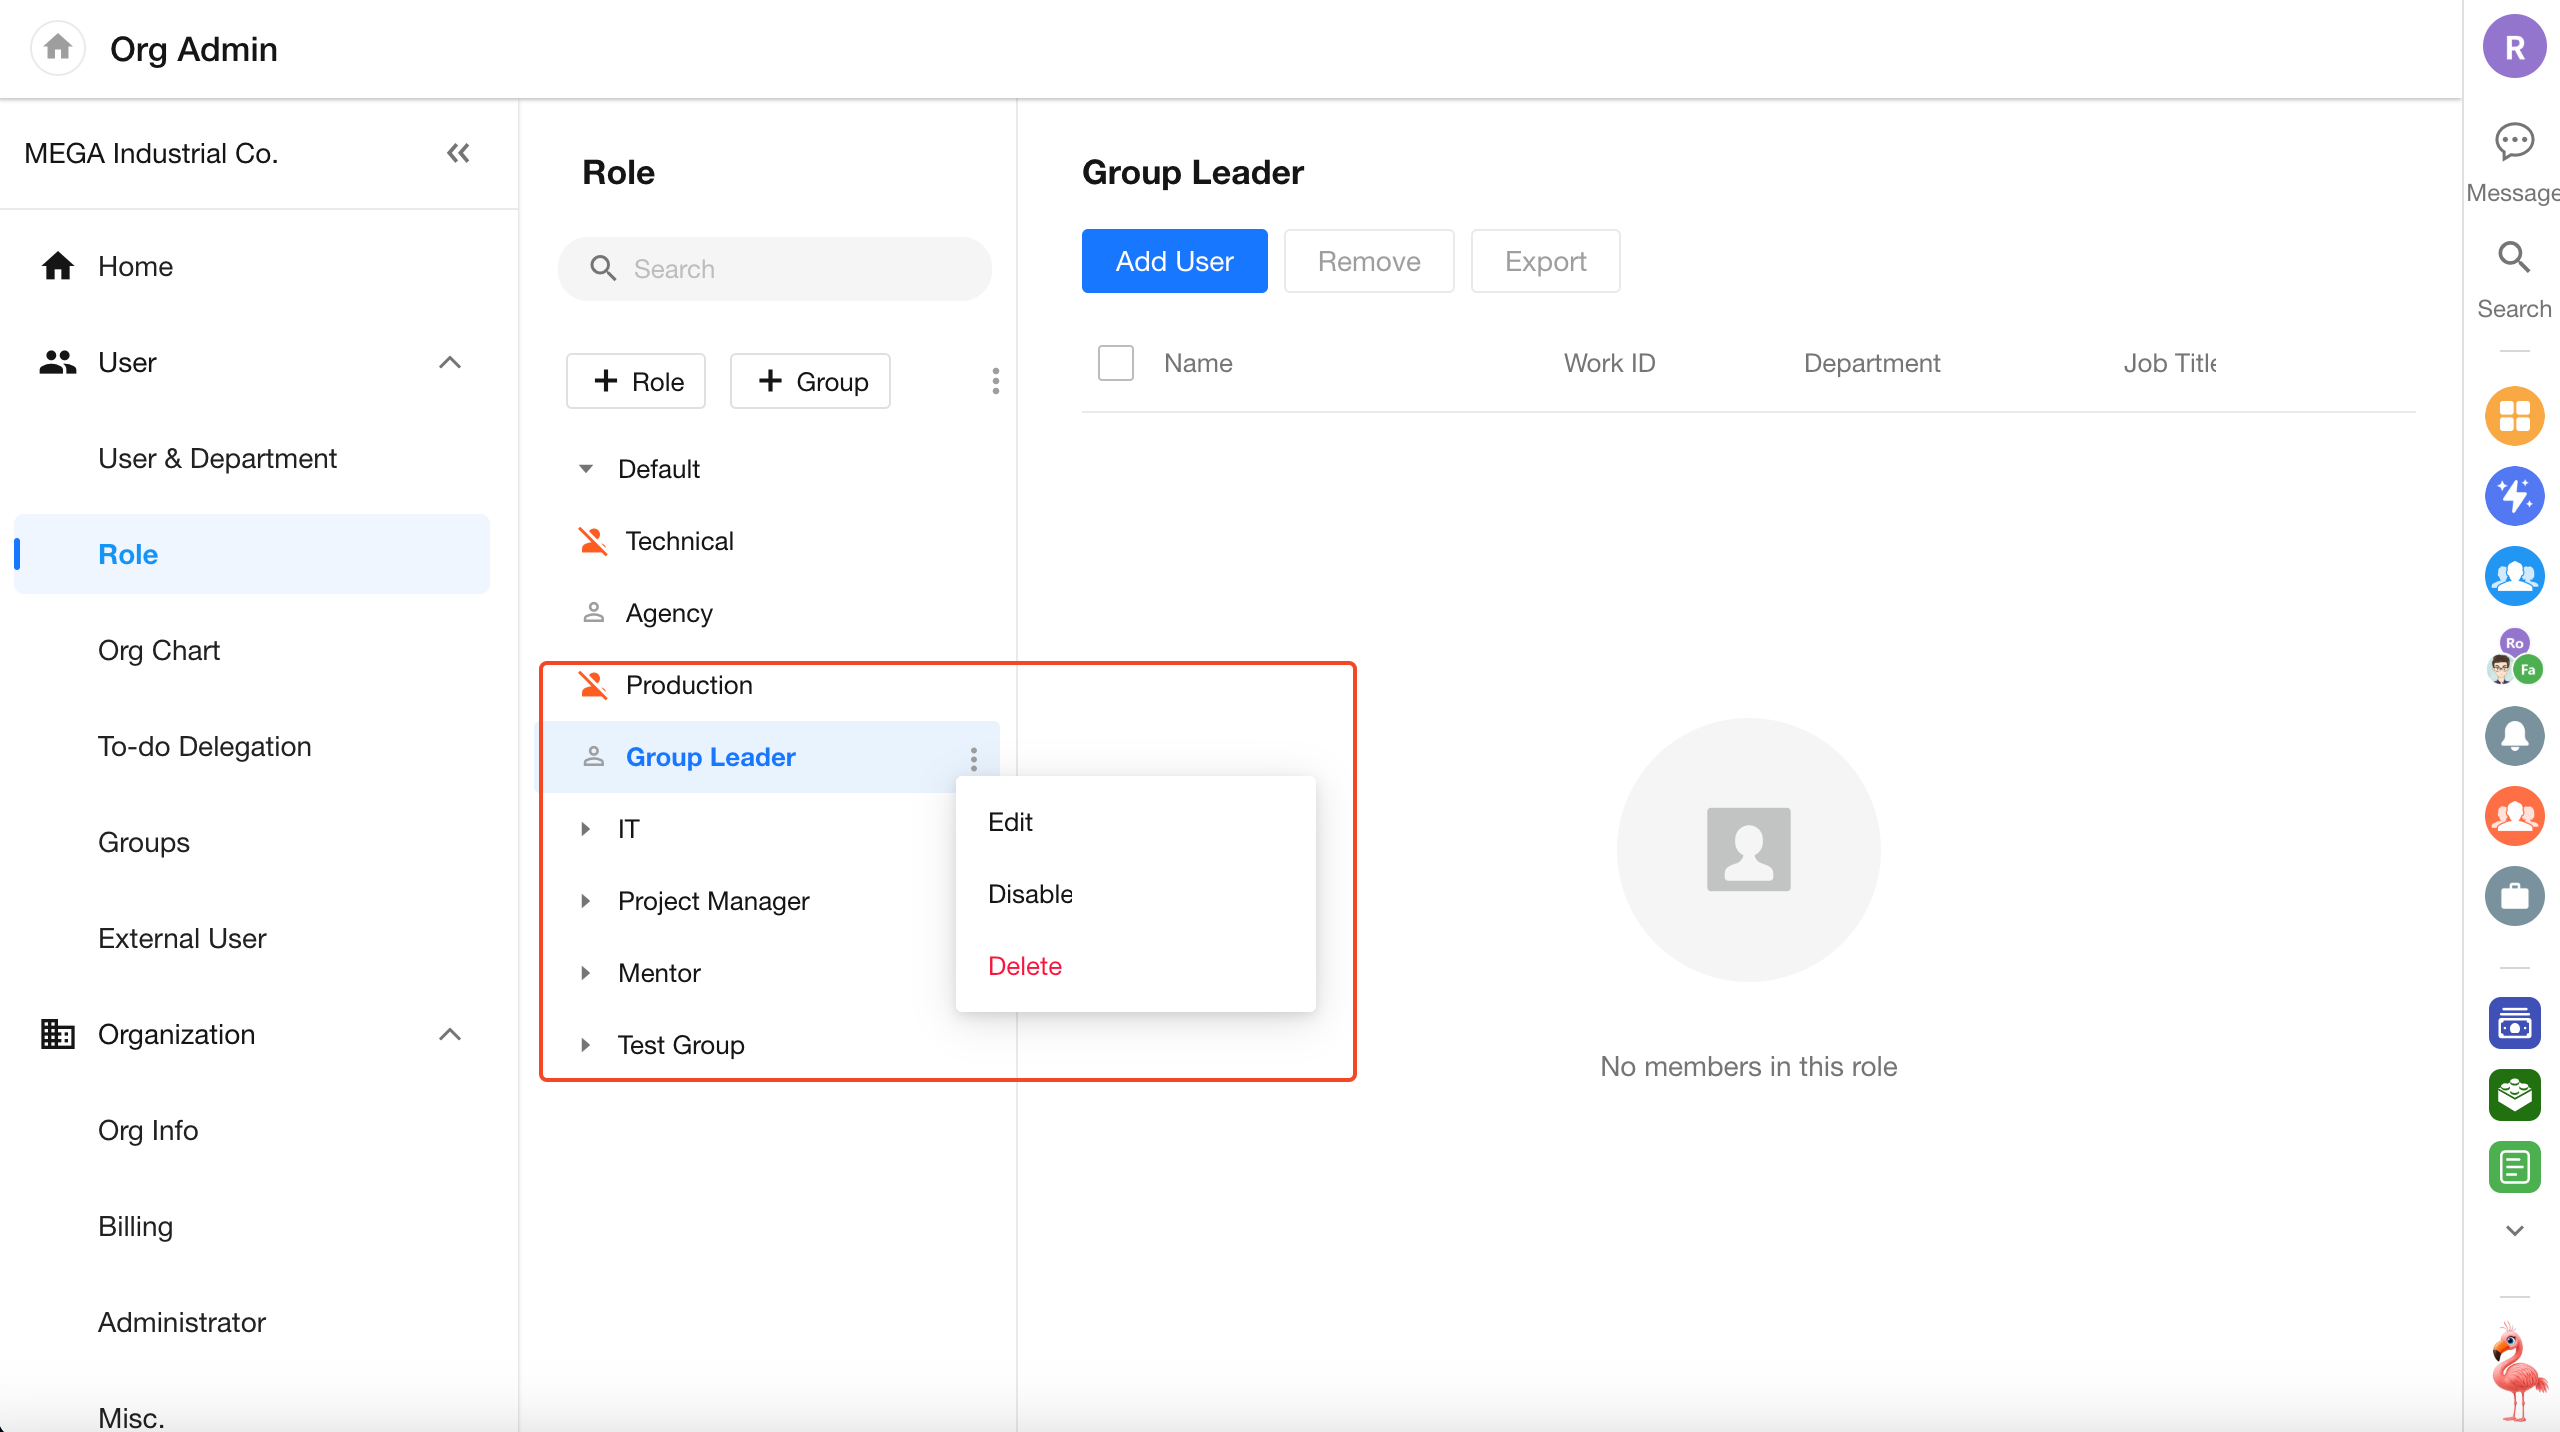
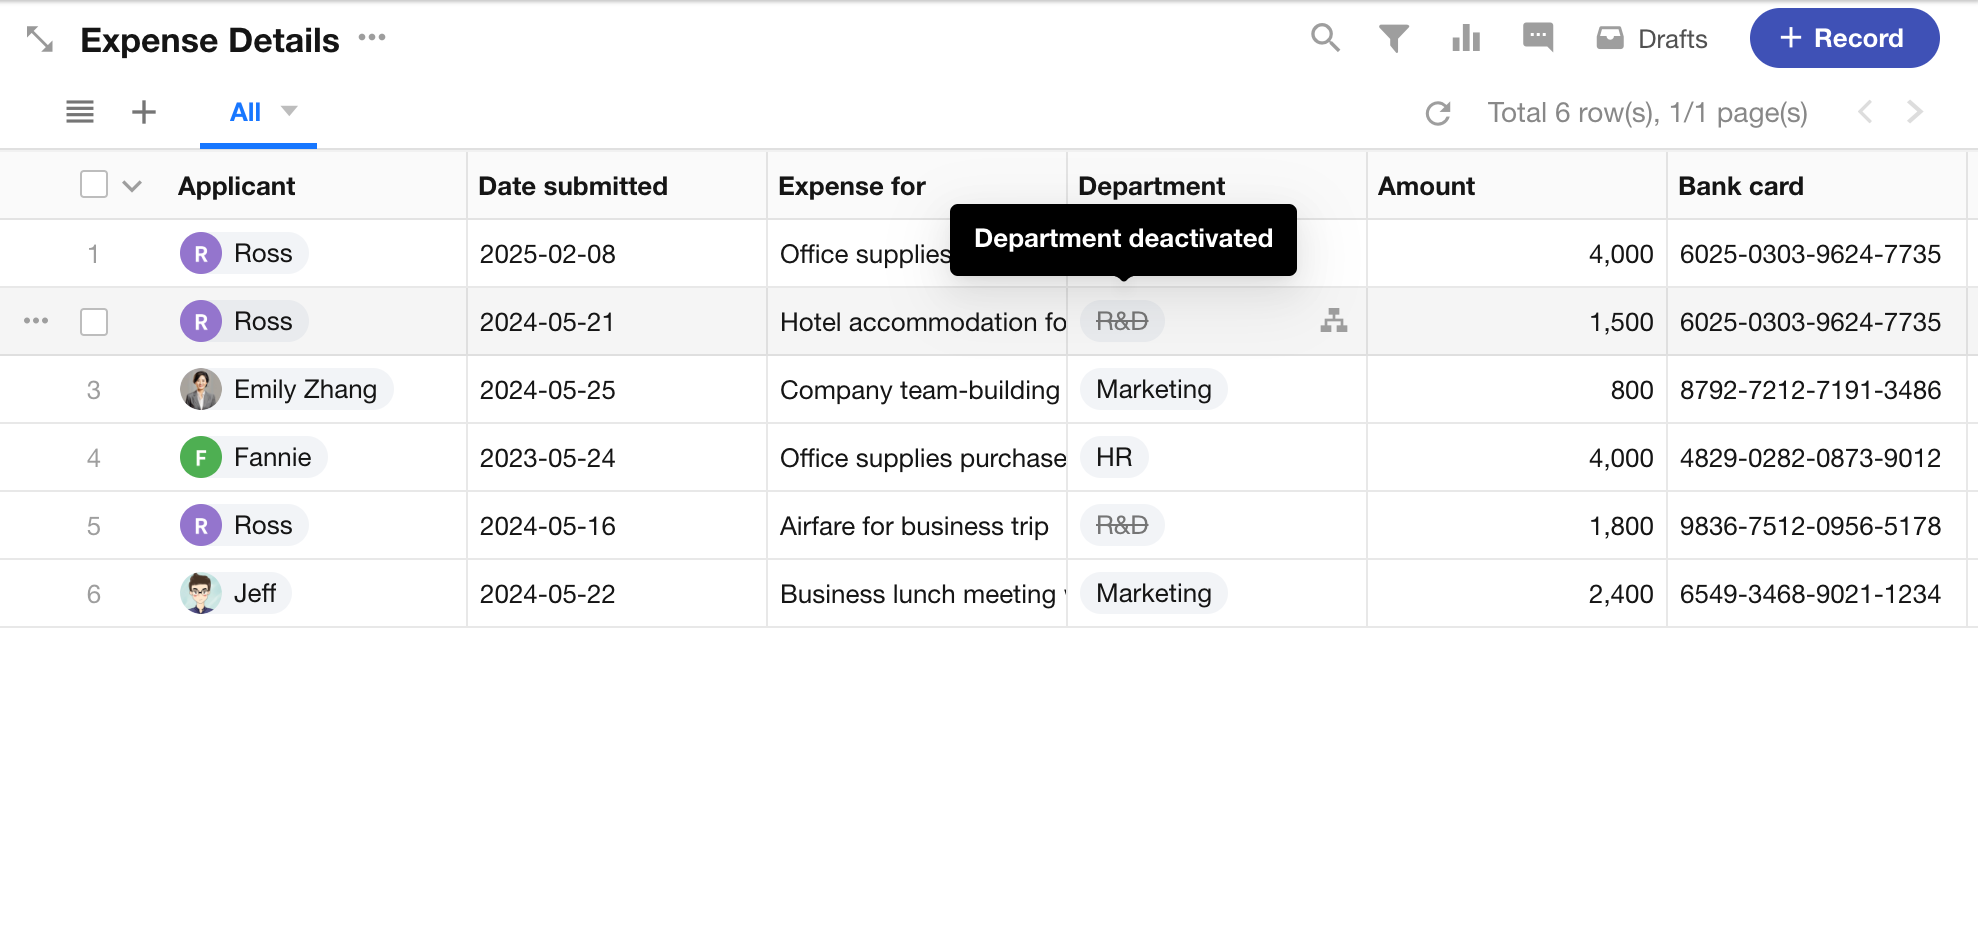
Support for Disabling Departments and Organization Roles
In the Organization Admin Console, admins can now set departments and organization roles to a disabled status.
- Disabled departments and roles are hidden from the Contacts list and selector components, and are marked as “disabled” in worksheet records
- Organization admins can continue to manage members under disabled departments or roles
- Admins can choose whether to display or hide disabled departments/roles in the admin console
- Disabled departments or roles can be re-enabled at any time

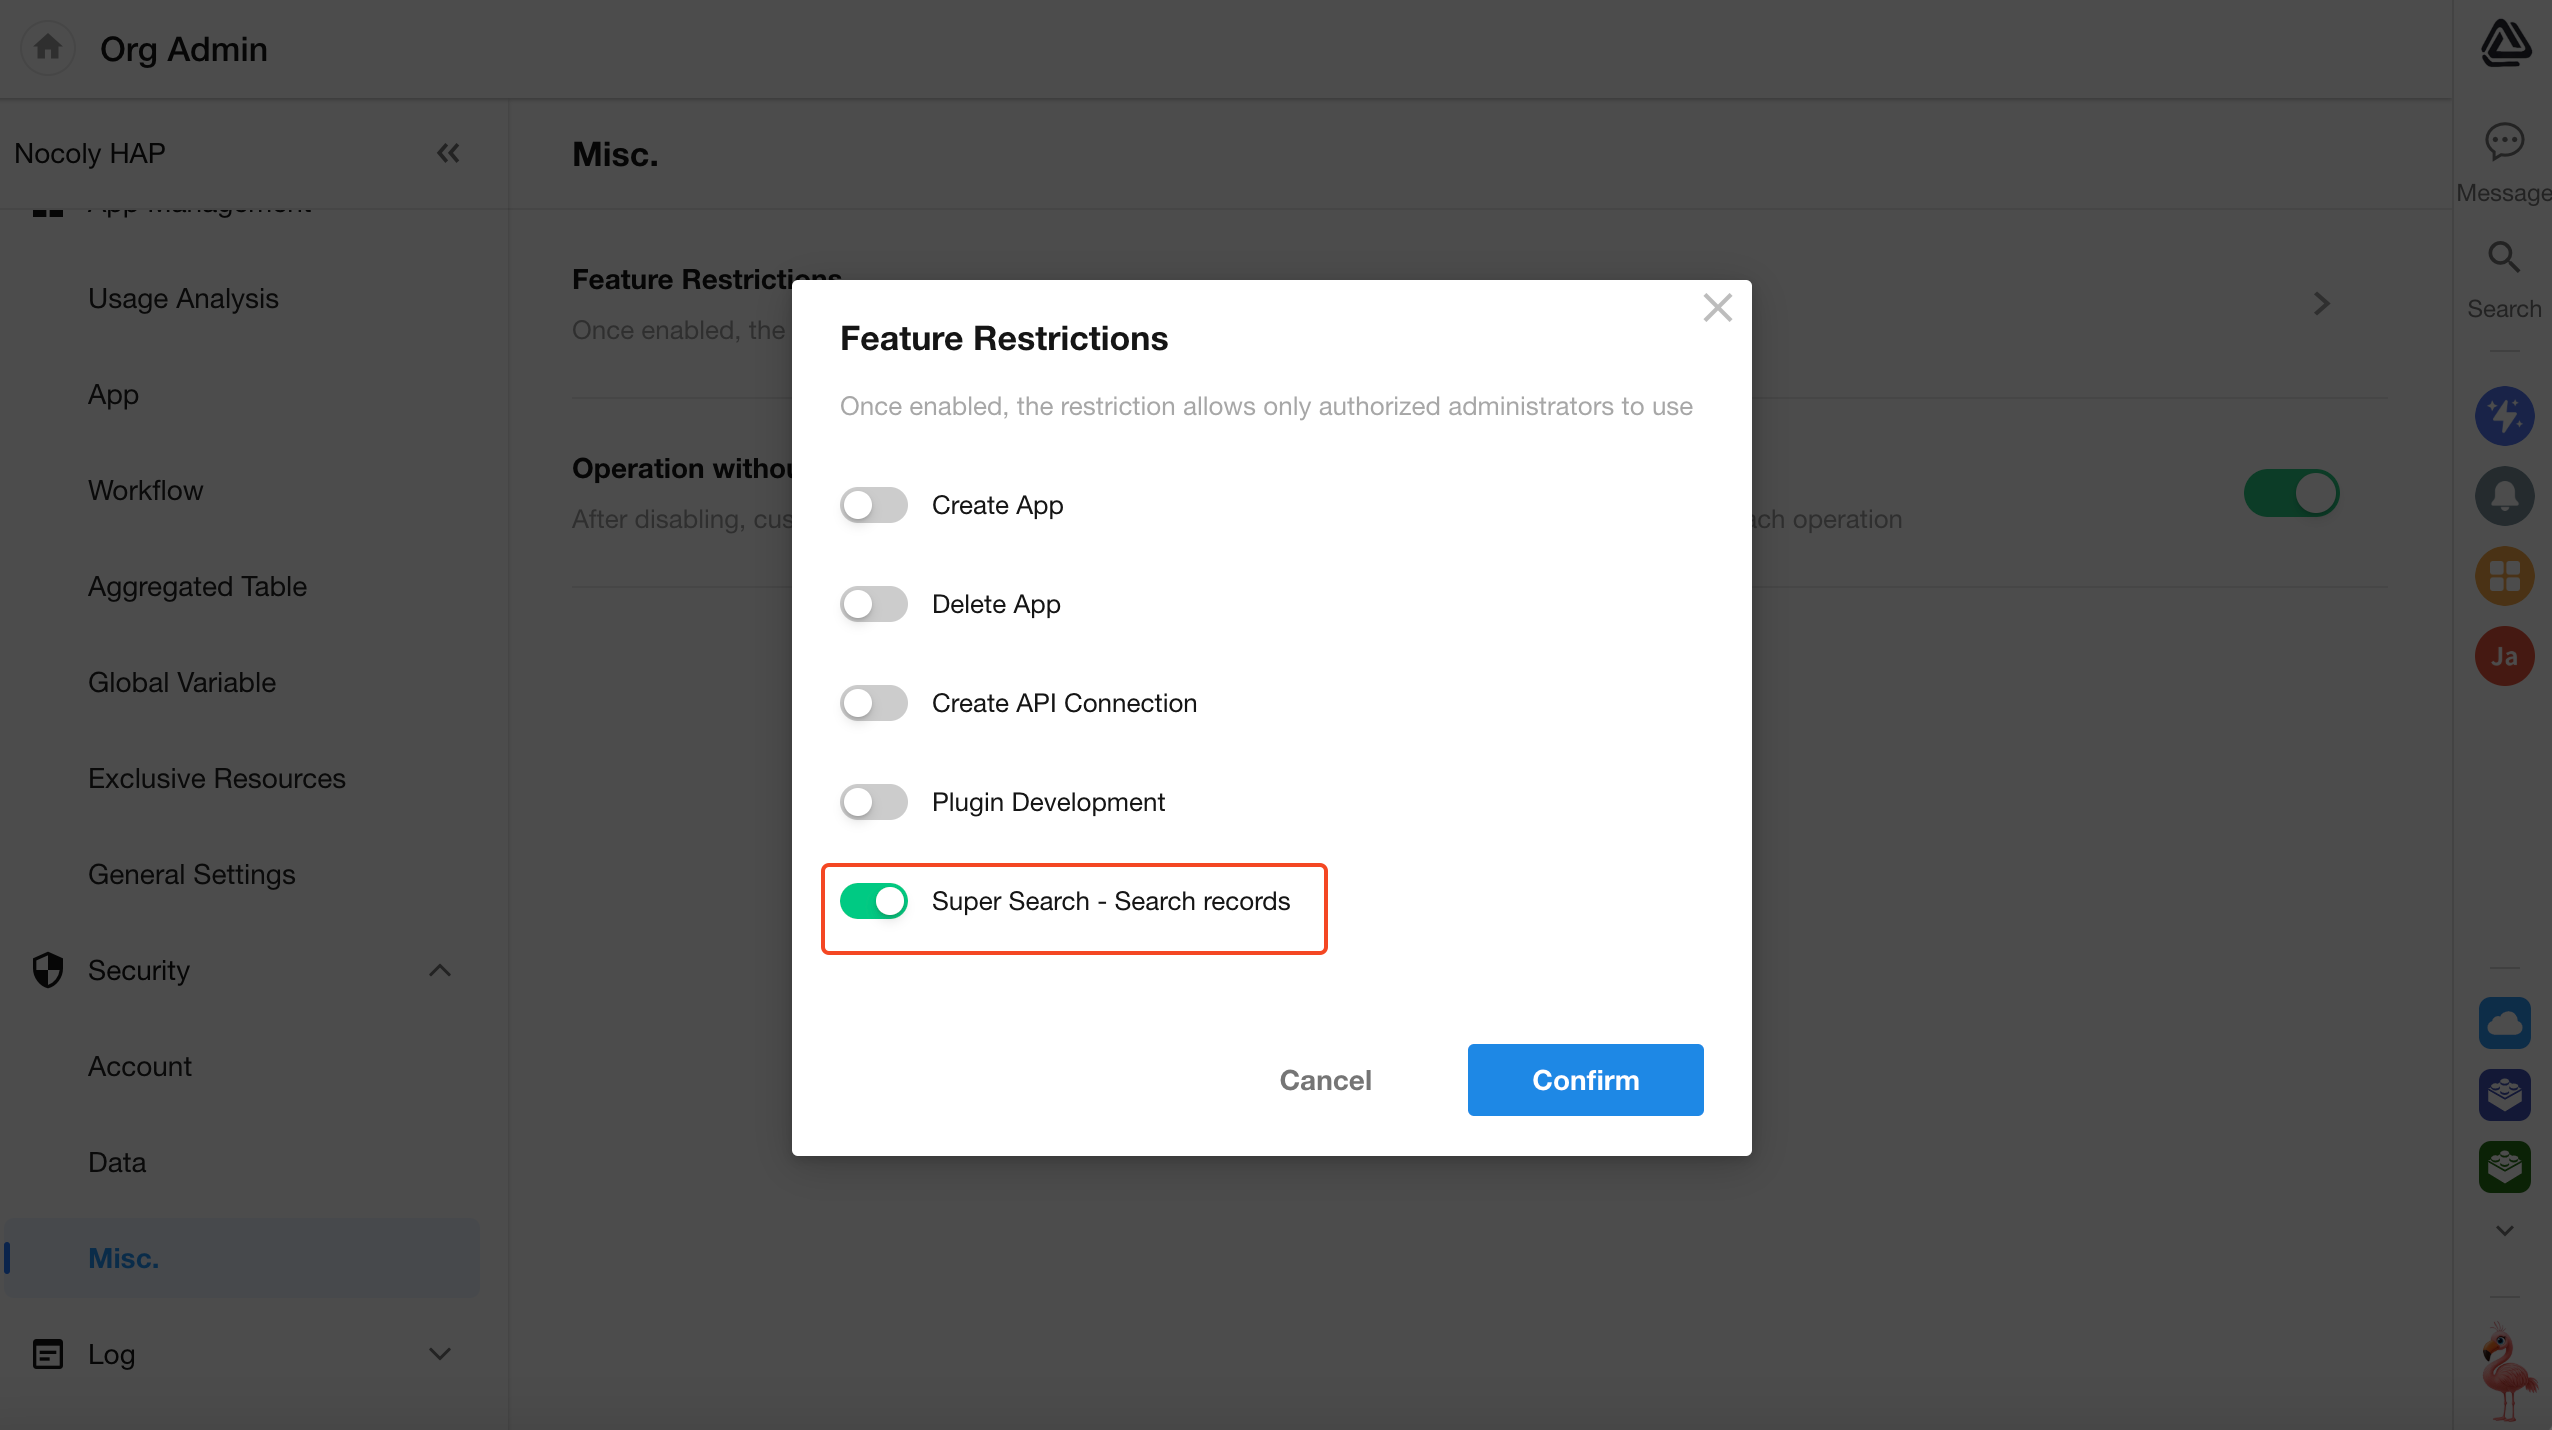
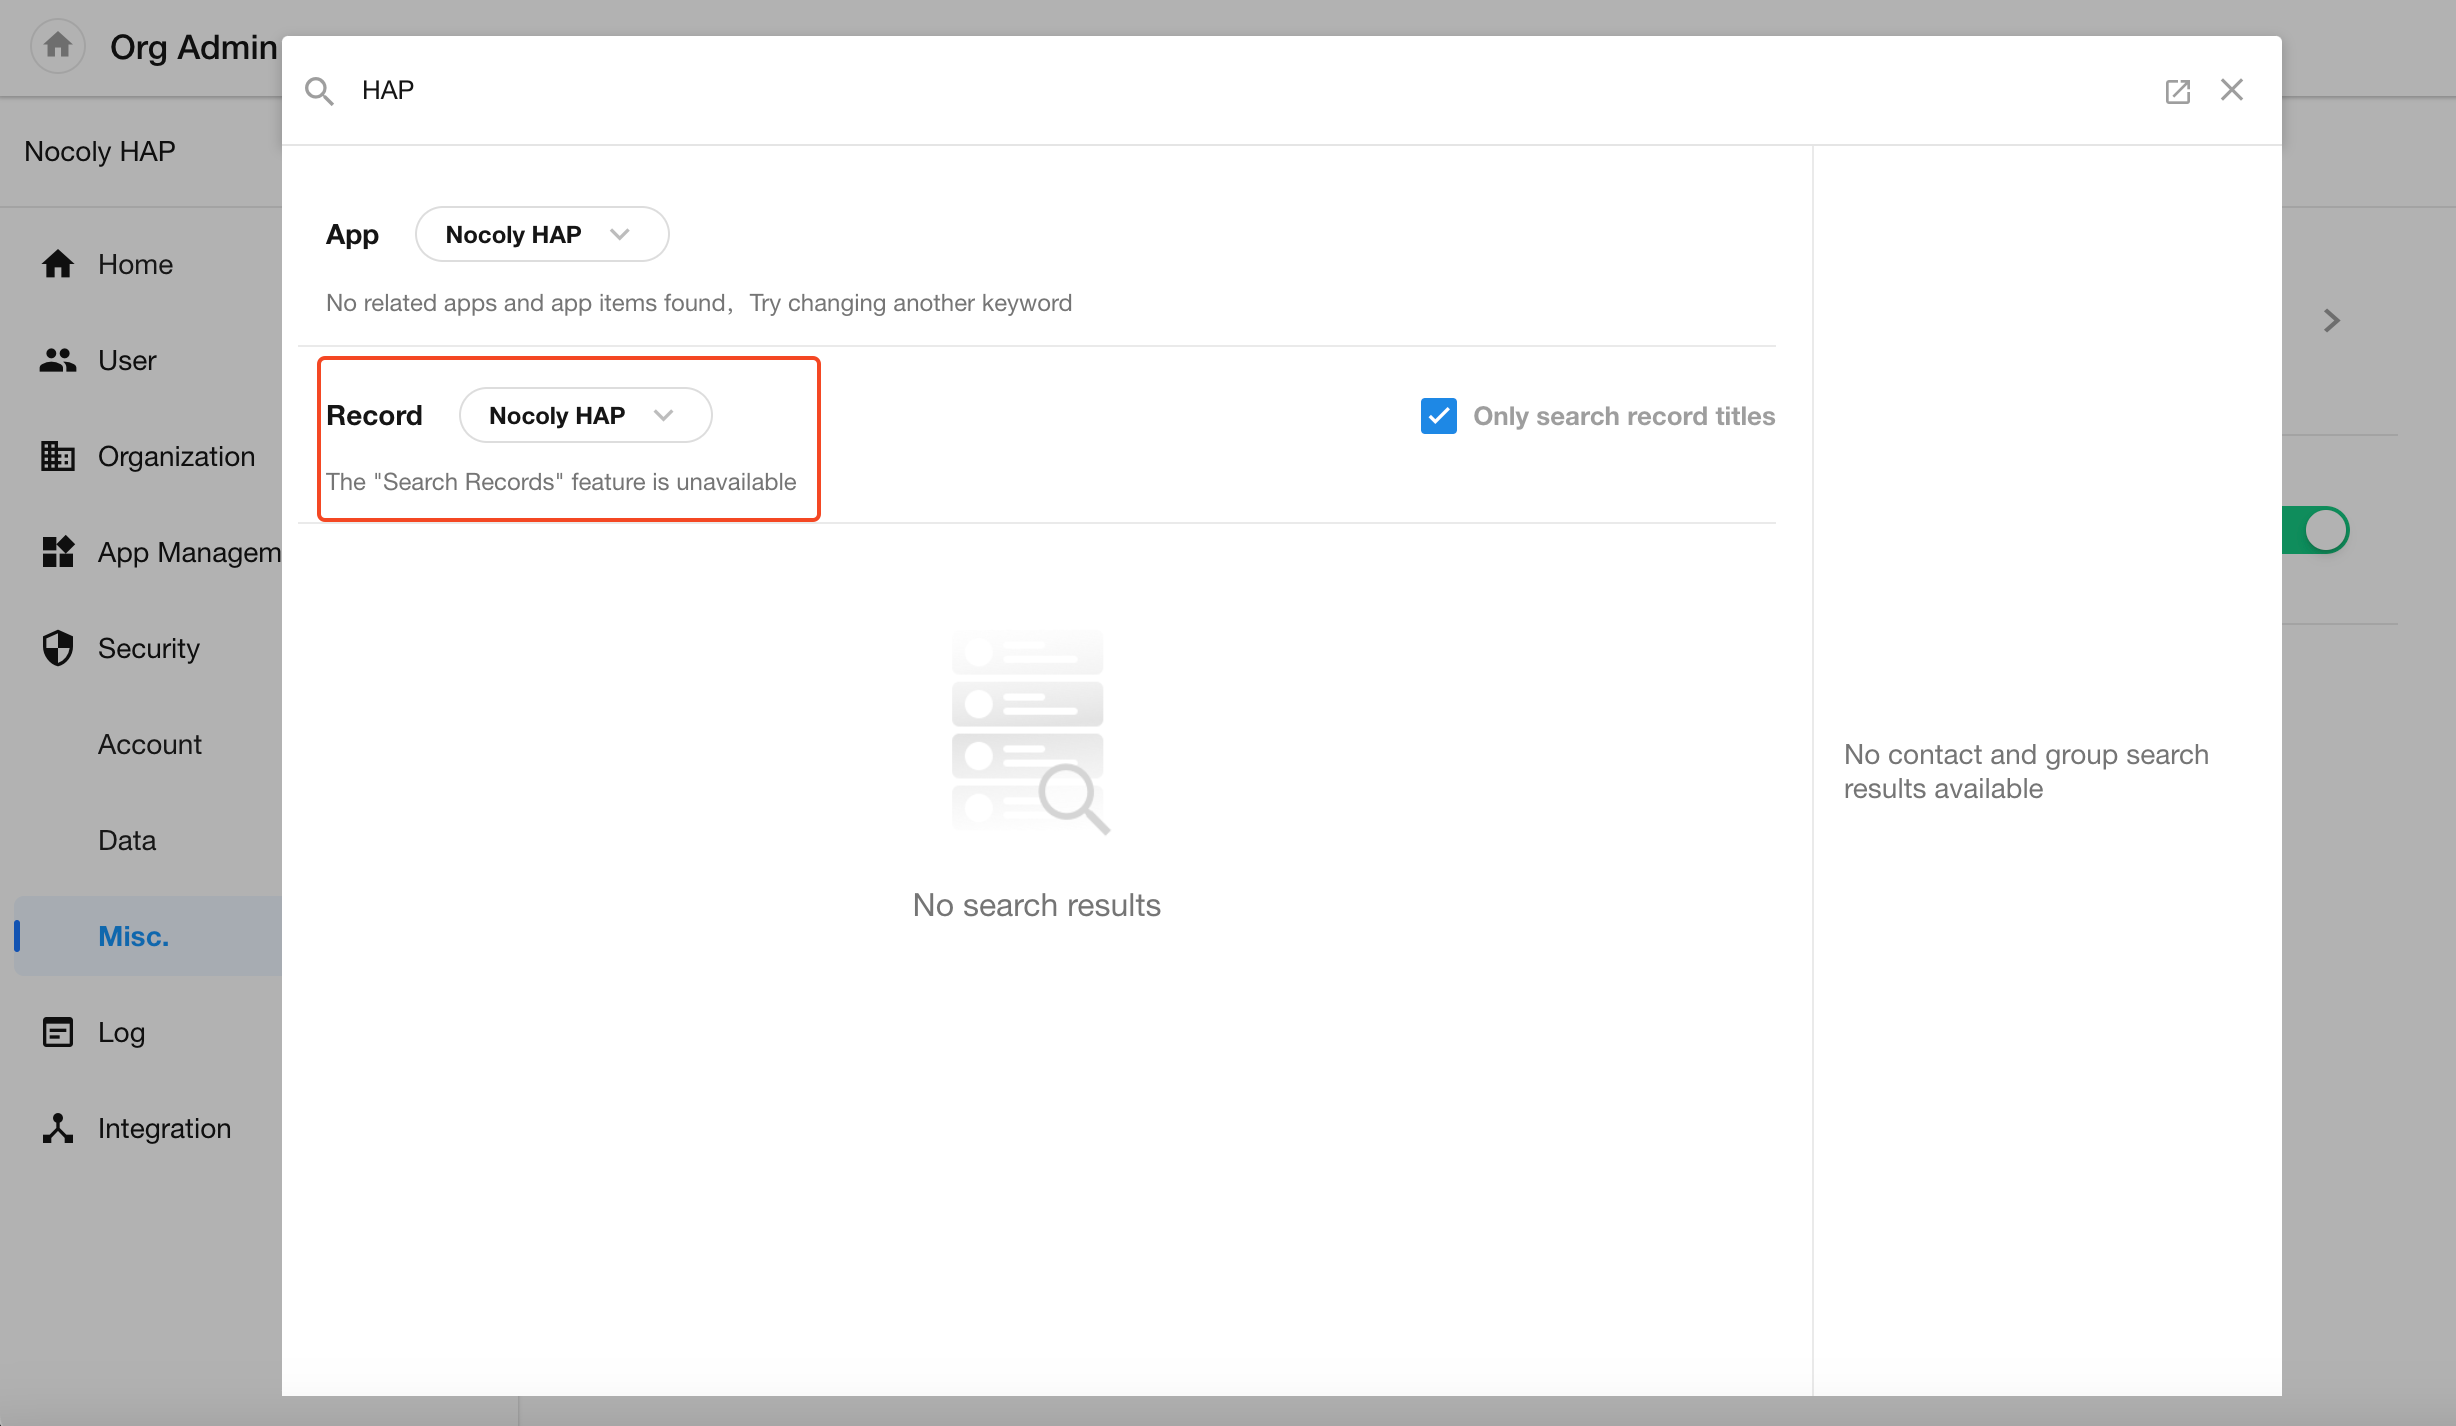
Option to Disable “Super Search – Search Records”
In Organization Admin Console → Security → Misc. → Feature Restrictions, admins can now disable the “Super Search – Search Records” feature.
Once disabled, no users in the organization will be able to access this functionality.
H5
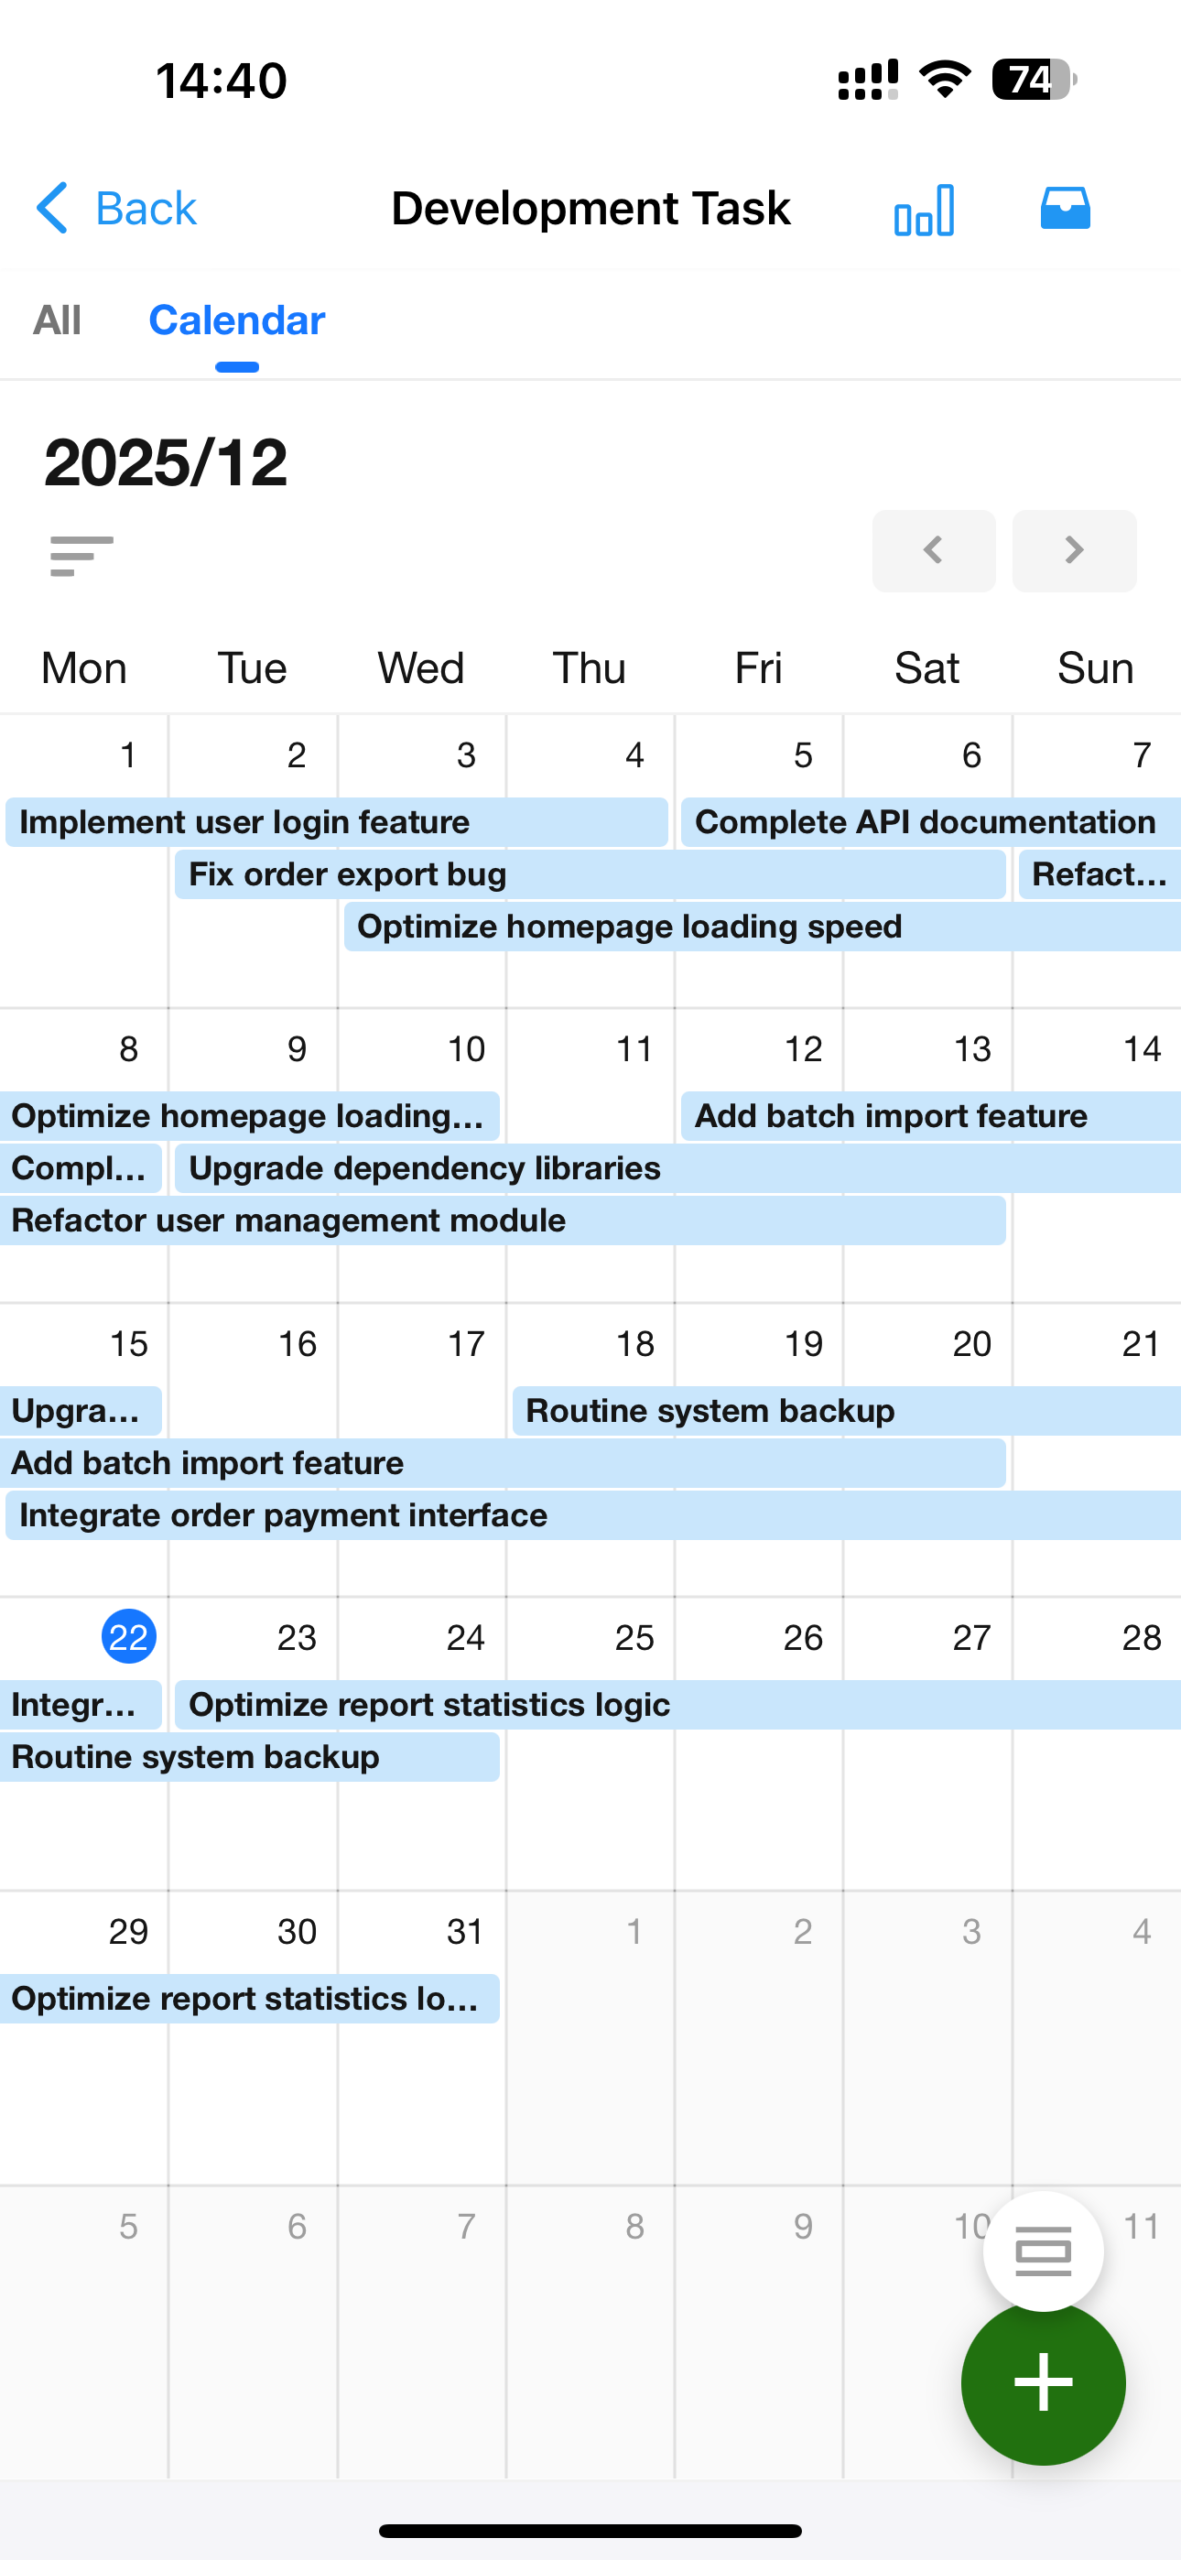
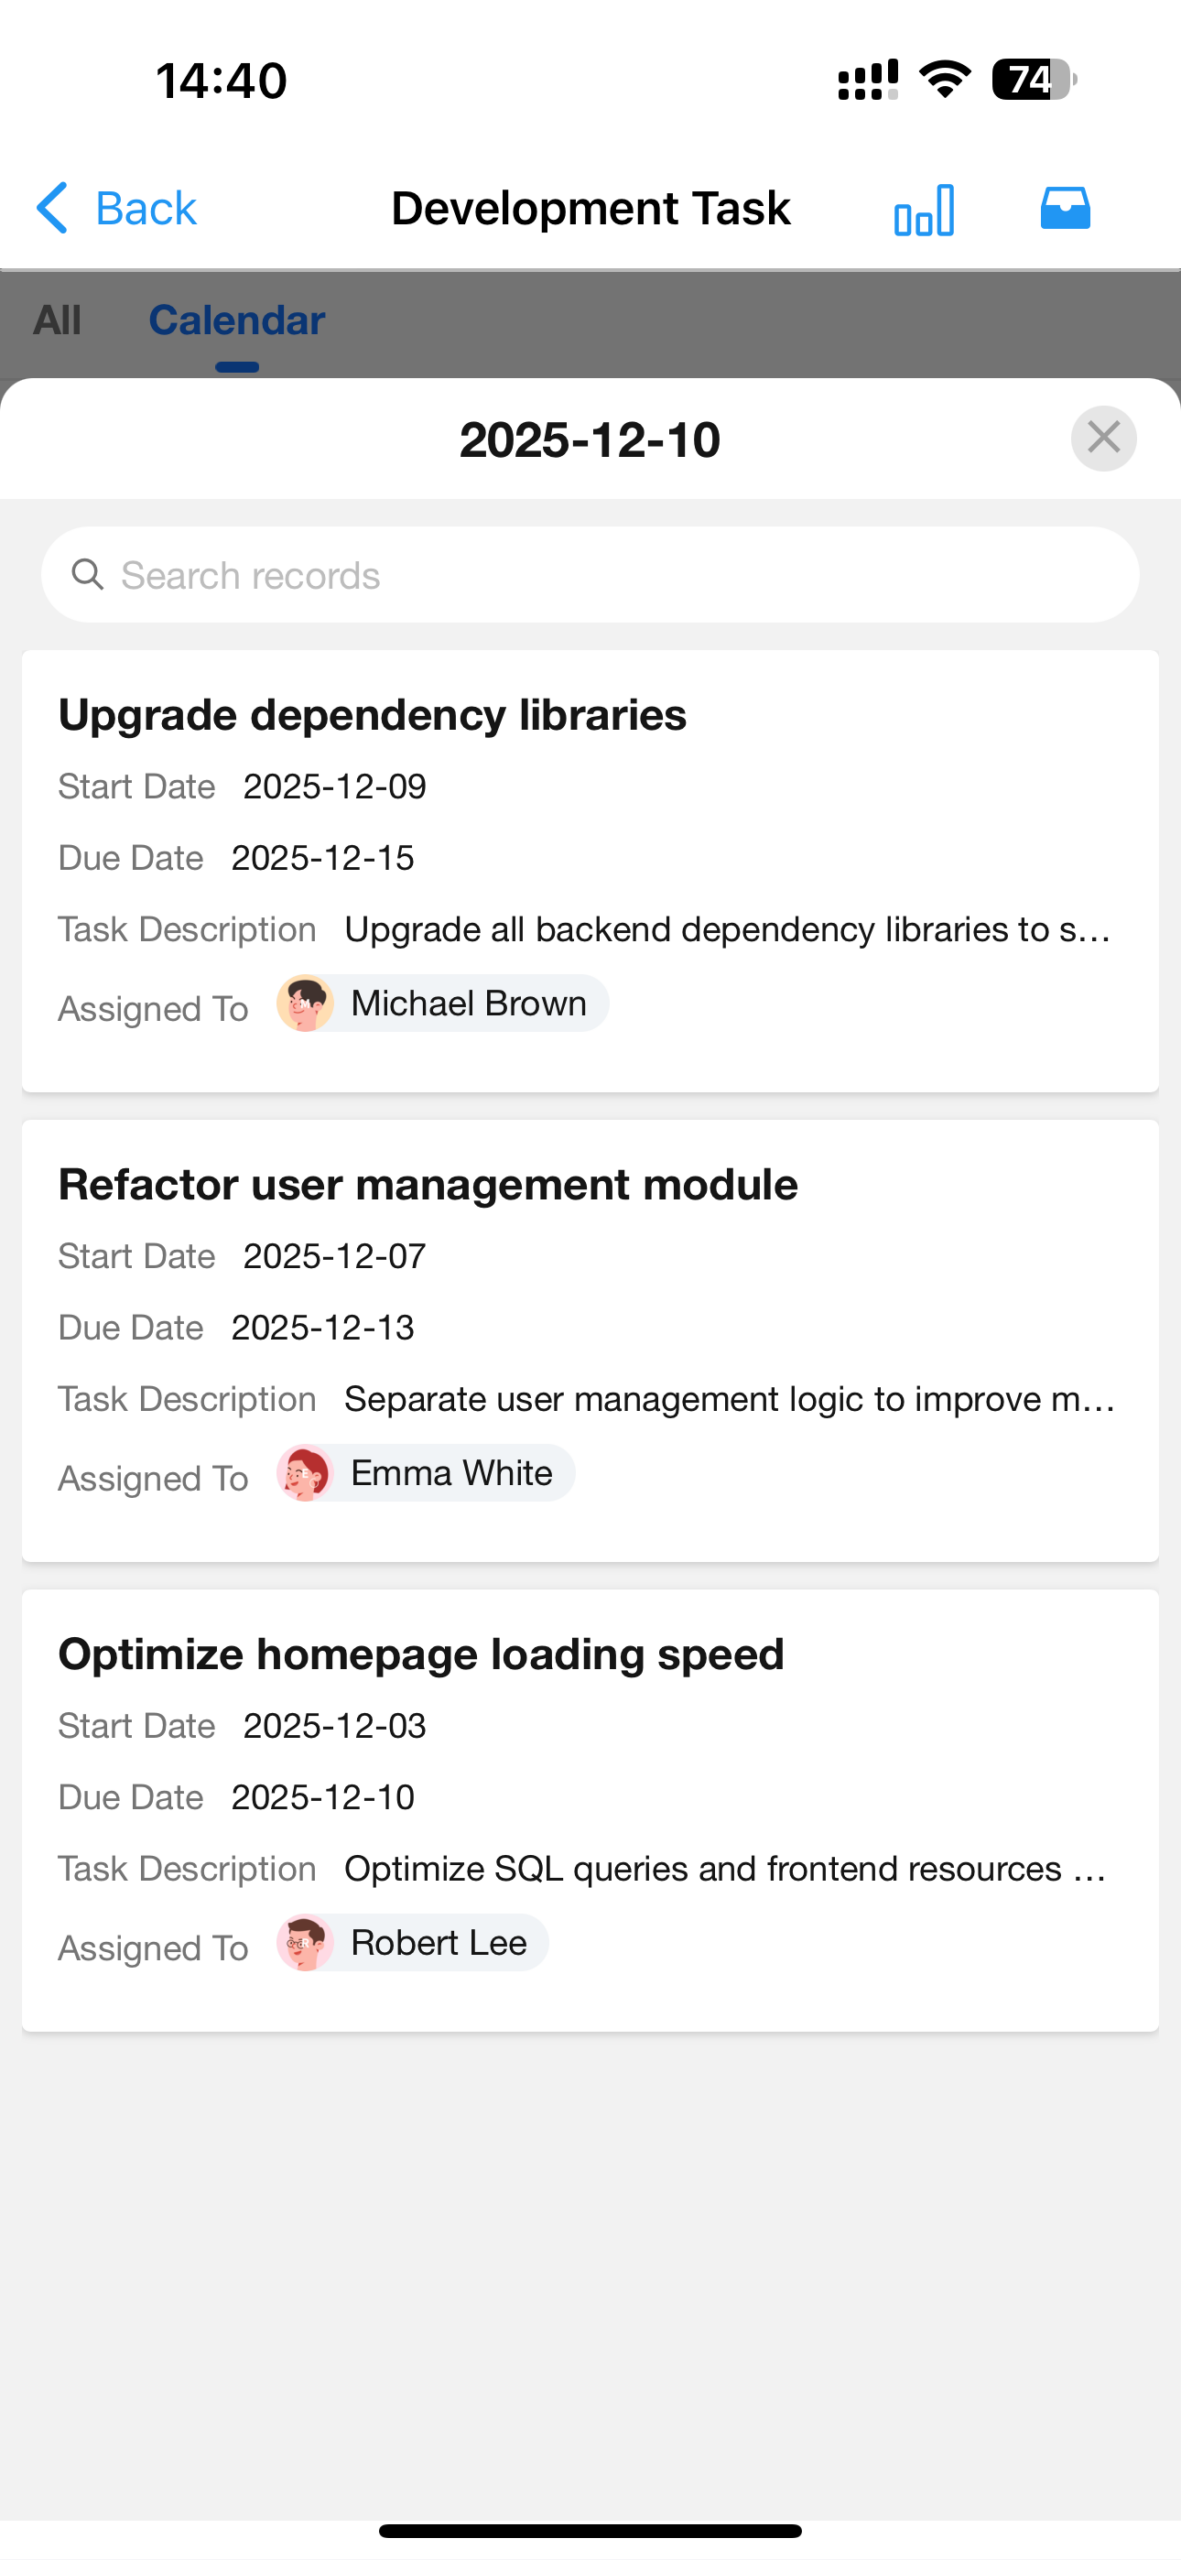
Calendar View Redesign & Optimization
We have redesigned and enhanced the calendar view with improved interactions and functionality, including:
- Switchable view granularity
- Cross-period display of calendar records
- Configurable fields display on record cards in the calendar
- Optimized styling and interactions for a smoother user experience
 |
 |
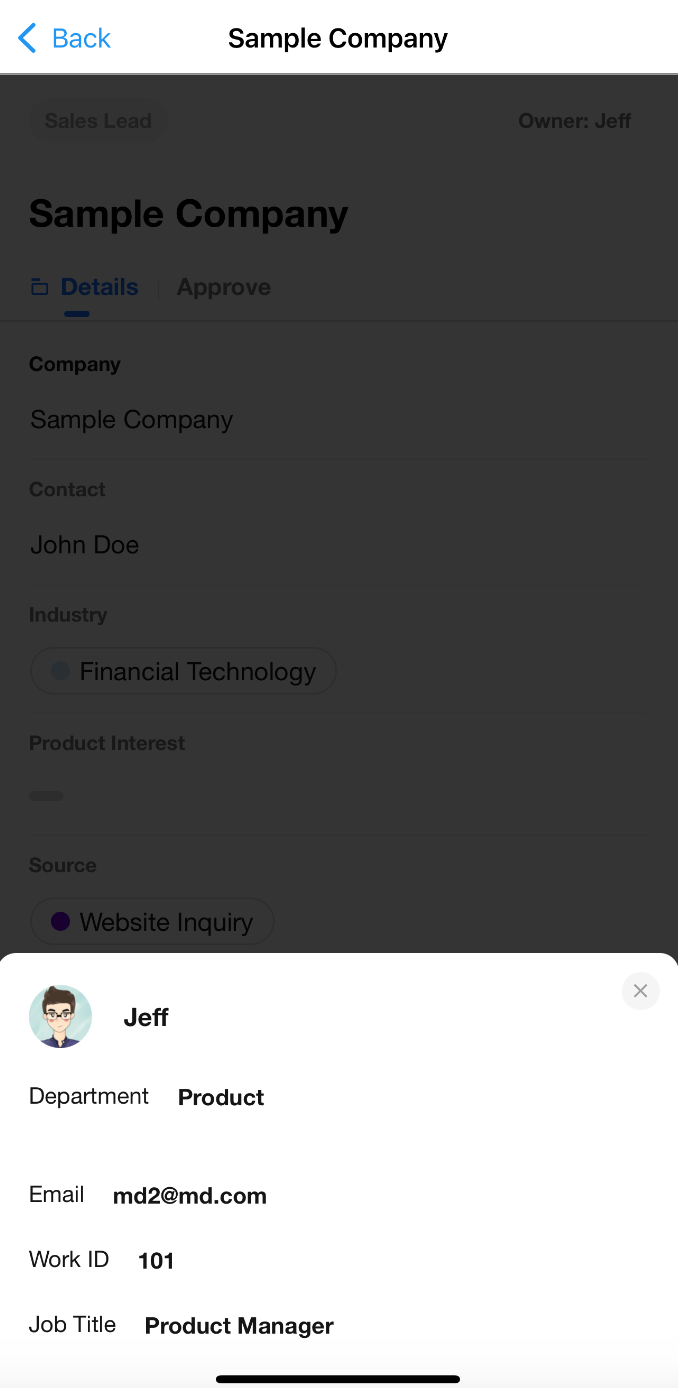
User Info Display Layer
Within the same organization, users with identical display names can now be distinguished more clearly, making it easier for team members to identify and contact each other.
User information is now more accessible in:
- Member fields within records
- Record owners
- Record discussions
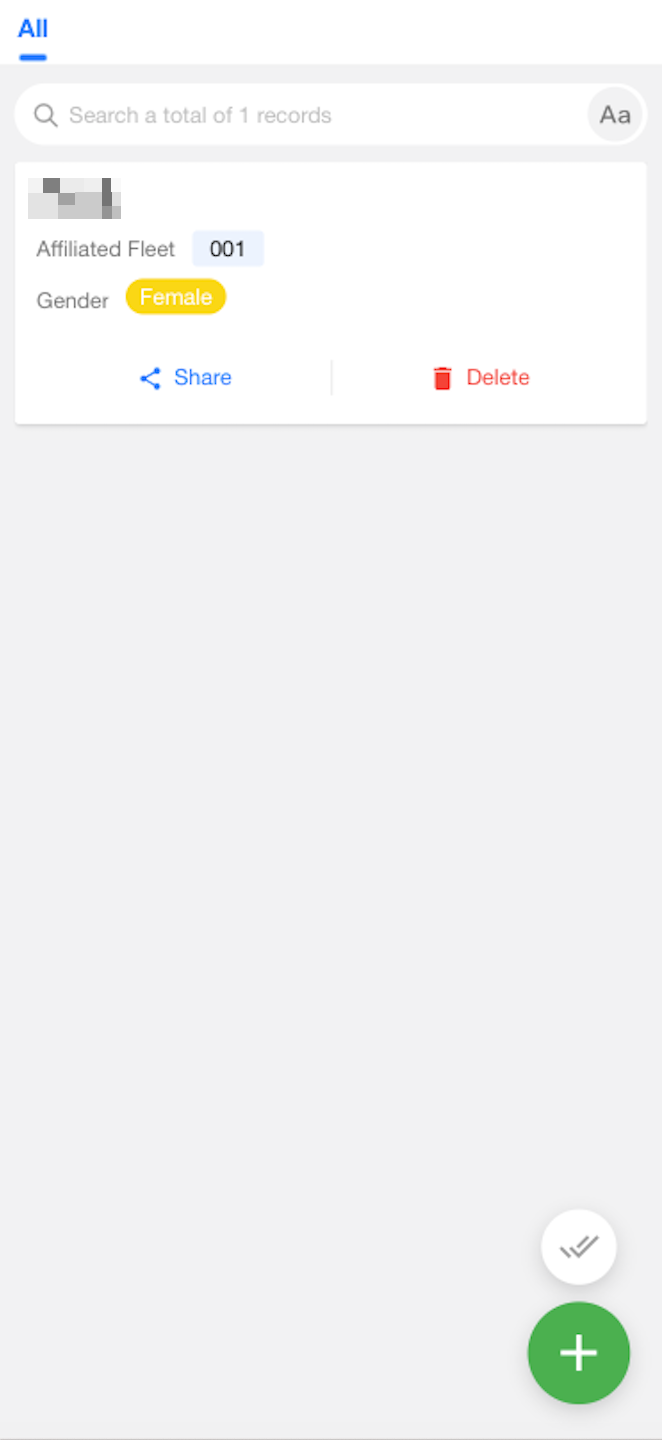
Quick Actions on Record Cards
Quick actions can now be configured for record cards in Table, Kanban, and Gallery views. This allows users to perform common actions more efficiently, directly from the record card.
Subform: Adaptive Column Widths
Based on user feedback, columns in subforms—typically containing numeric or short text values—were previously fixed at a uniform width of 180px, leading to inefficient use of space.
To improve readability and space utilization, column widths in subforms now adapt dynamically within a range of 80px to 200px, depending on content density.
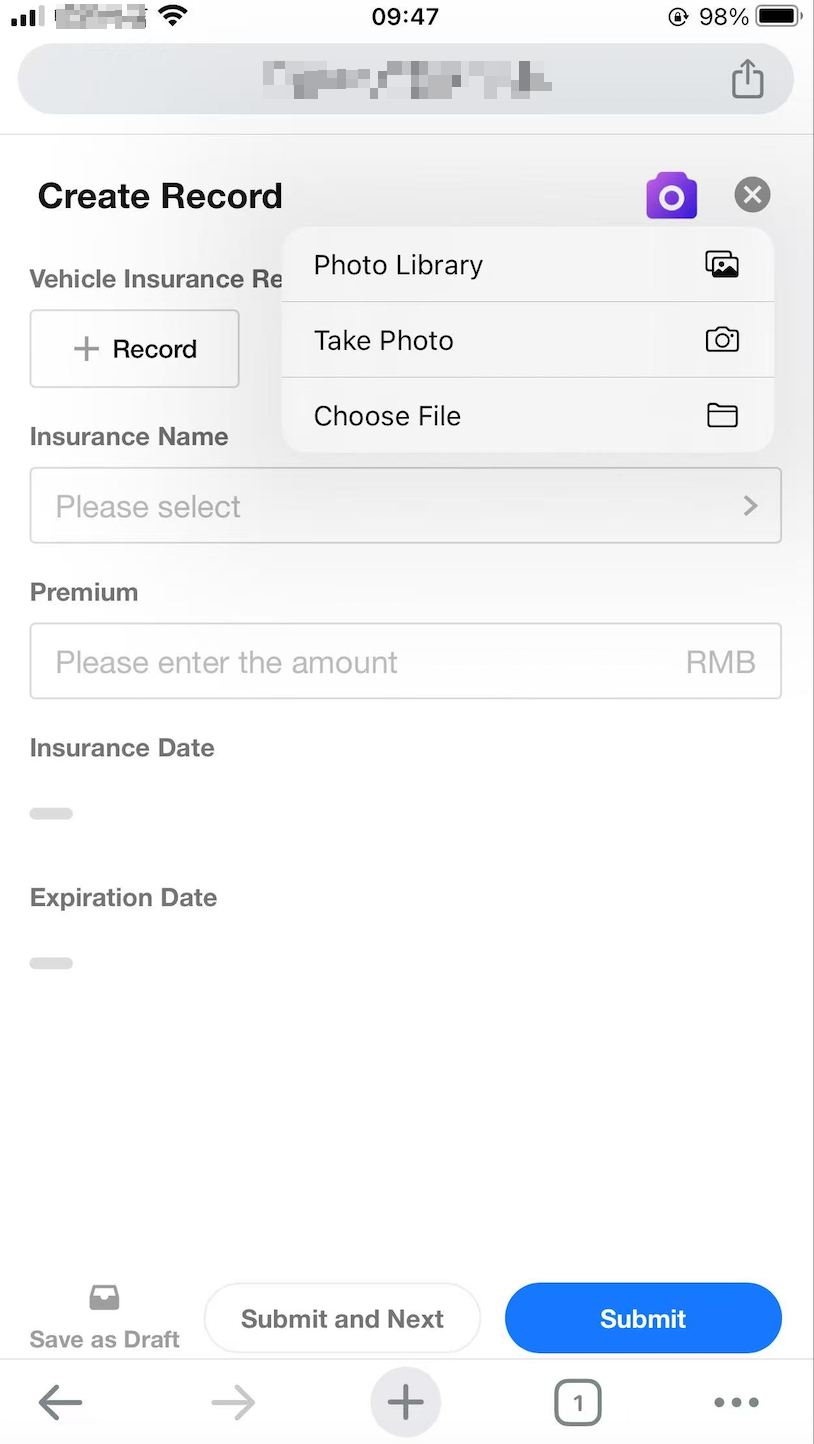
Mingo-Assisted Record Creation
With Mingo’s AI-powered image recognition, users can now extract data from images and automatically populate corresponding fields in a record—greatly enhancing data entry efficiency.
 |
 |
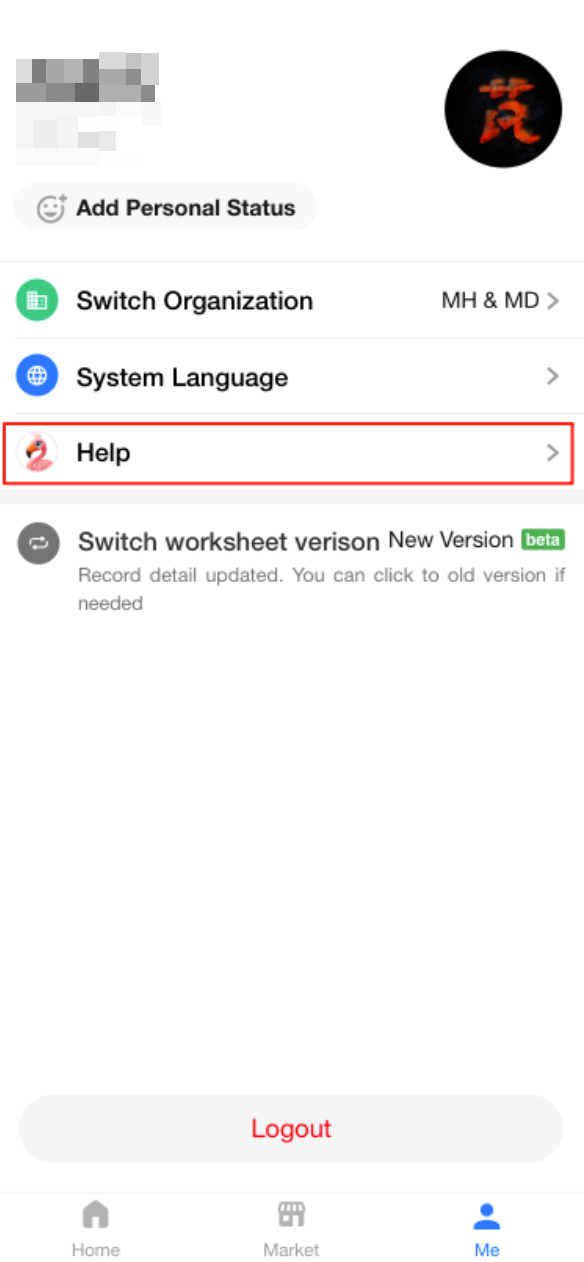
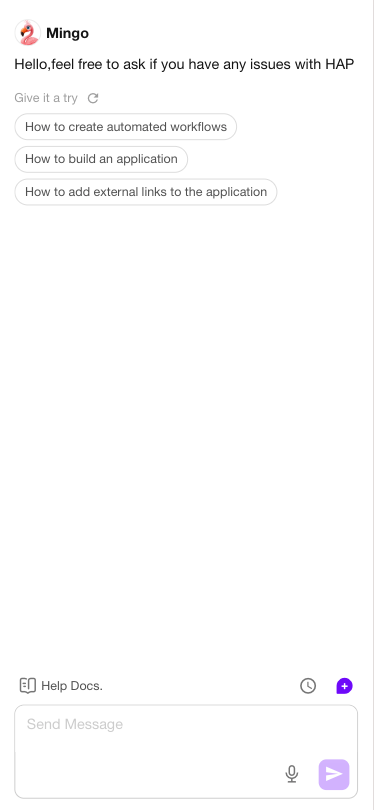
Chat with Mingo to Get Help (Mobile)
Users can now chat with Mingo on the HAP mobile app (App & H5) to get instant help and guidance on using HAP features more effectively.
 |
 |
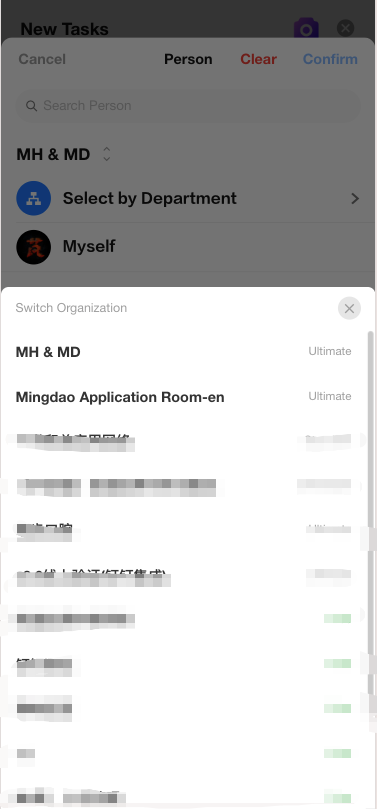
Cross-Organization Member Selection
On the HAP mobile app, when selecting a user in a members field, if the field is configured to use the Contacts, users can now switch between organizations to select members—no longer limited to a single organization.
Other Improvements
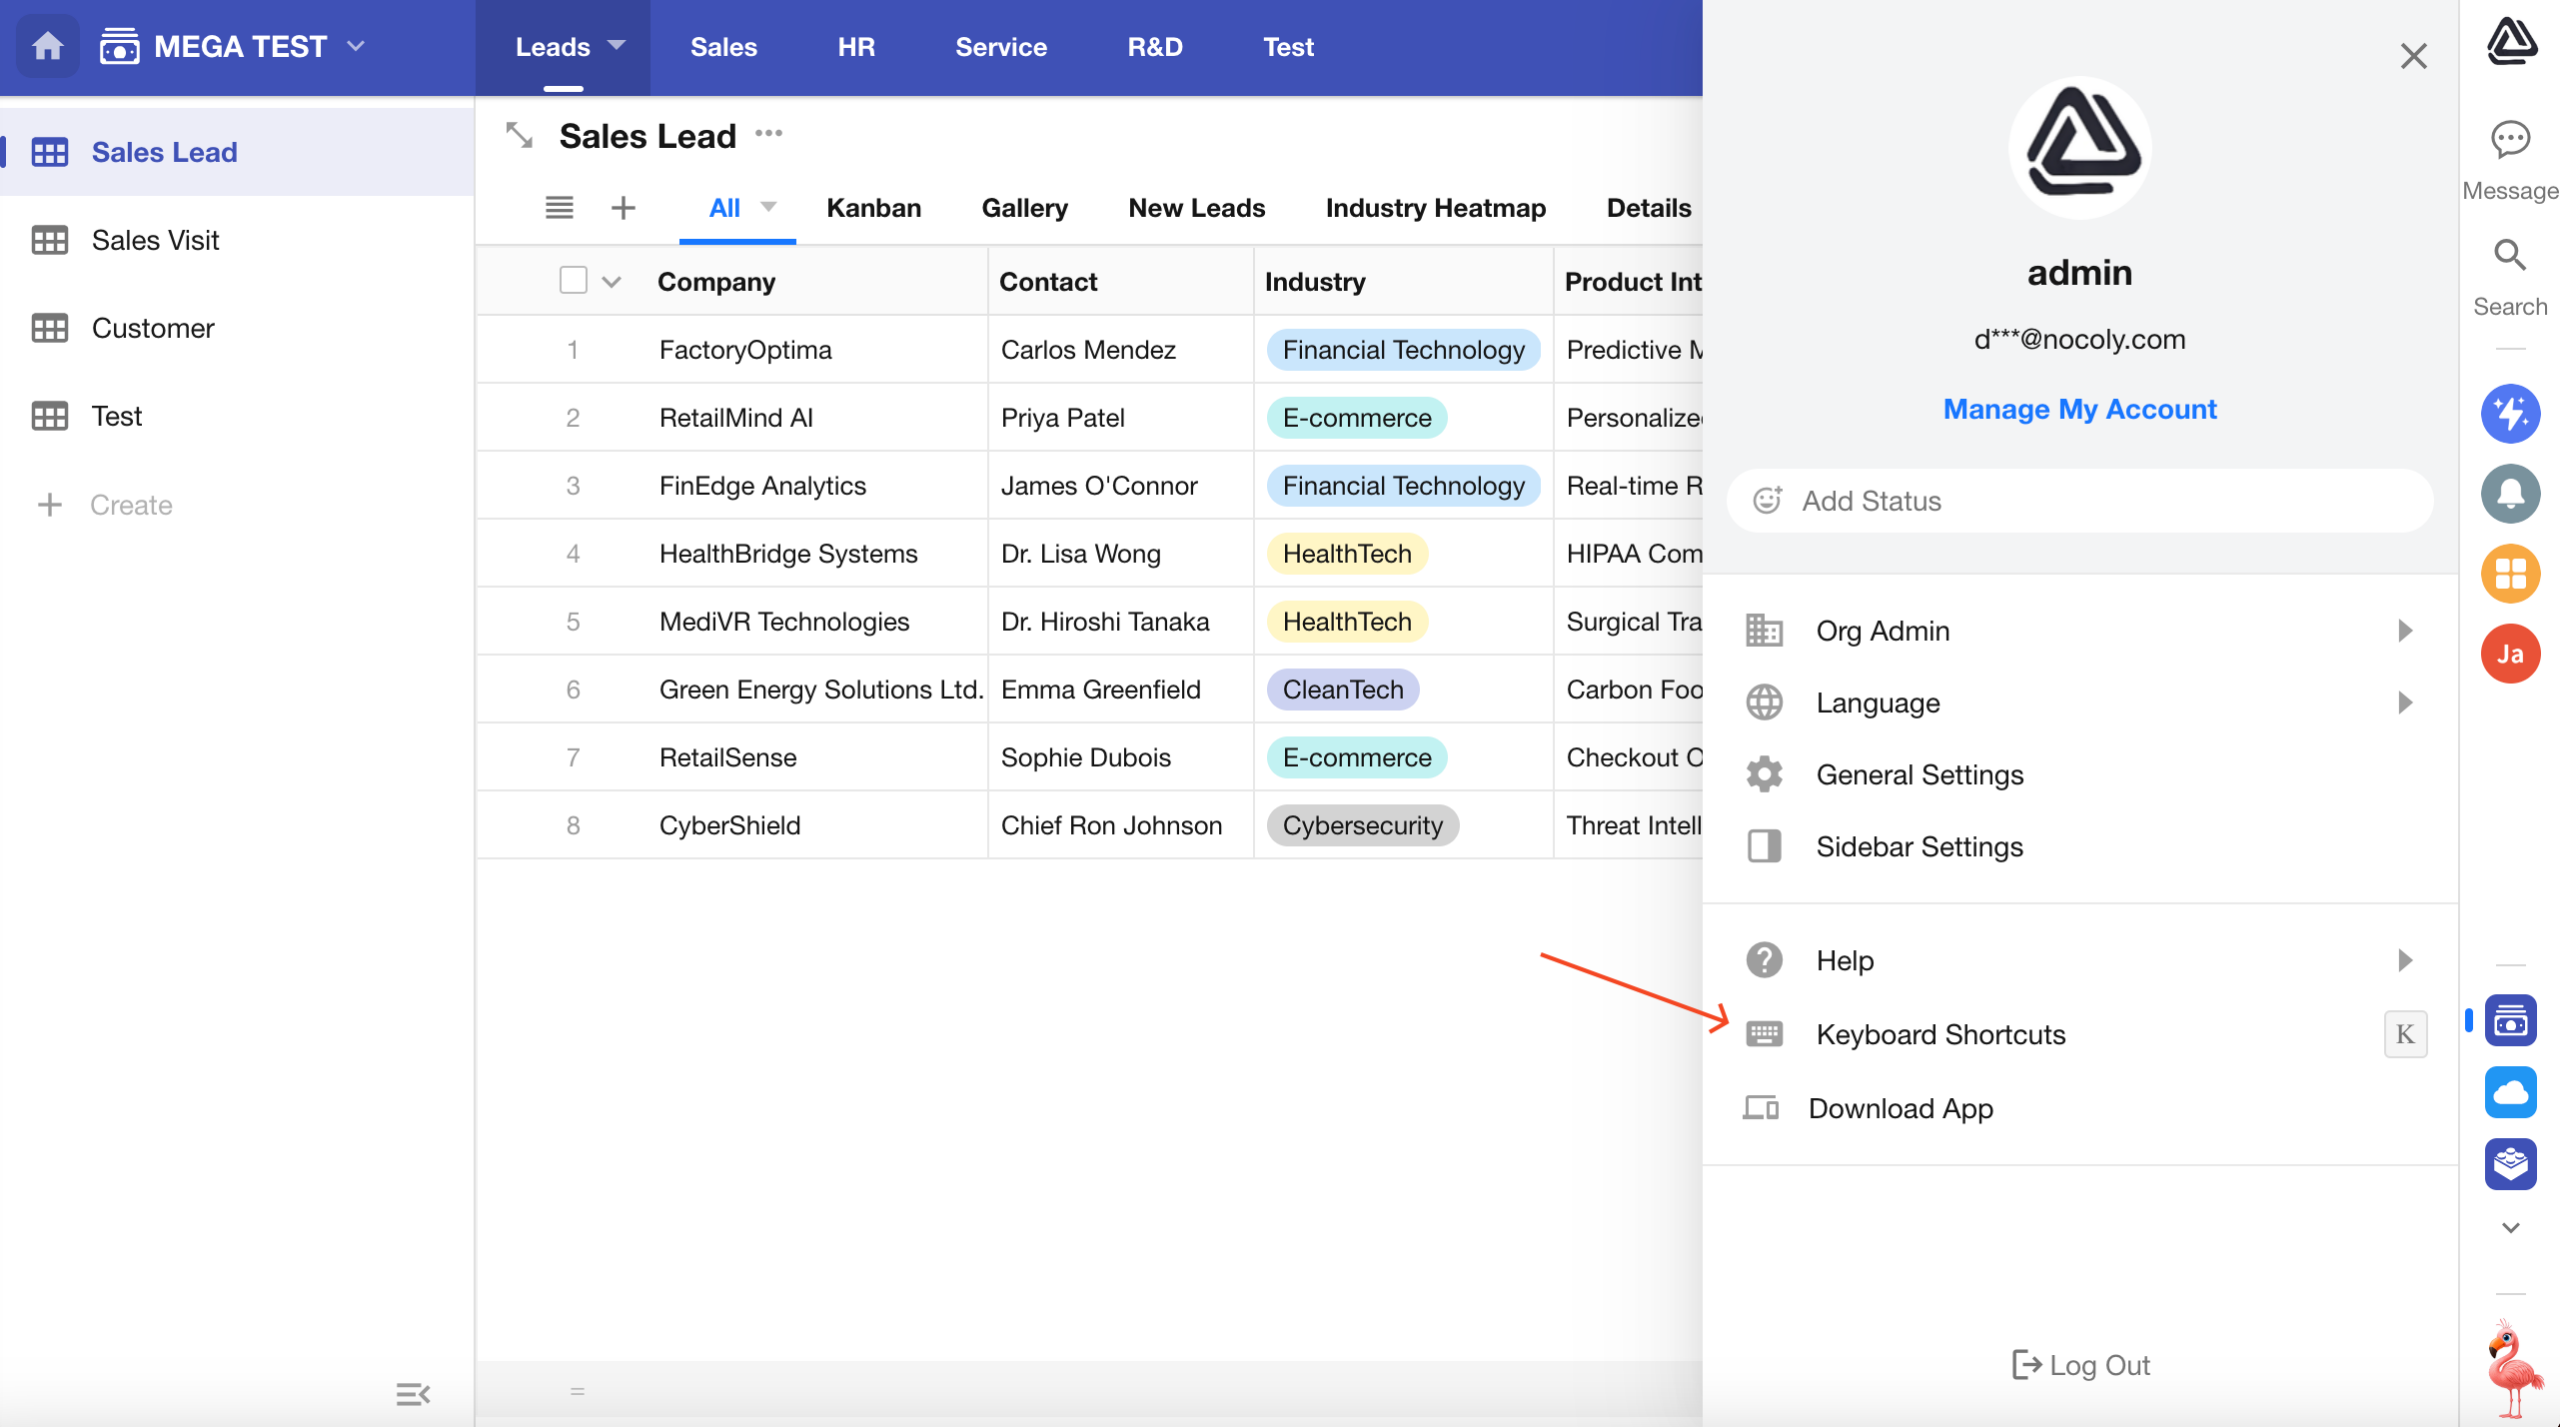
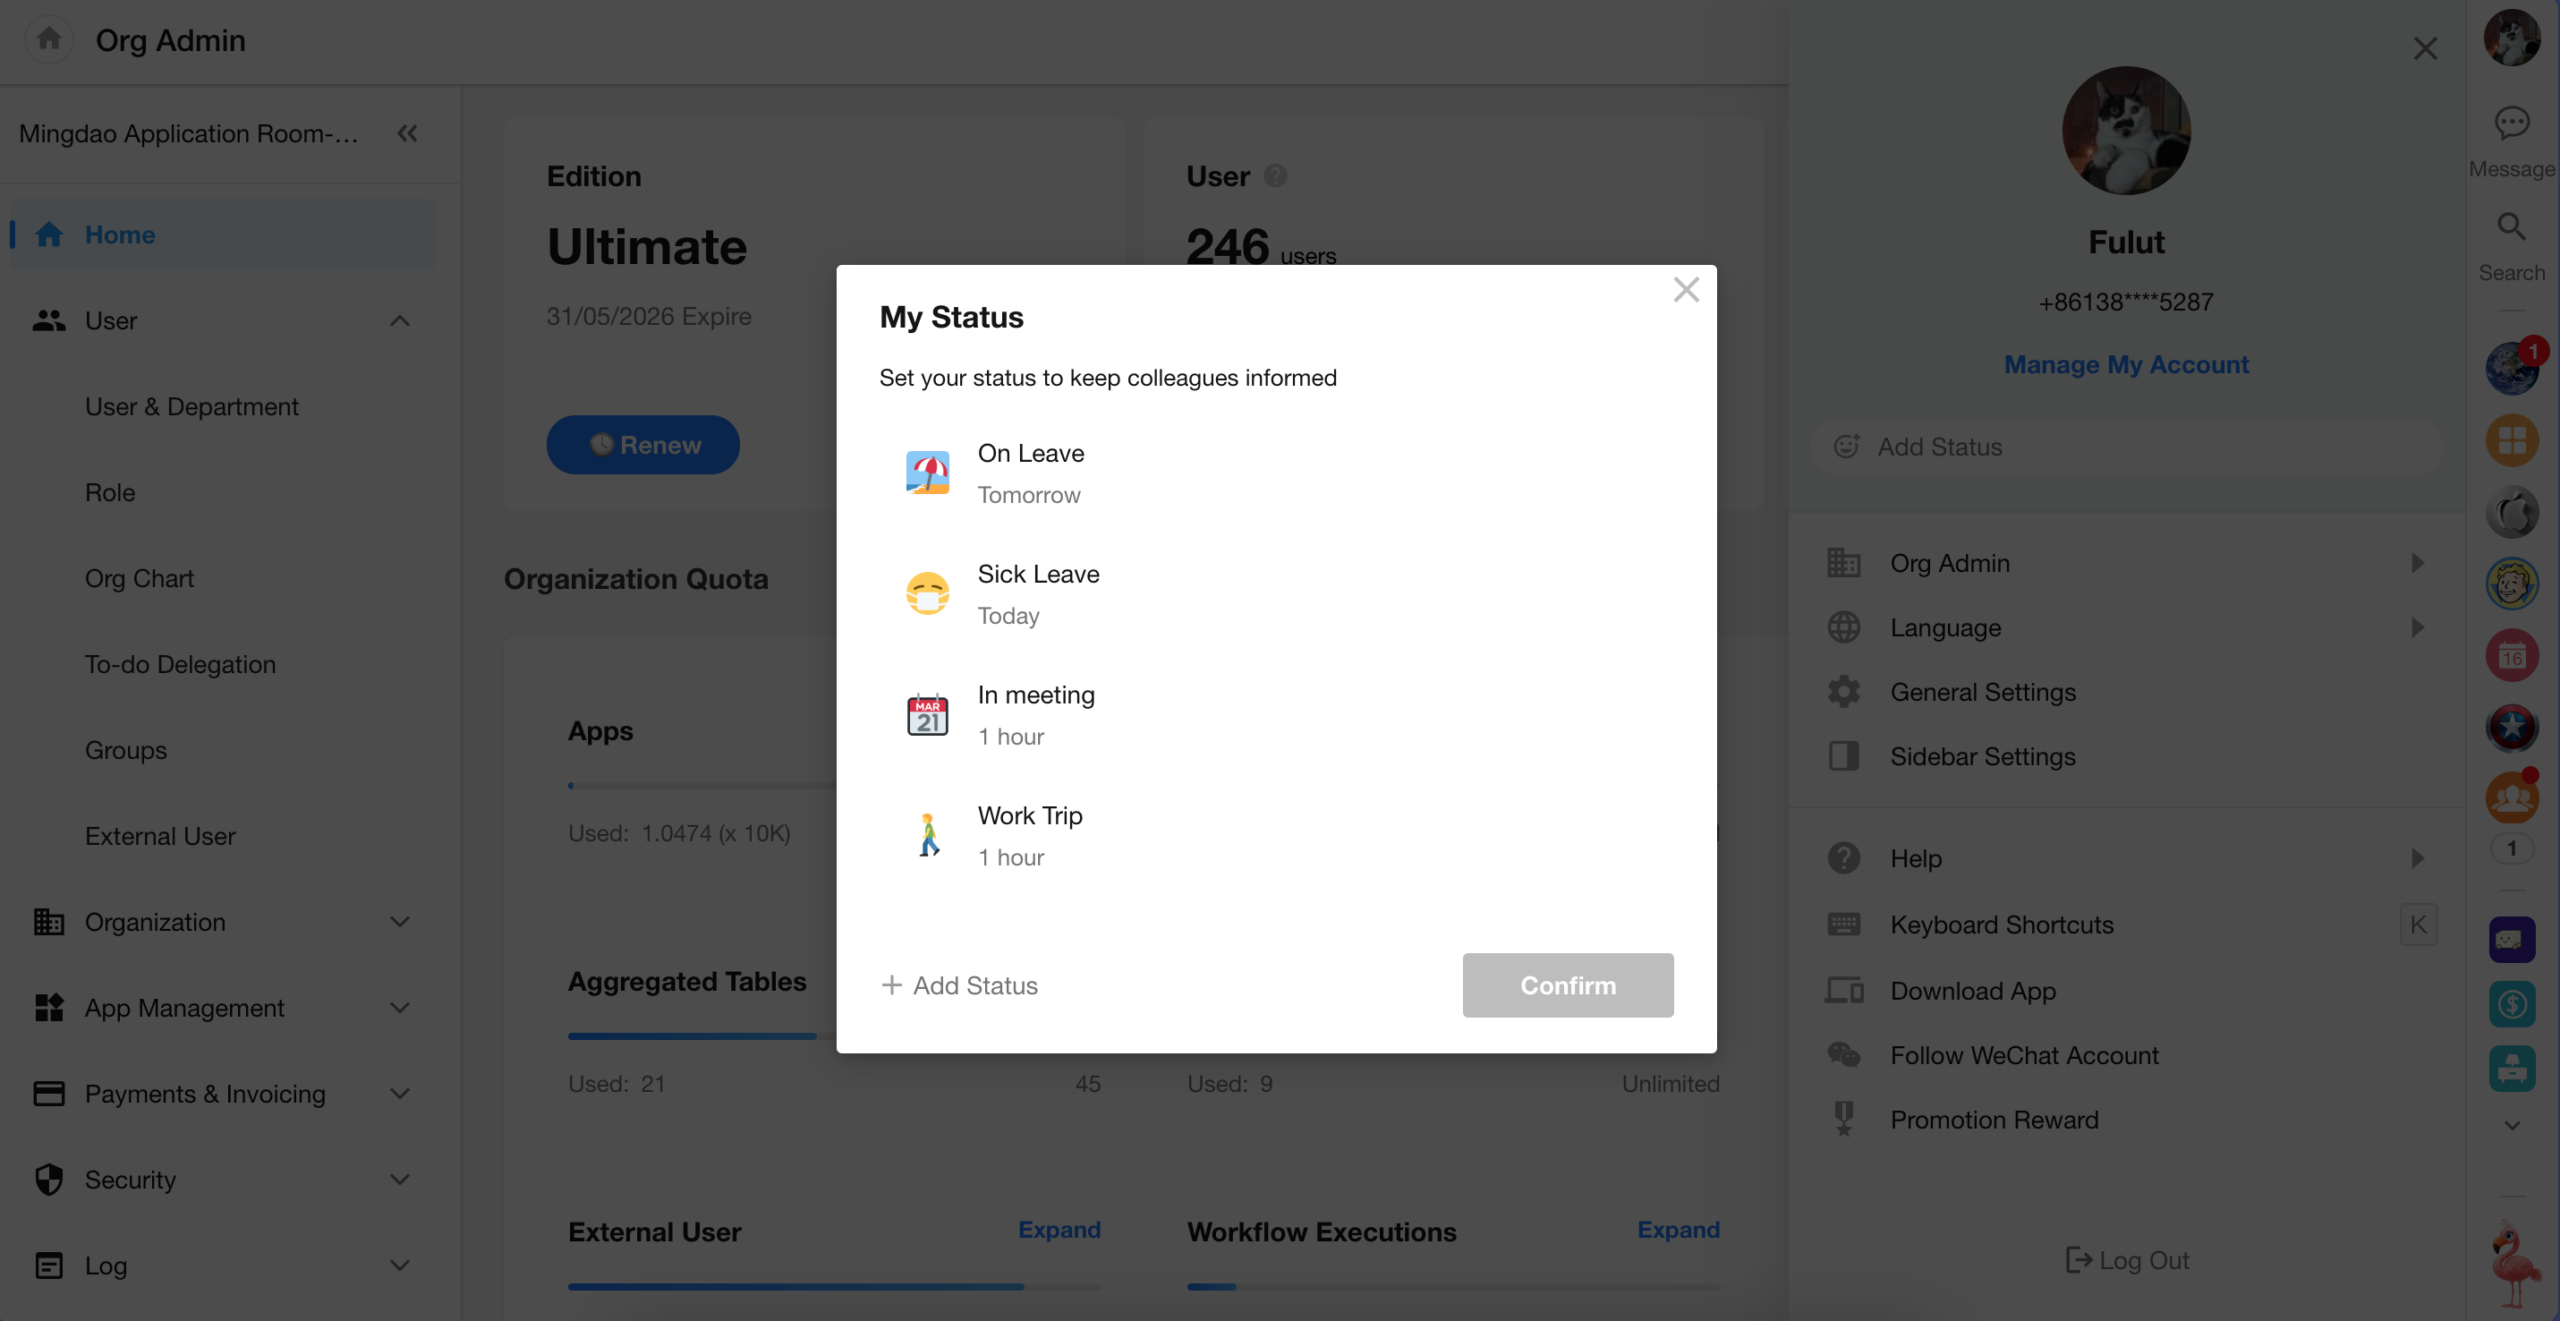
Set Personal Status
Users can now set their personal status directly from:
- The sidebar panel that appears when clicking their avatar on PC
- The HAP mobile app
Once set, the personal status will be visible to other users across the platform, helping teams stay informed of each other’s availability or context.

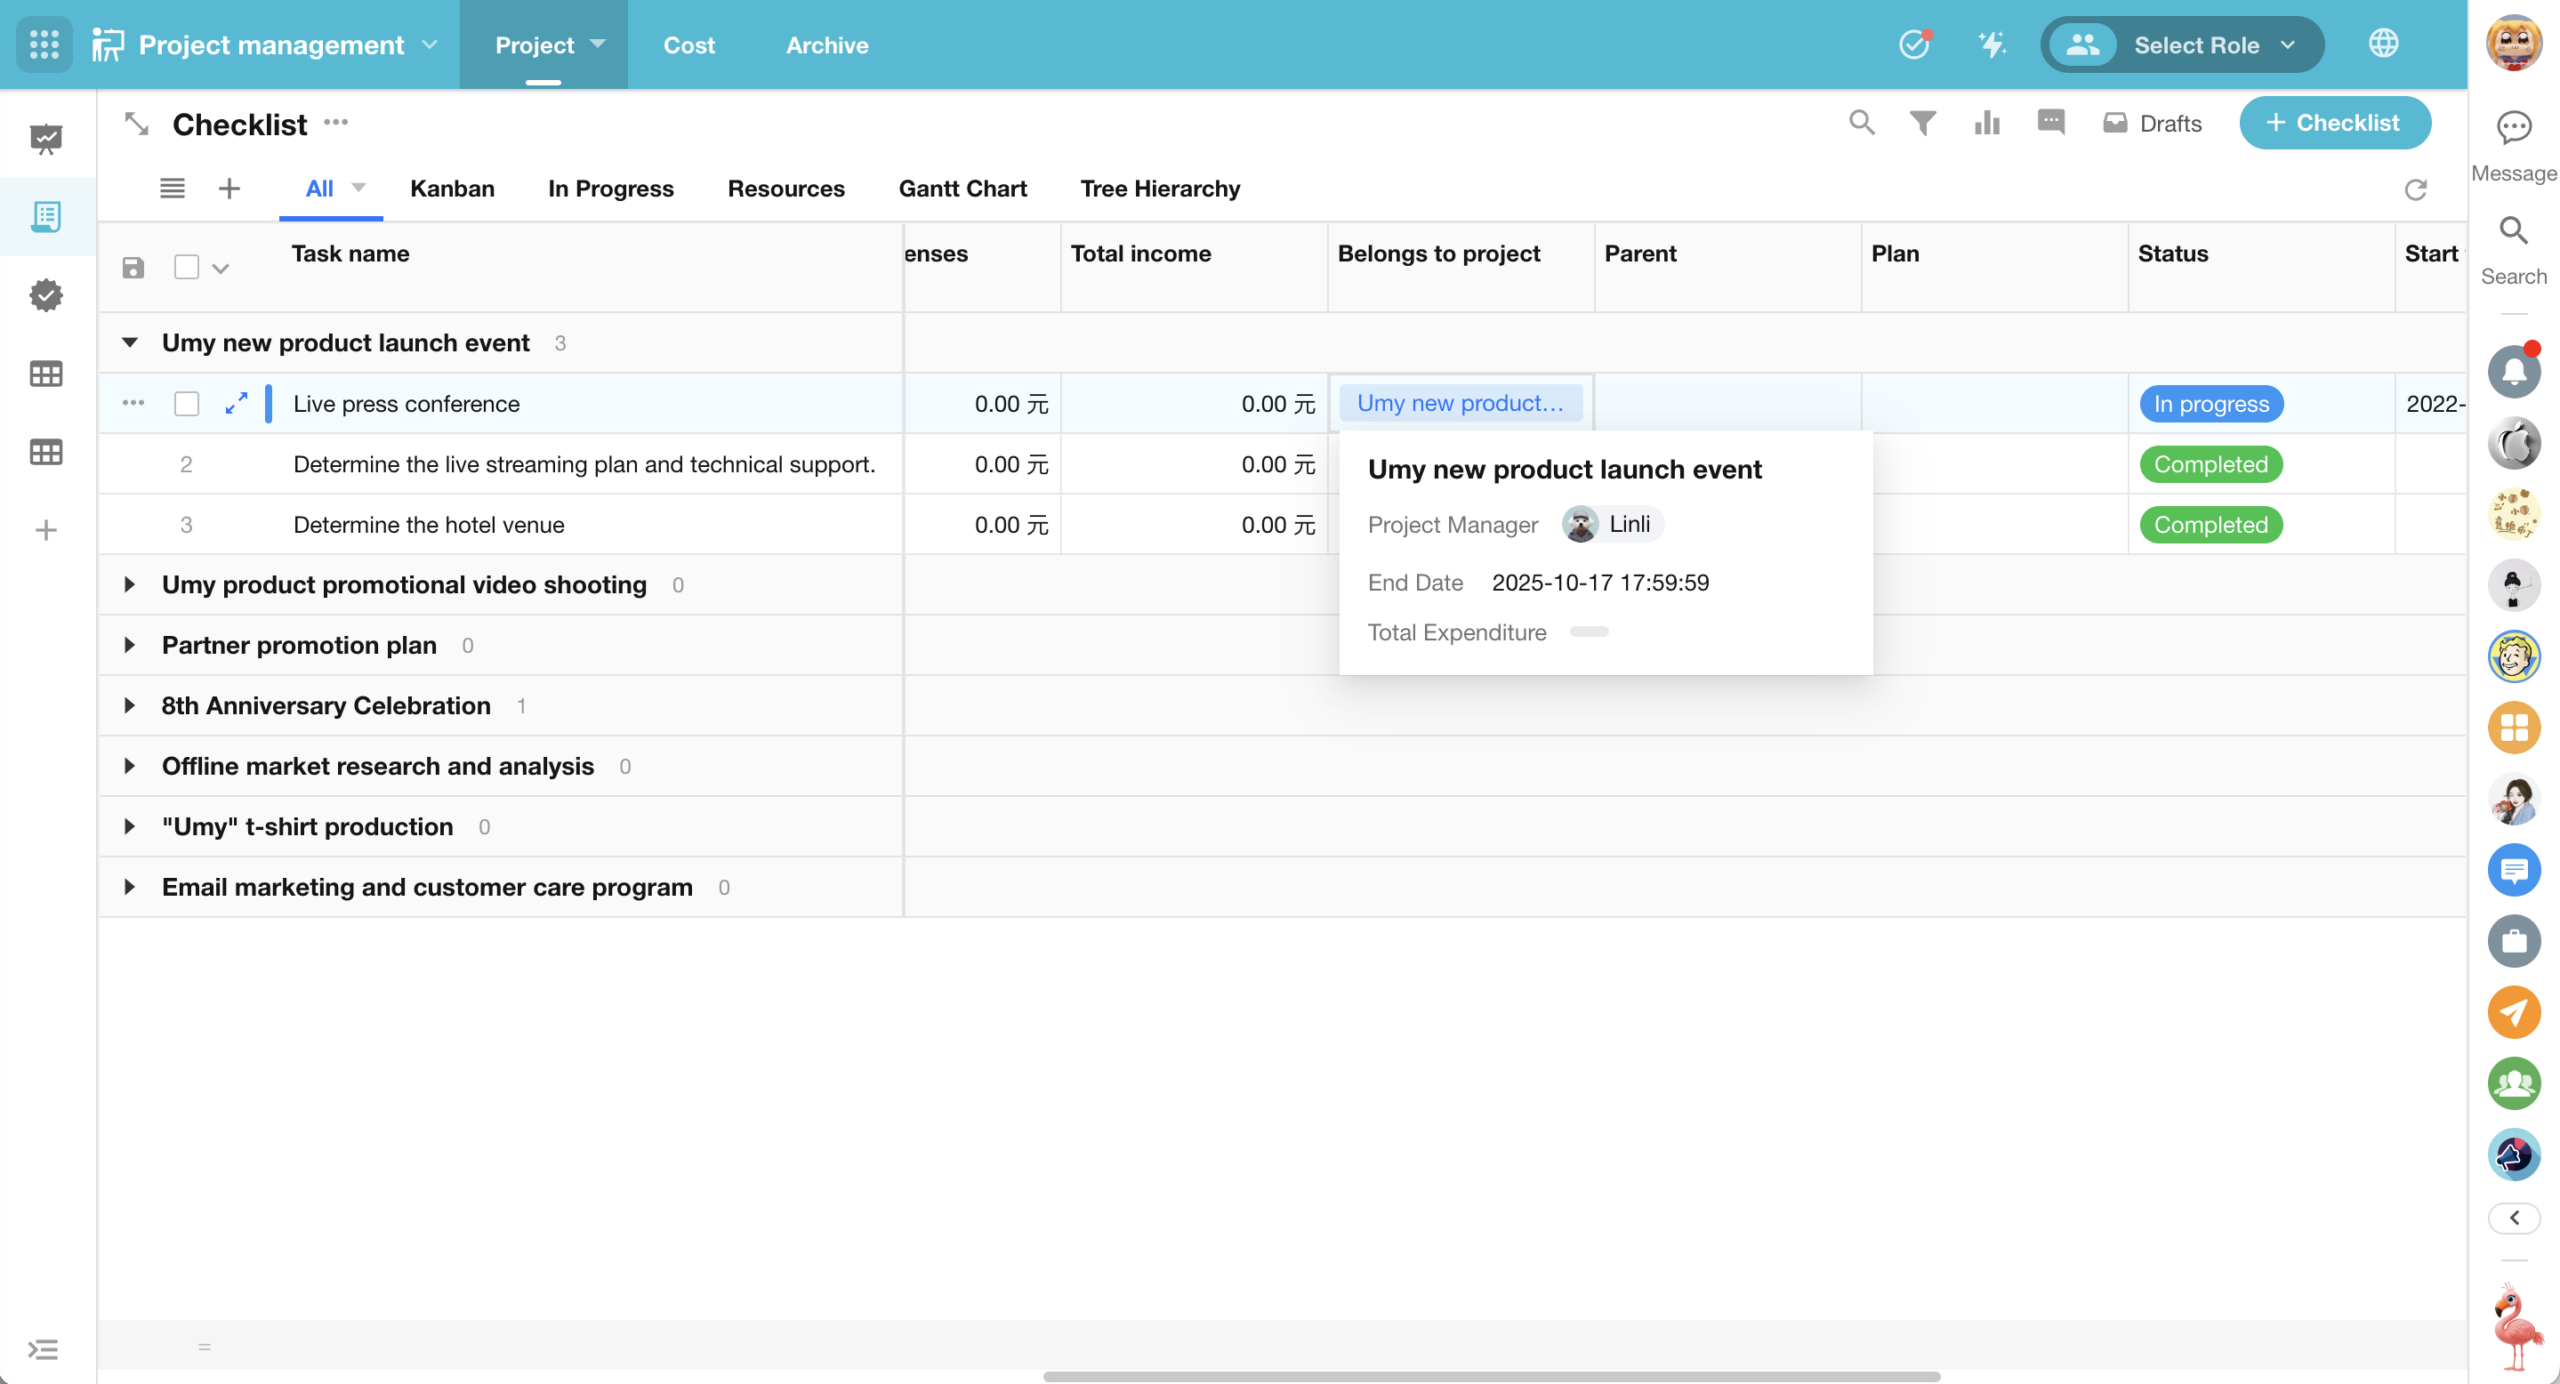
Relationship Field (Card/Dropdown): Hover to Preview Record Card
For relationship fields displayed in card or dropdown mode, users can now hover over a related record in a view to see a record card preview, without needing to open the full record detail page.
Displayed Content:
- The record card shows fields defined in the “Display Fields” setting of the relationship field. (It does not include subform fields, relationship fields, or query records fields.)
- The cover image is also displayed if configured.
Supported Views:
- Table, Kanban, Calendar, Gallery, Org, Map, Gantt, Details (multi-record display)
Excel Print Templates: Support for Numeric Data Types
In earlier versions, Excel print templates only exported data as text, even for numeric fields. This caused inconvenience for users who needed to reformat exported data for analysis.
With this update:
- If a field is configured as a numeric type in the Excel print template, the exported file will retain the numeric format,
- Making it easier for users to perform calculations and statistical analysis directly in Excel.
Workflow Now Supports Querying Aggregated Tables
The “Get Single Data” and “Get Multiple Data” nodes in workflows now support querying aggregated tables.
- Records from an aggregated table can now be used as standard worksheet records within workflows.
- However, update and delete operations are not allowed on aggregated table records.
The “Rollup” node also now supports aggregation from aggregated tables, allowing for secondary aggregation of already summarized data—enabling more advanced data analytics within workflow processes.
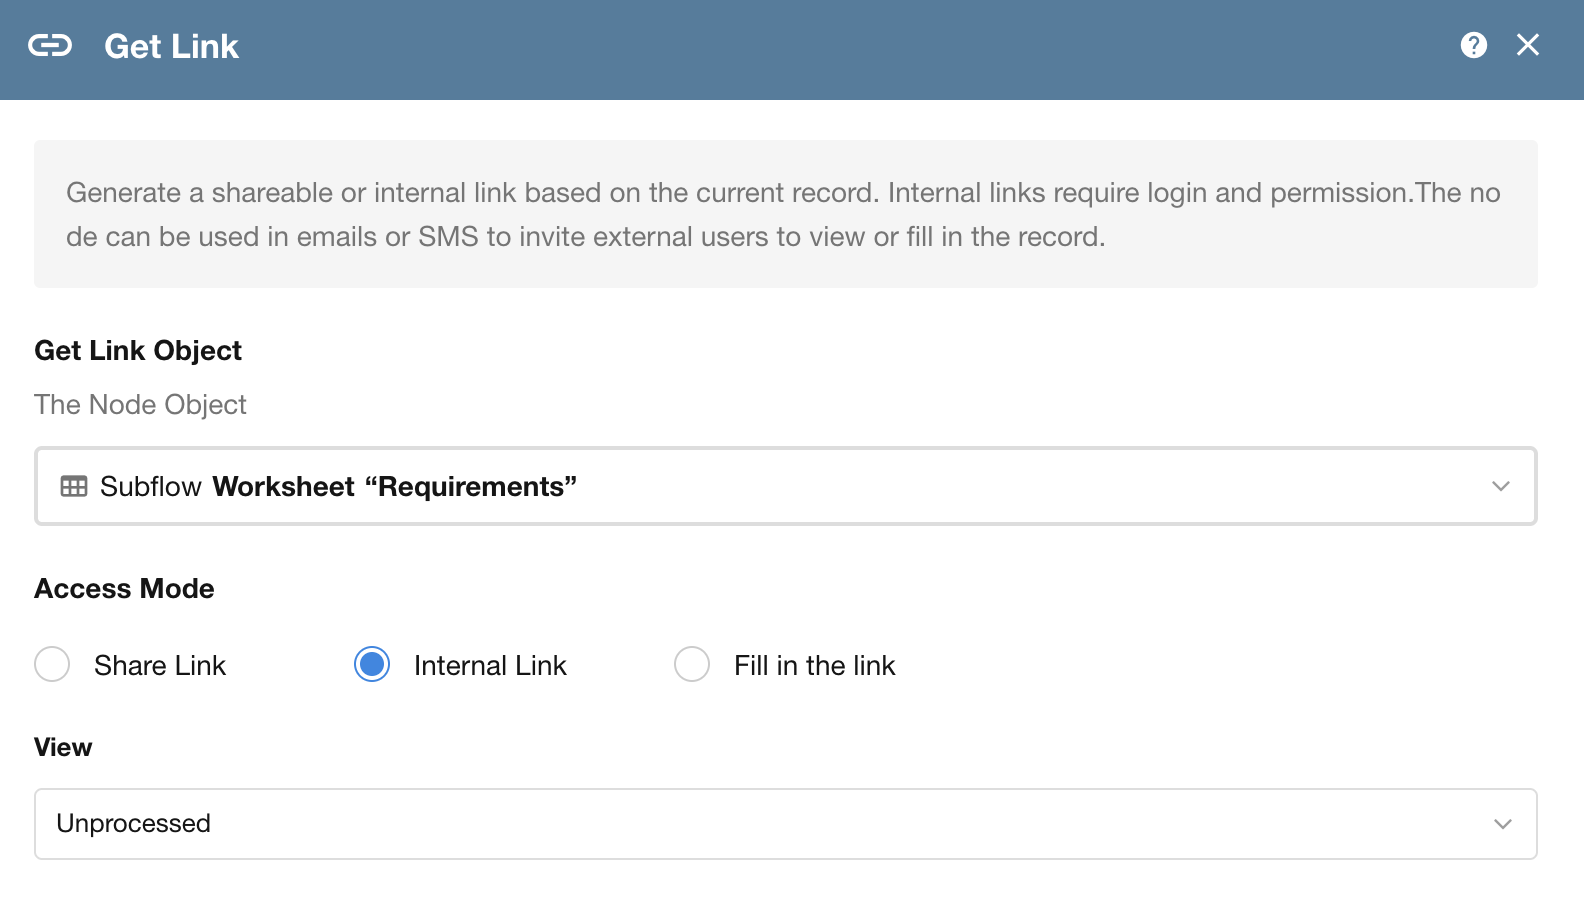
Get Link Node: Now Supports Internal Record Links
In the “Get Link” node within a workflow, a new option has been added to retrieve an internal link to a record.
- Previously, internal links had to be manually constructed for use in notifications or emails.
- Now, the system can directly generate a valid internal link pointing to the record in a specific view.
Note: Internal links can only be accessed by users who are logged in and have the appropriate permissions.
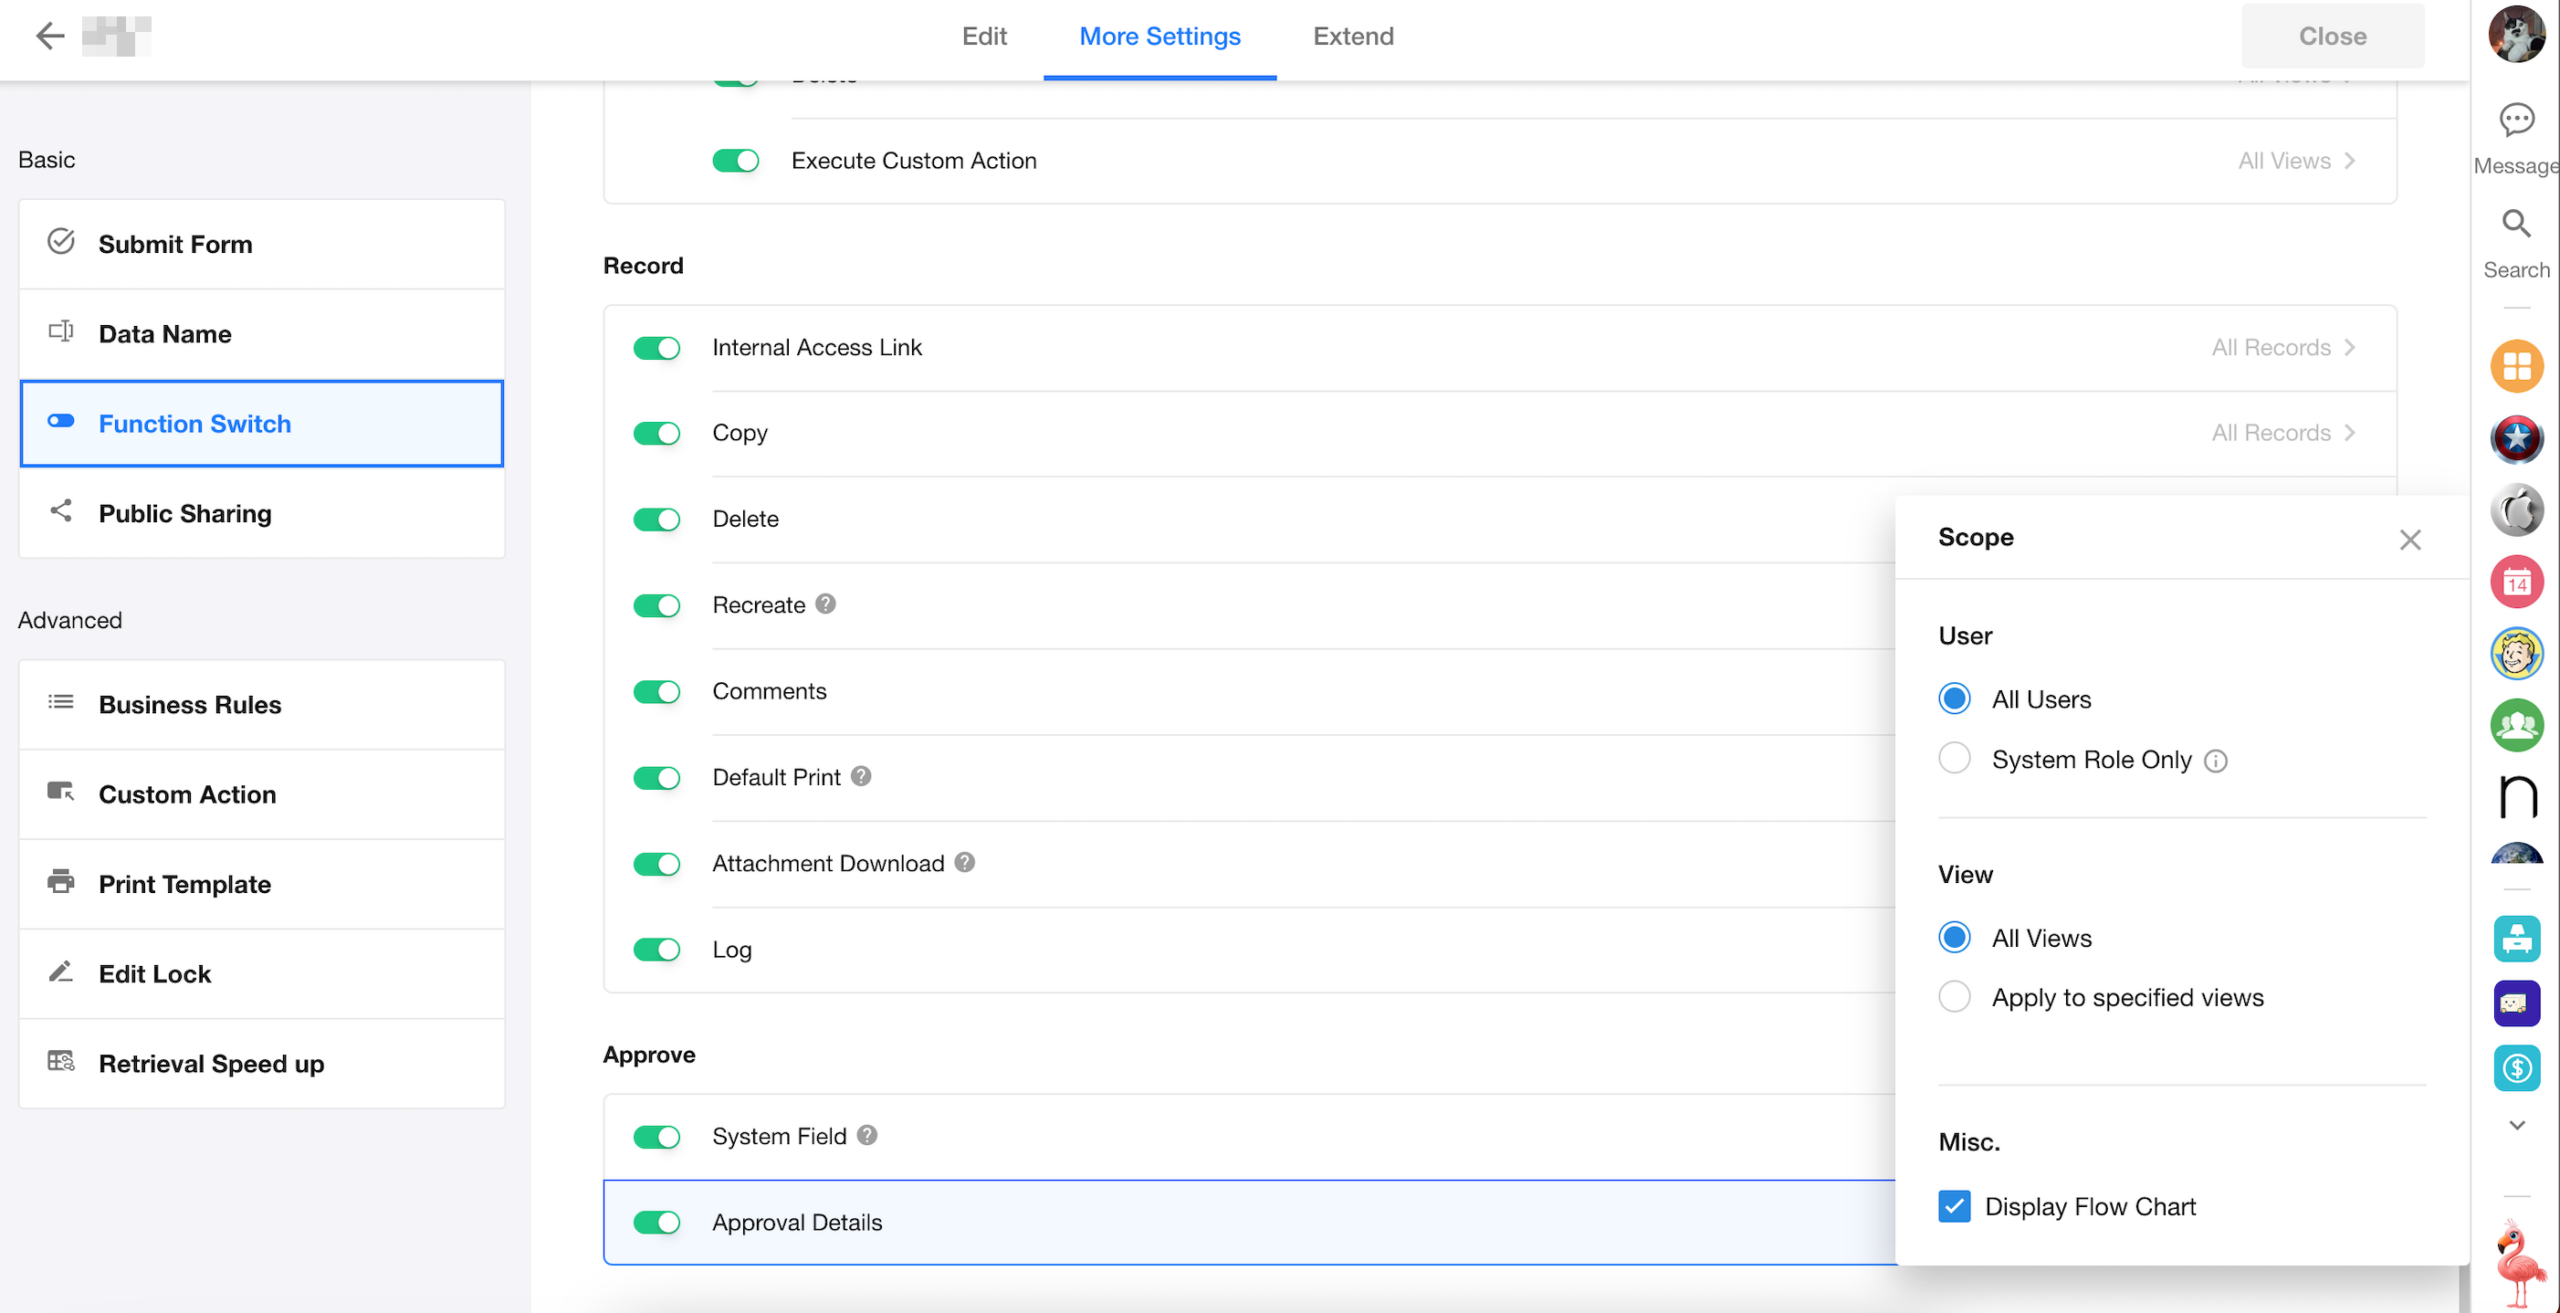
New Display Option for Approval Flow Chart
A new toggle has been added under Function Switch → Approval Details, allowing users to configure whether or not to display the approval flow chart in records.
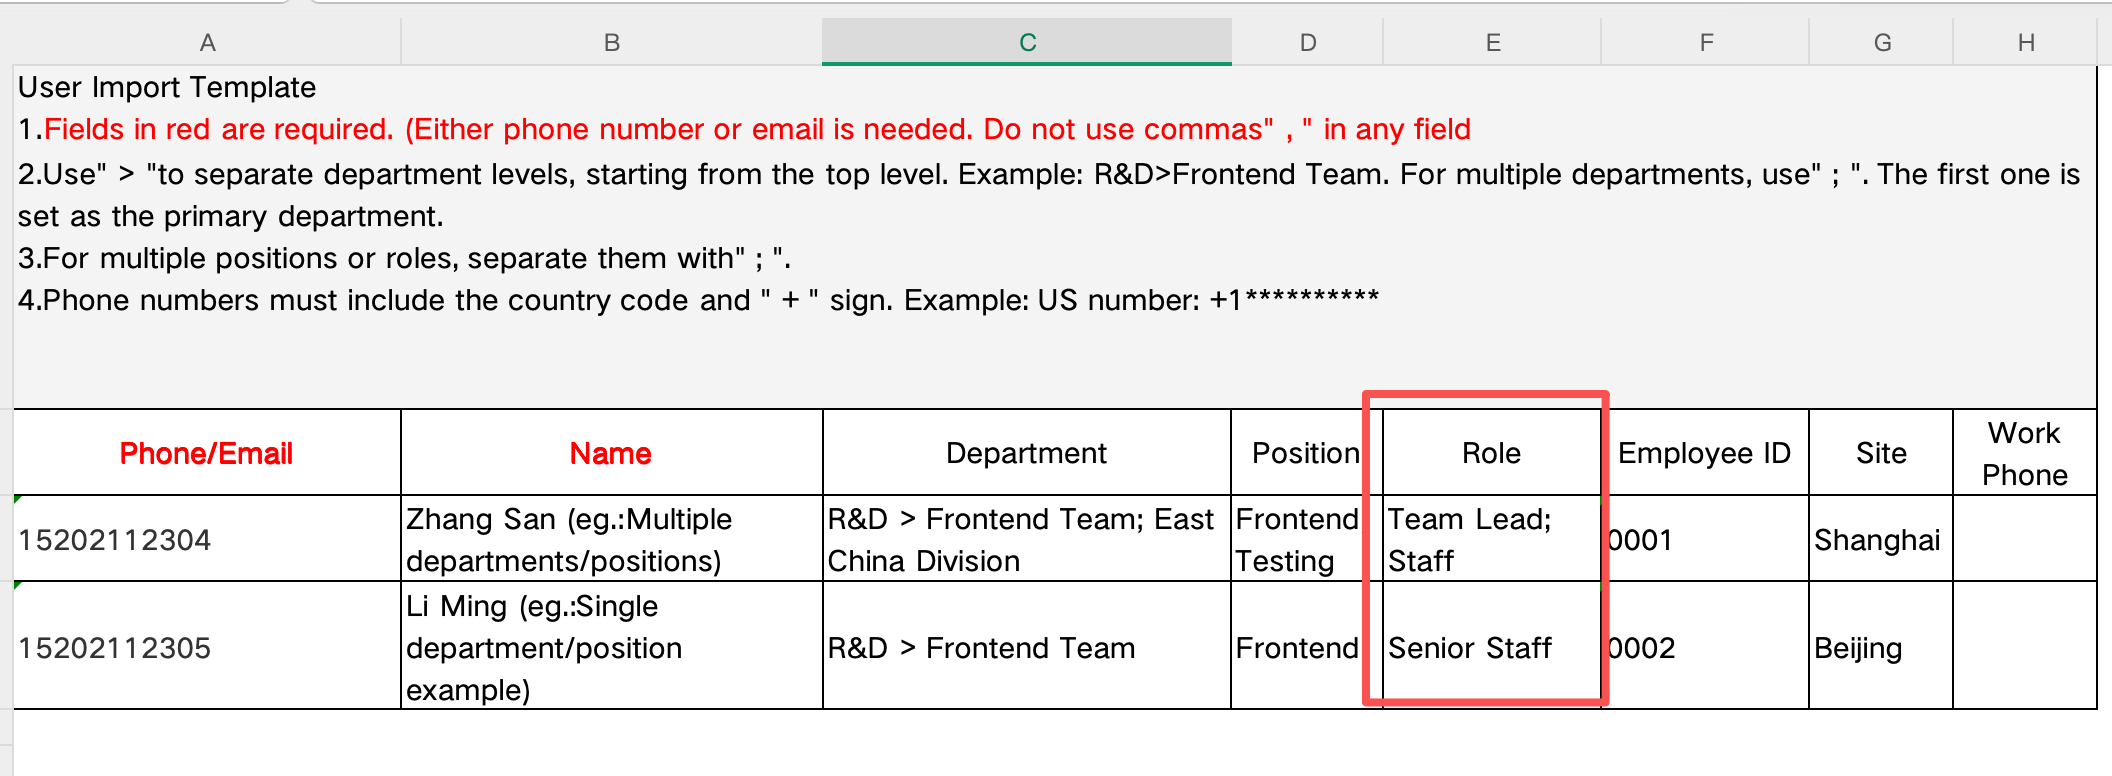
Import/Export Organization Members with Organization Roles
When importing or exporting organization members, the system now includes support for organization roles, enabling more complete and structured user data management across systems.
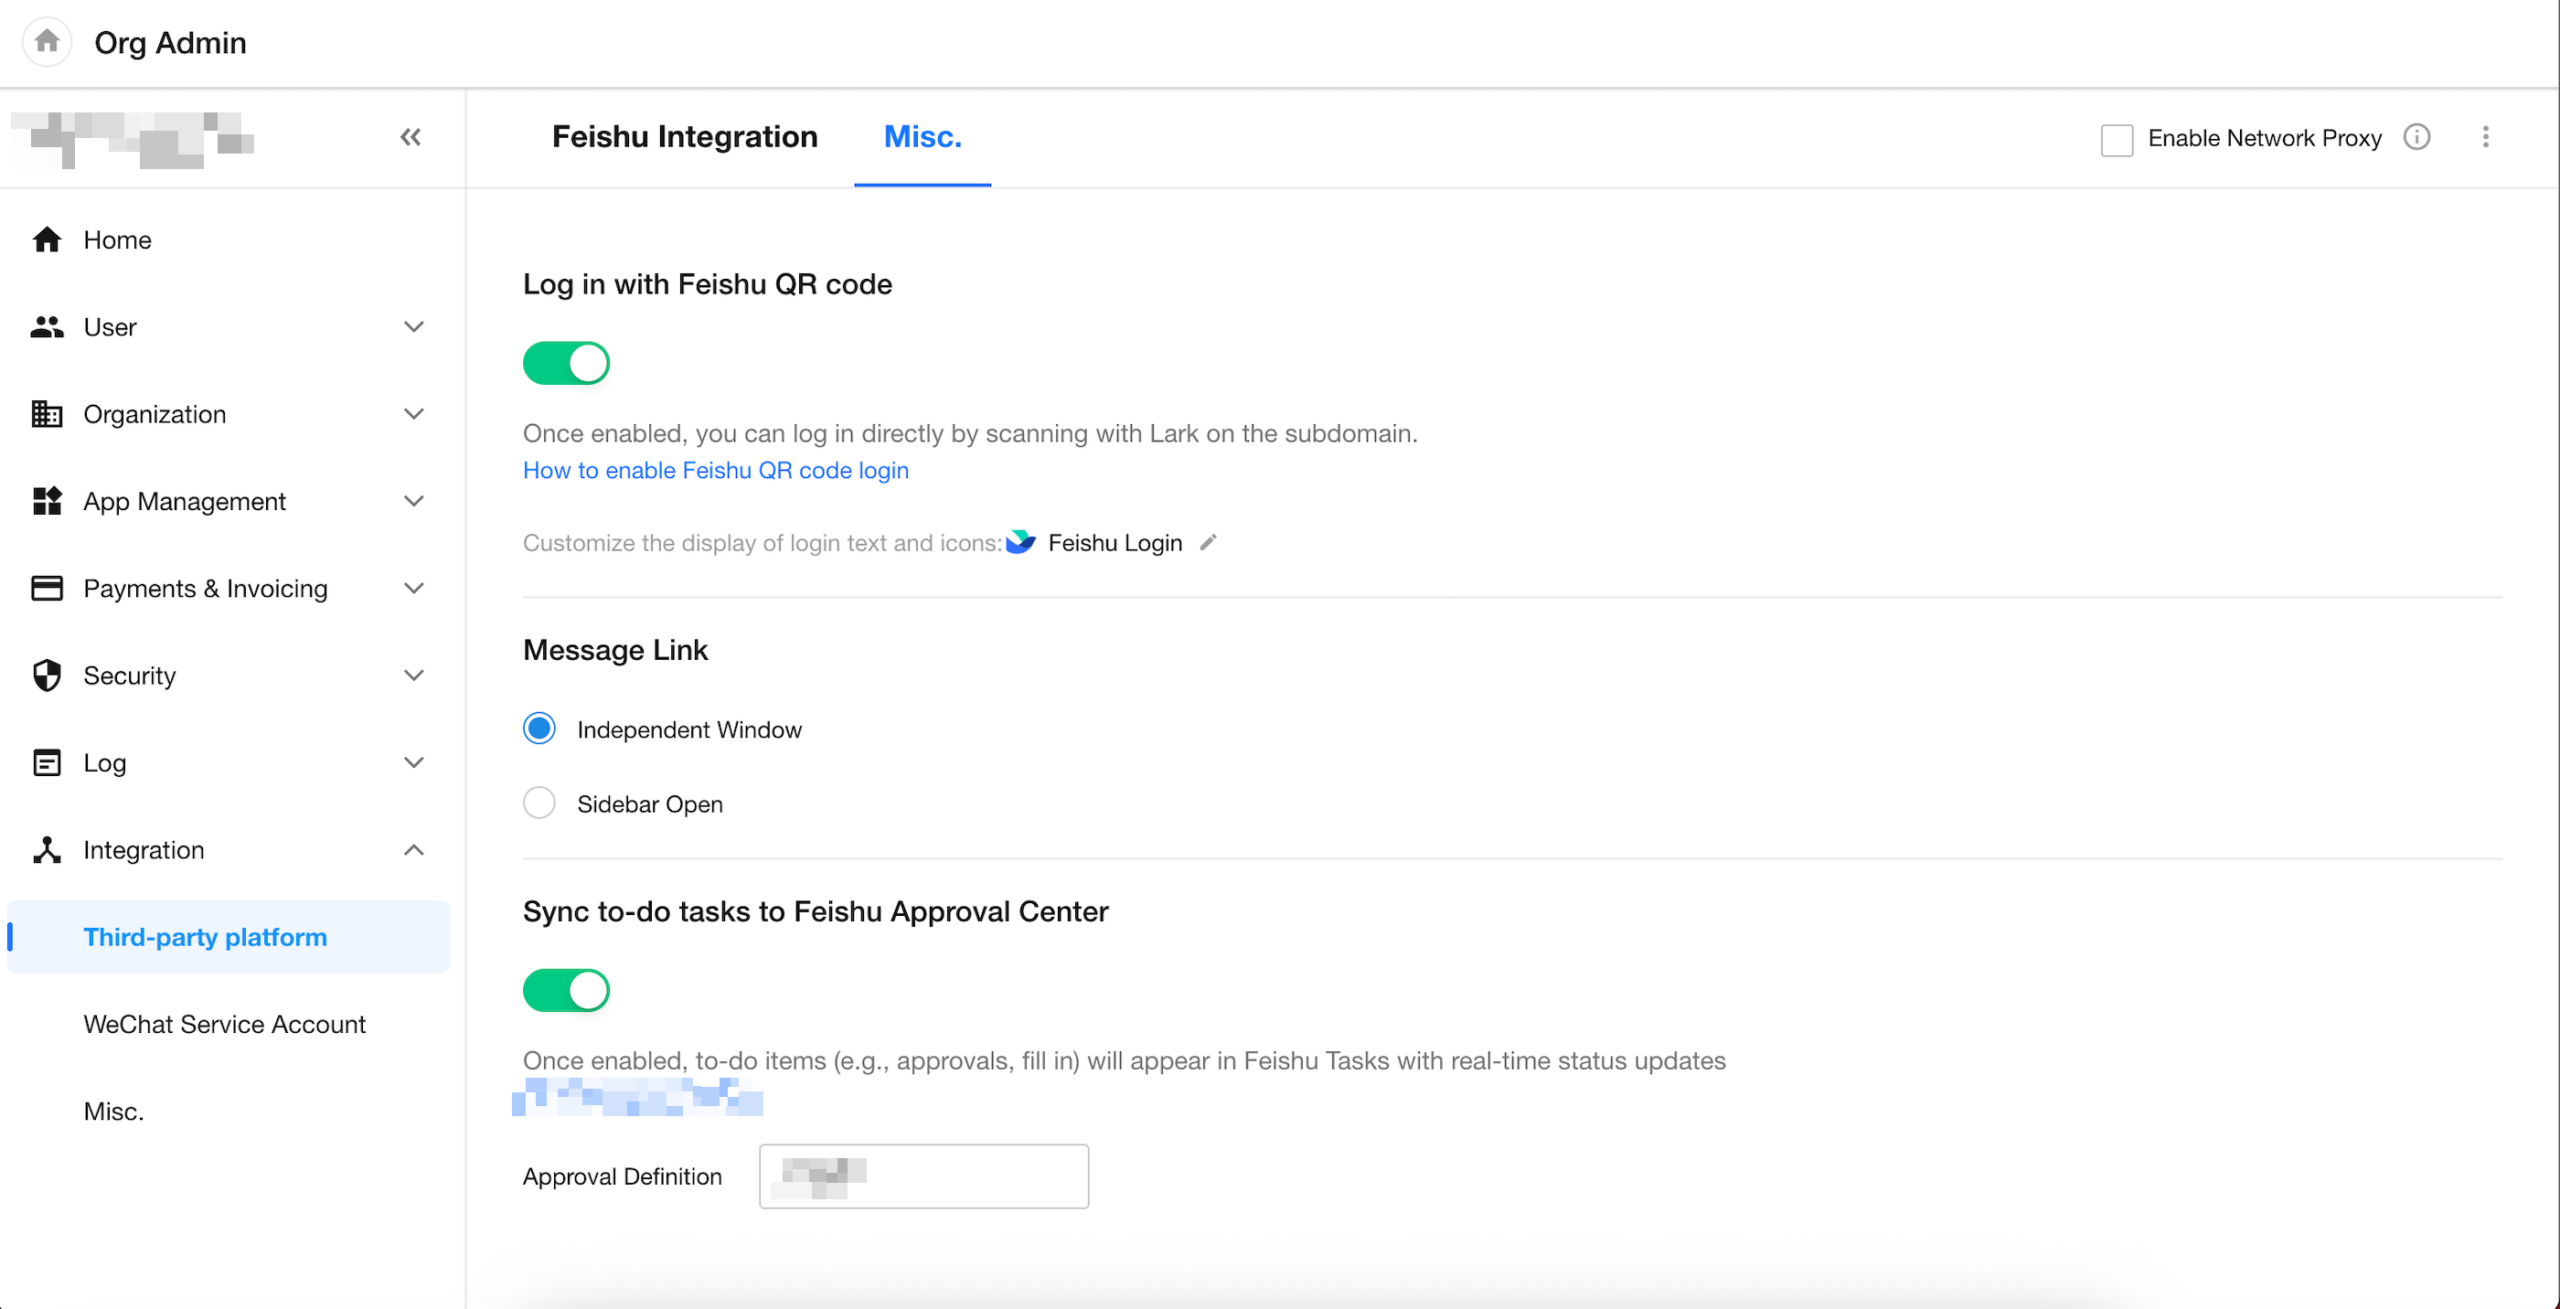
Workflow To-Dos Can Now Sync to Feishu / Lark
By simply enabling a toggle, workflow to-do items in HAP can now be synchronized to Feishu / Lark, allowing users to complete approvals directly within Fei / Lark.
Business Rule: Enable up to 100 Rules
Filters in Embed Field: Dynamic Field Values Now Support Foreign Fields
Filters with Region/City Fields Now Support Dynamic Region-Type Inputs
When using region/city fields in filters, the system now supports dynamic field values that are also region-type fields.
This enhancement applies to the following scenarios:
- Setting record selection scopes in relationship fields
- Setting default values via worksheet queries
- Filtering data sources in cascading fields
- Setting filters in embed fields
- Defining query conditions in query records fields
- Applying filters in business rules
HAP Platform Management
(Primarily for Server Edition and Application Platform Core)
AI Model & Provider Management
Objectives
1. Centralized Model Management and Feature Allocation
Establish a unified module for managing AI models, allowing centralized maintenance of model capabilities and flexible assignment of different models to different AI-powered features.
2. Hot-Switching Between Model Providers
Support configuring multiple provider sources for the same model, enabling seamless switching in case of provider failures or degraded performance—ensuring high availability and stability of AI services.
Feature Overview
Global AI Service Toggle:
- When disabled, all AI-related feature entry points will be hidden across the platform. Existing AI features (e.g., AIGC workflow nodes, ChatBots) will fail to execute.
- When enabled, administrators can configure available AI models and assign them to corresponding feature modules.
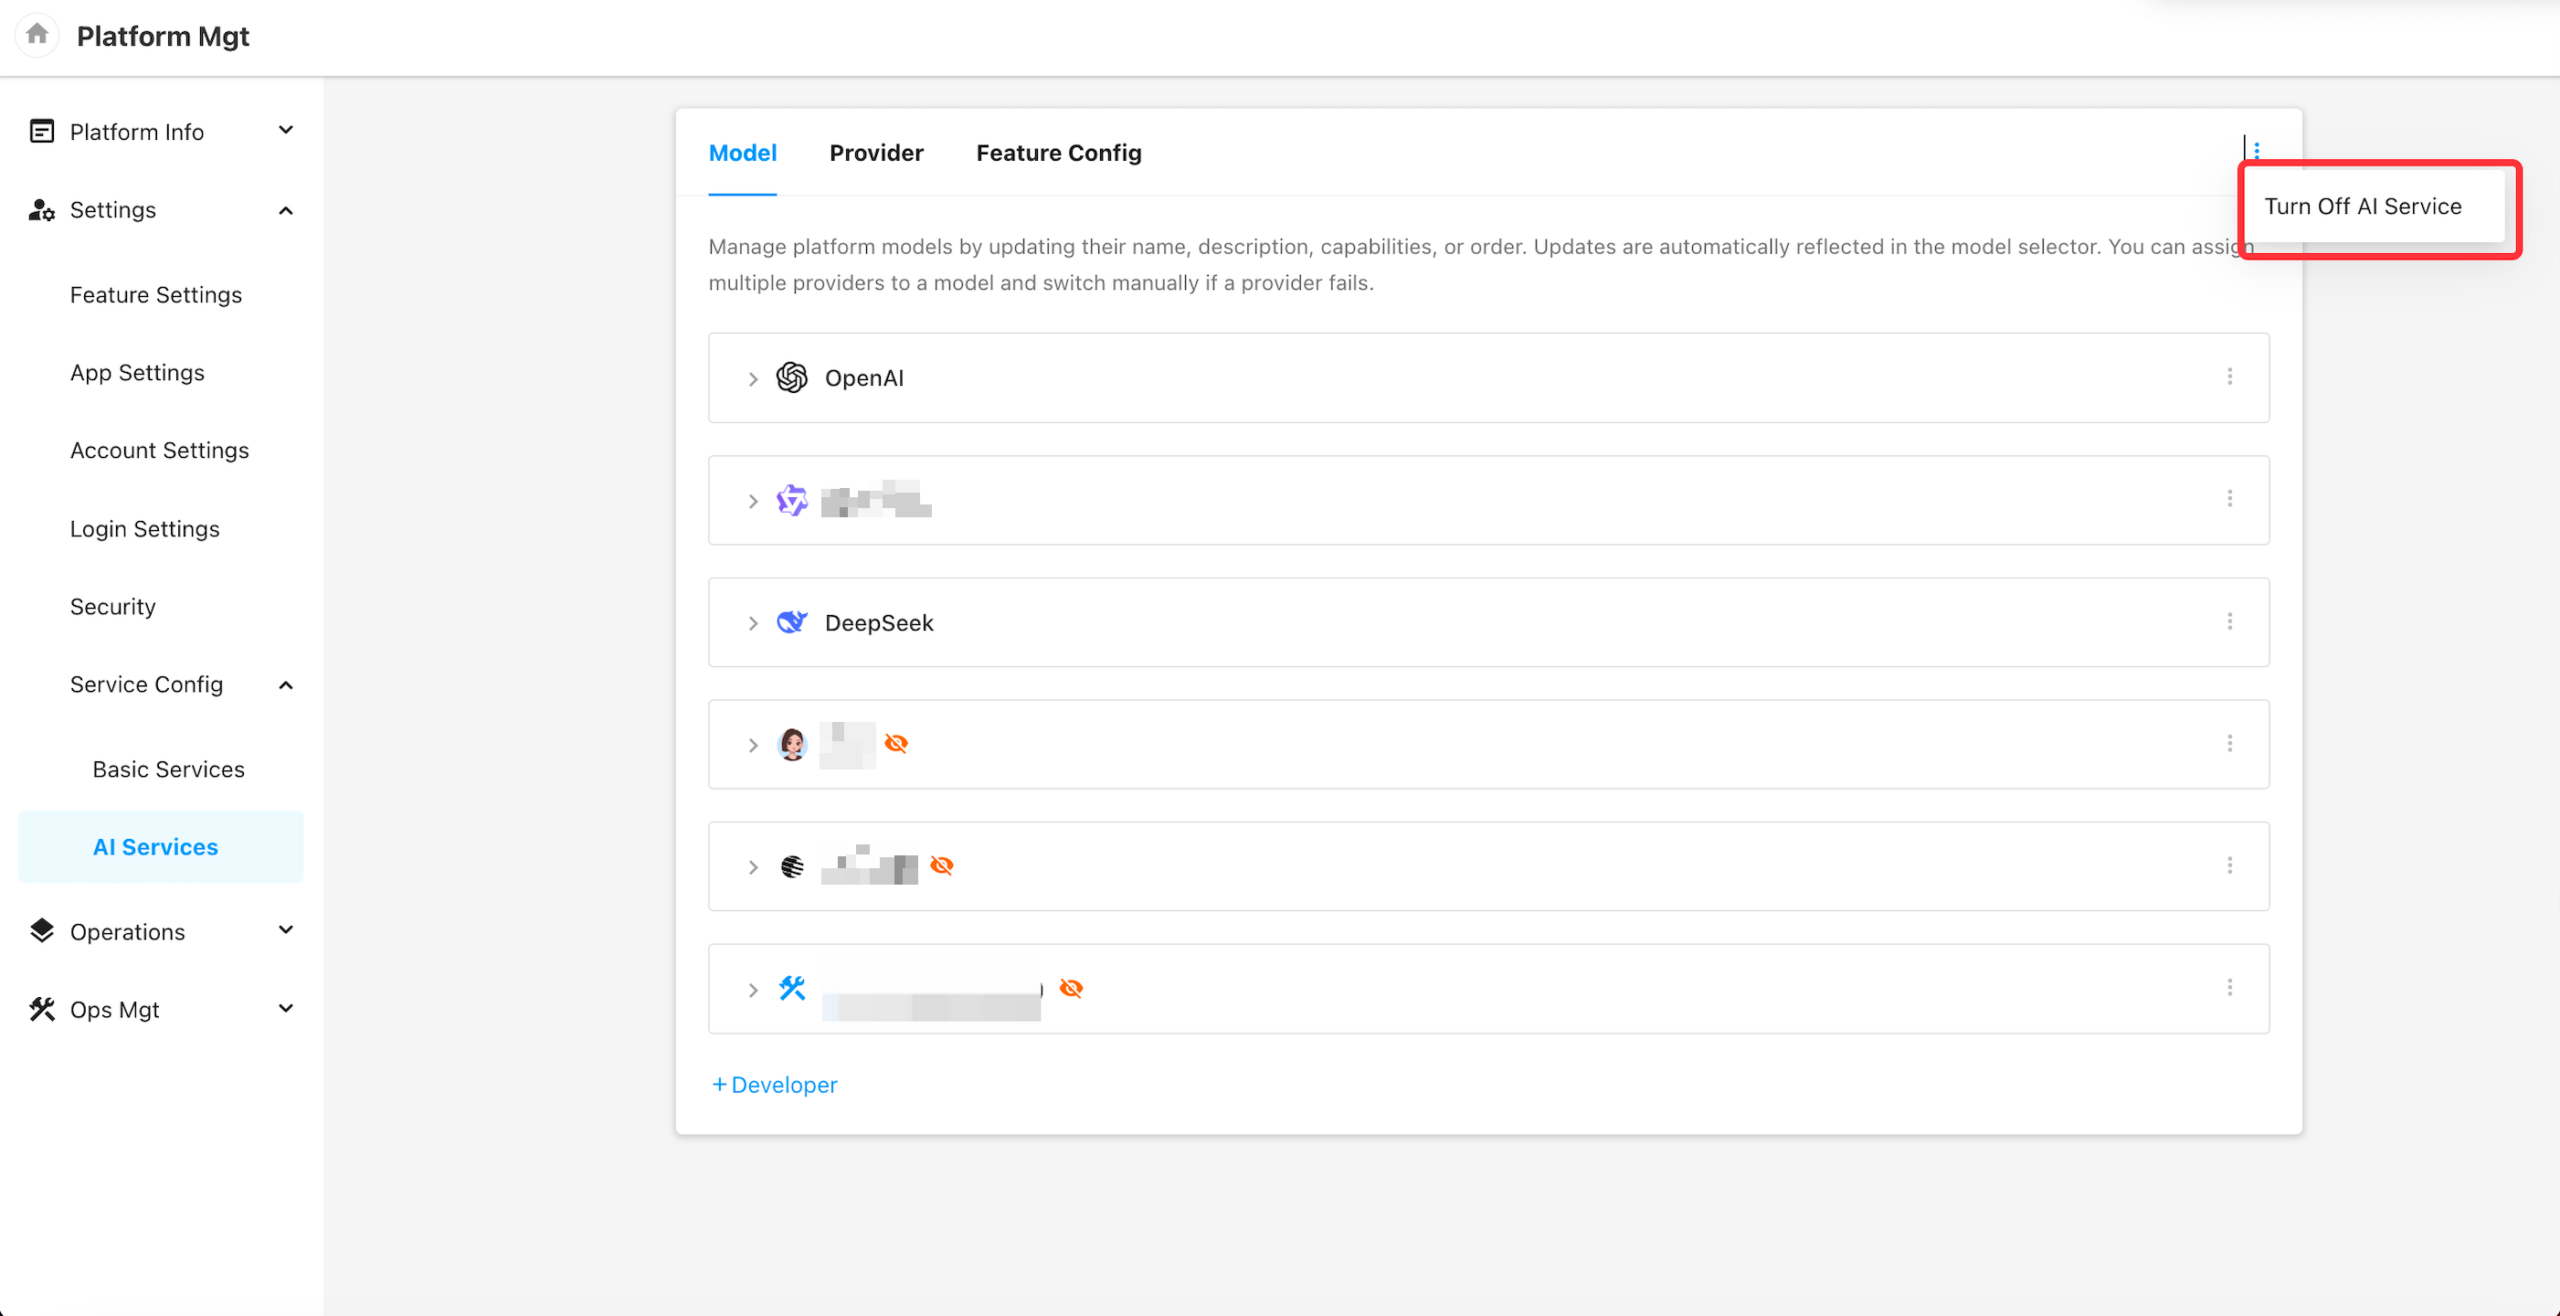
Model
1. Add Developer Groups
You can now add custom developer groups, as well as built-in groups for the following platforms:
- OpenAI
- DeepSeek
- Qwen (Tongyi Qianwen)
Built-in groups cannot be added more than once.
Once added, each built-in group will automatically include a default set of models, along with pre-filled base parameters.
Platform administrators only need to configure the provider credentials to begin using the models.
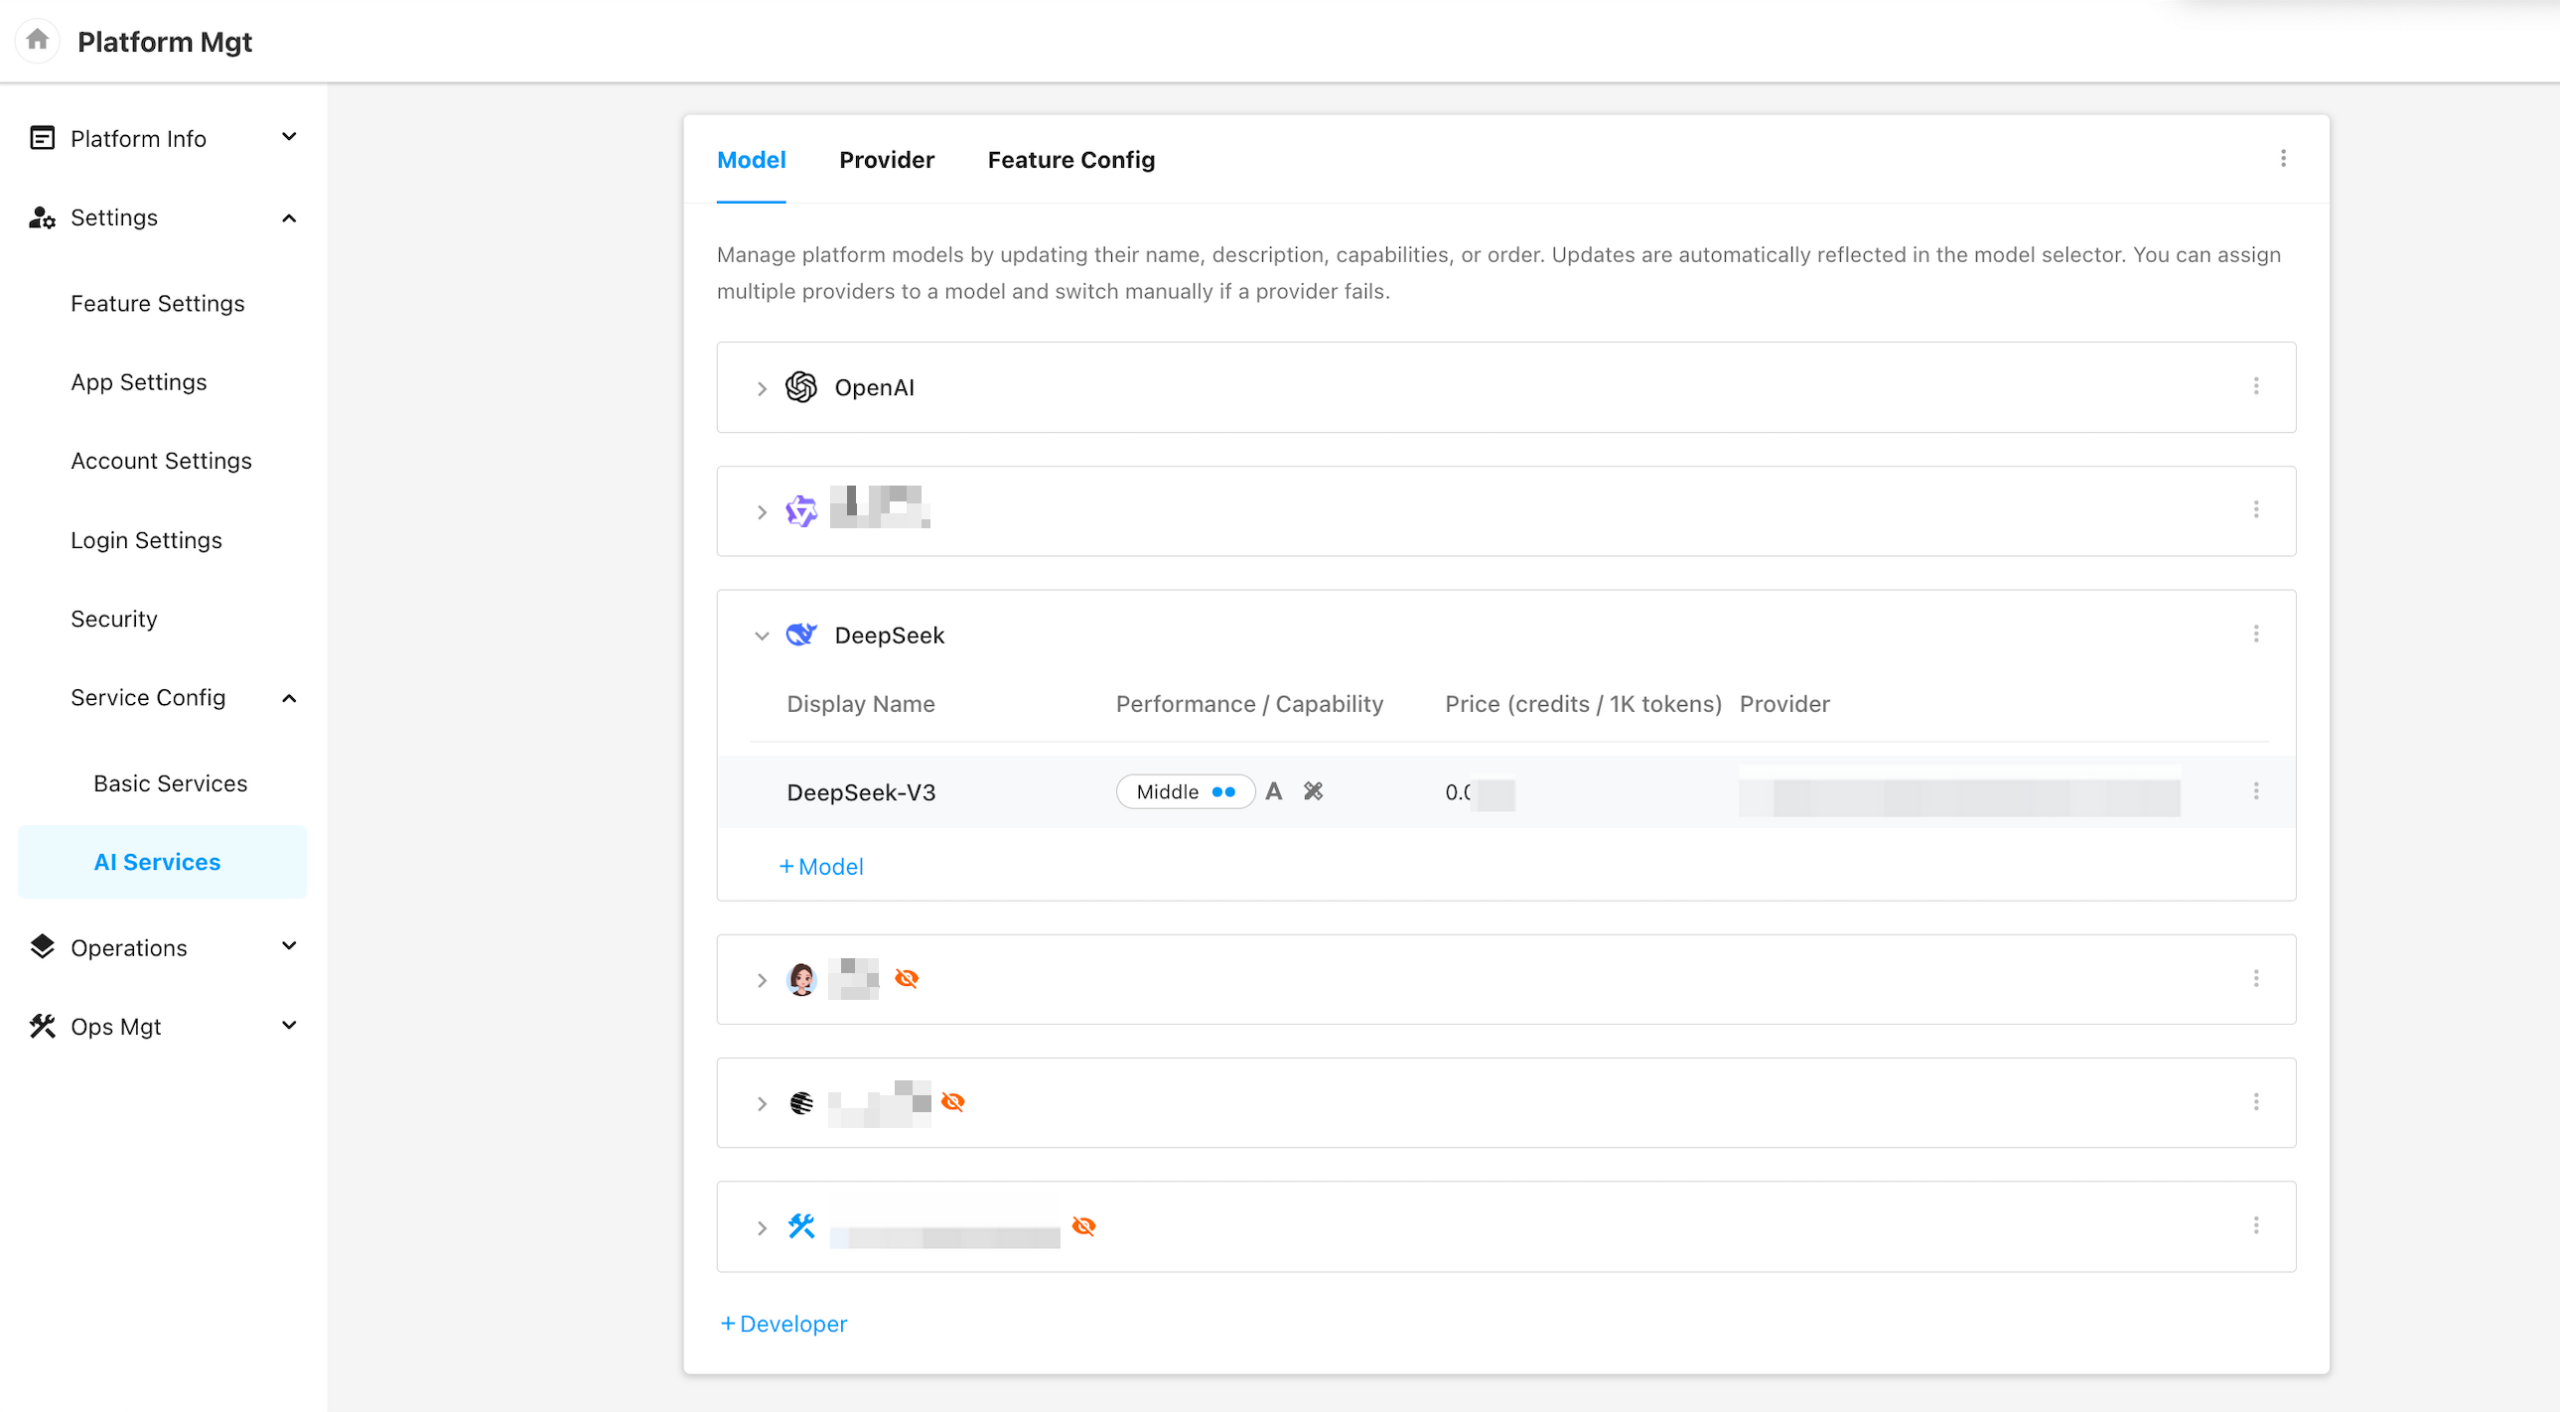
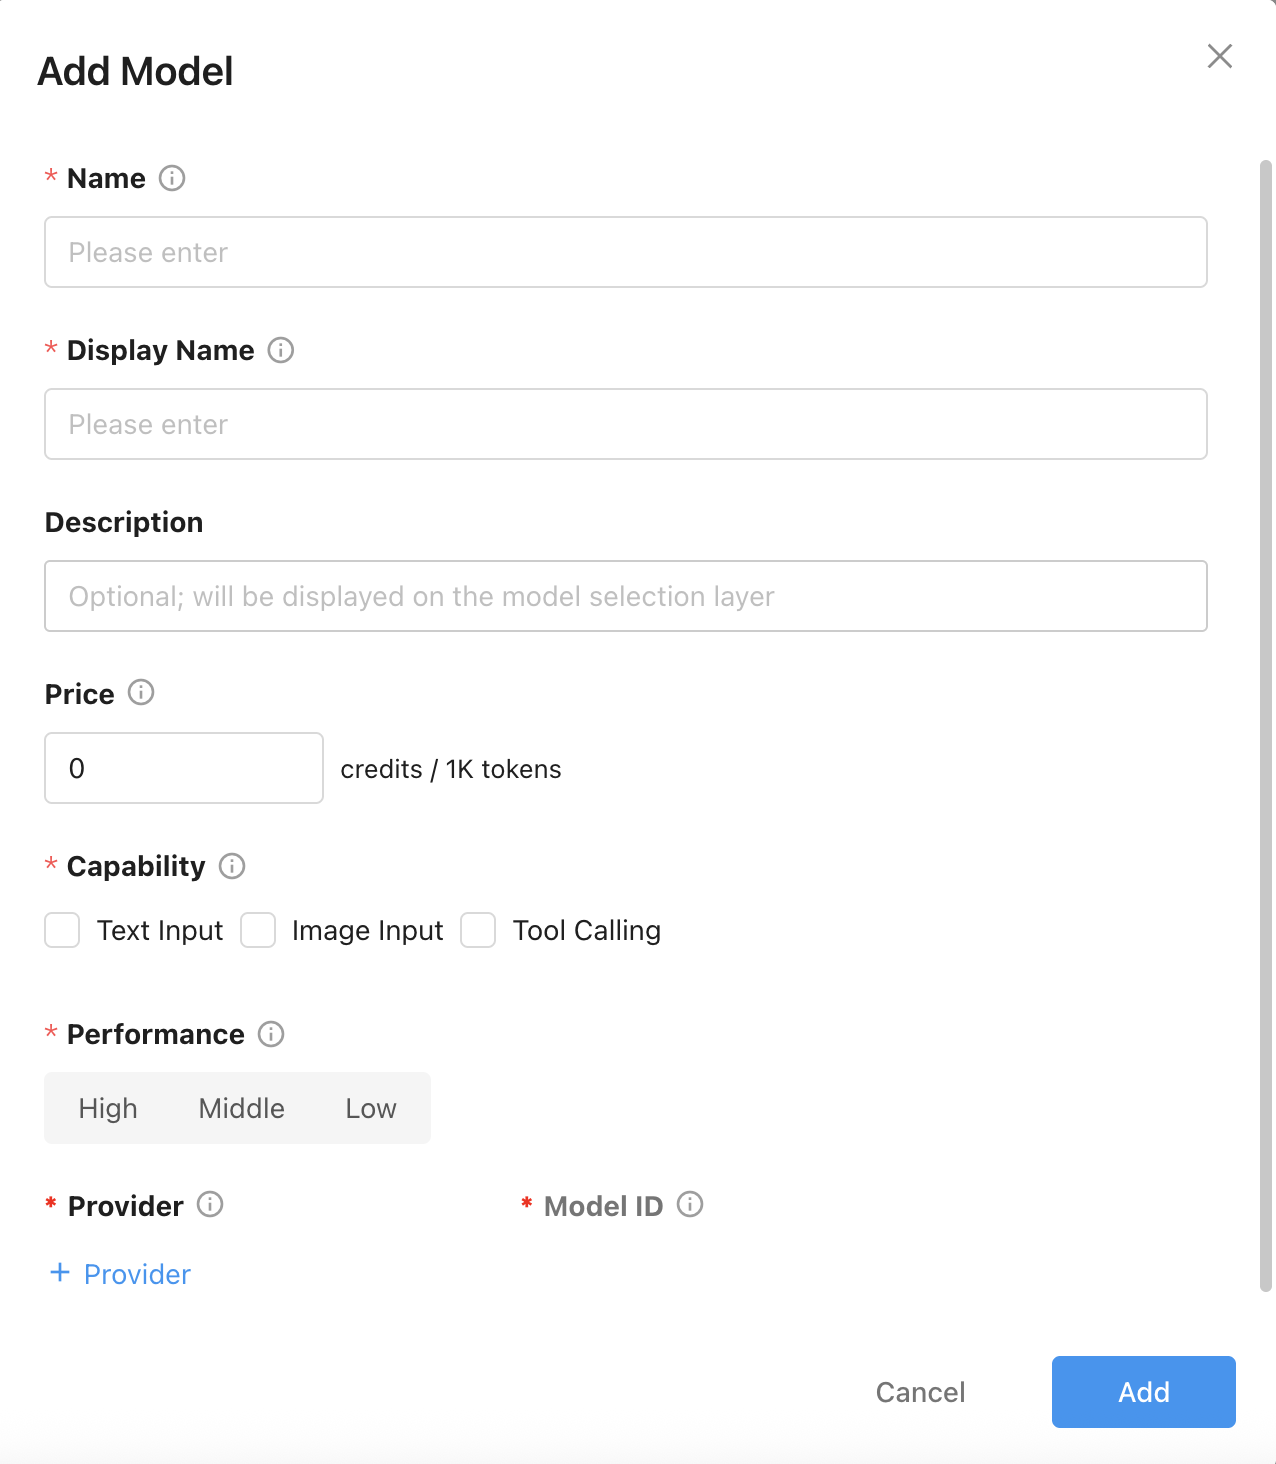
2. Add Models Under a Developer Group
You can add individual models under each developer group with the following fields:
- Name
- A unique identifier used internally by the platform for model matching.
- Must be unique and cannot be duplicated.
- Display Name
- The name shown to end users when selecting or viewing the model.
- Capability
- The functional capabilities of the model (e.g., text generation, code completion), which the system uses to automatically match models to AI features.
- Performance
- A qualitative assessment of the model’s overall performance, used to assist in automated model selection.
- Can include evaluations across dimensions such as accuracy, speed, stability, and cost.
- Provider and Model ID
- The actual provider platform and corresponding model ID used for invocation.
- You may configure multiple providers for a single model, but only one can be active at a time.
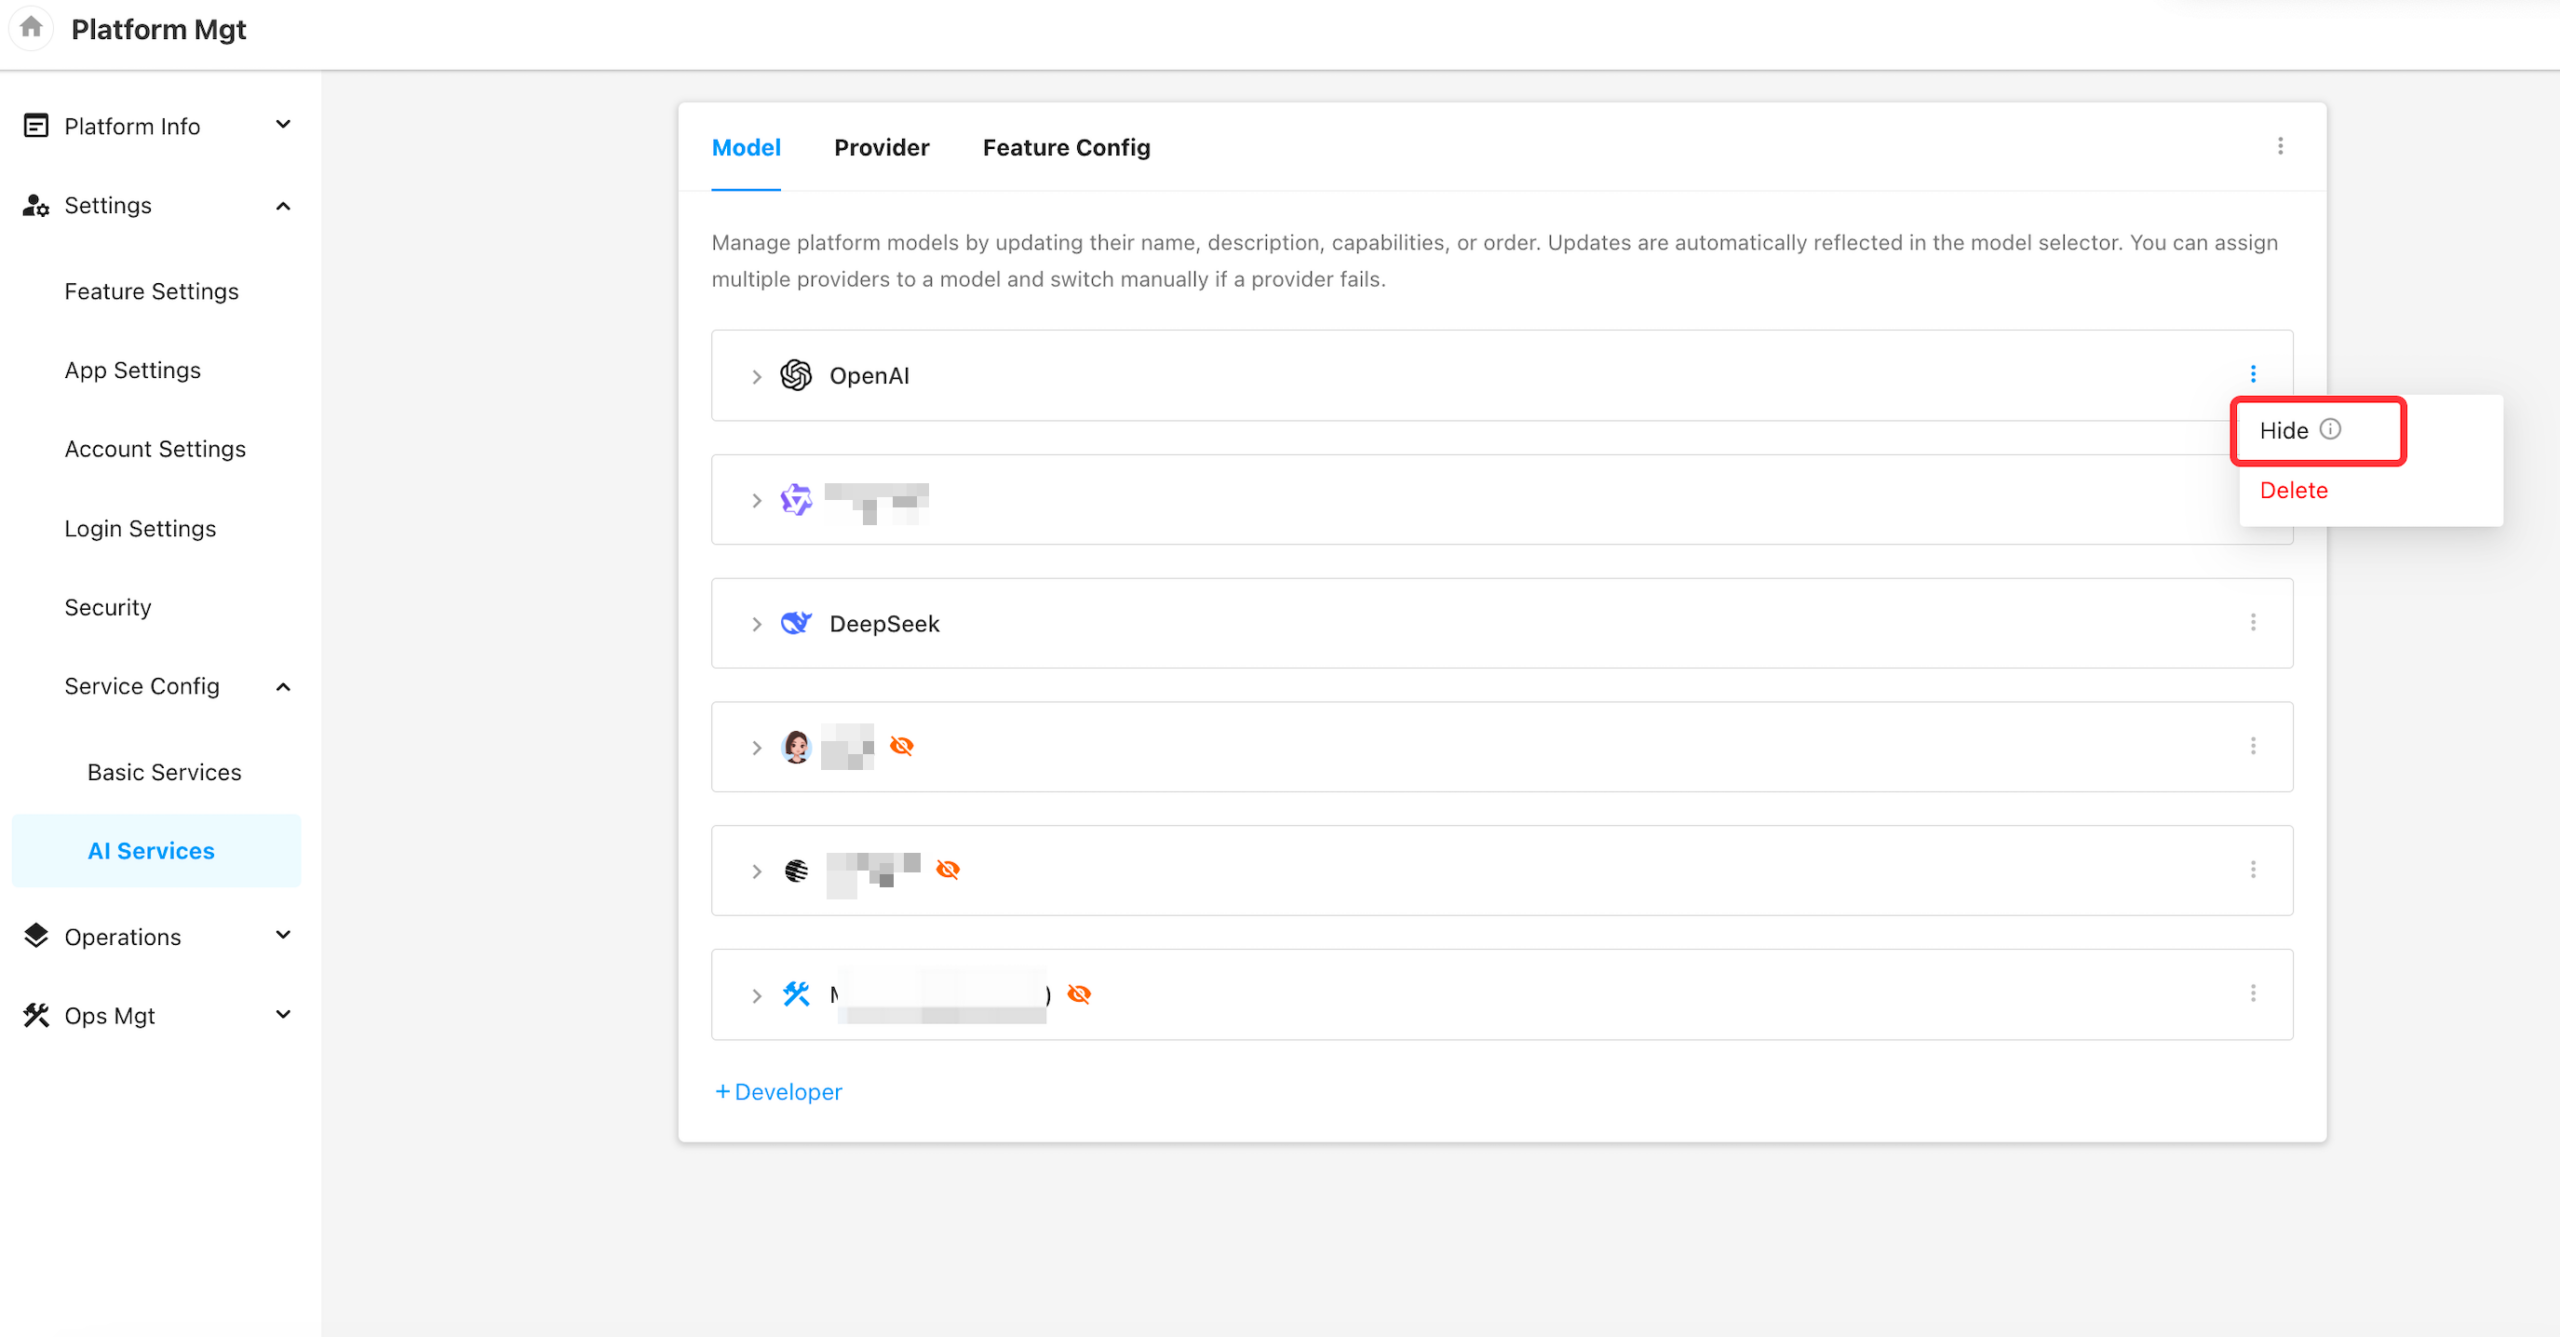
3. Hide Developer Groups and Models
When a Developer Group or Model is set to “Hidden”, it will no longer appear in the model selection panel on the tenant side (e.g., in AIGC workflow nodes).
However, hidden groups and models remain fully accessible in Platform Management and can still be selected in system-level configuration.
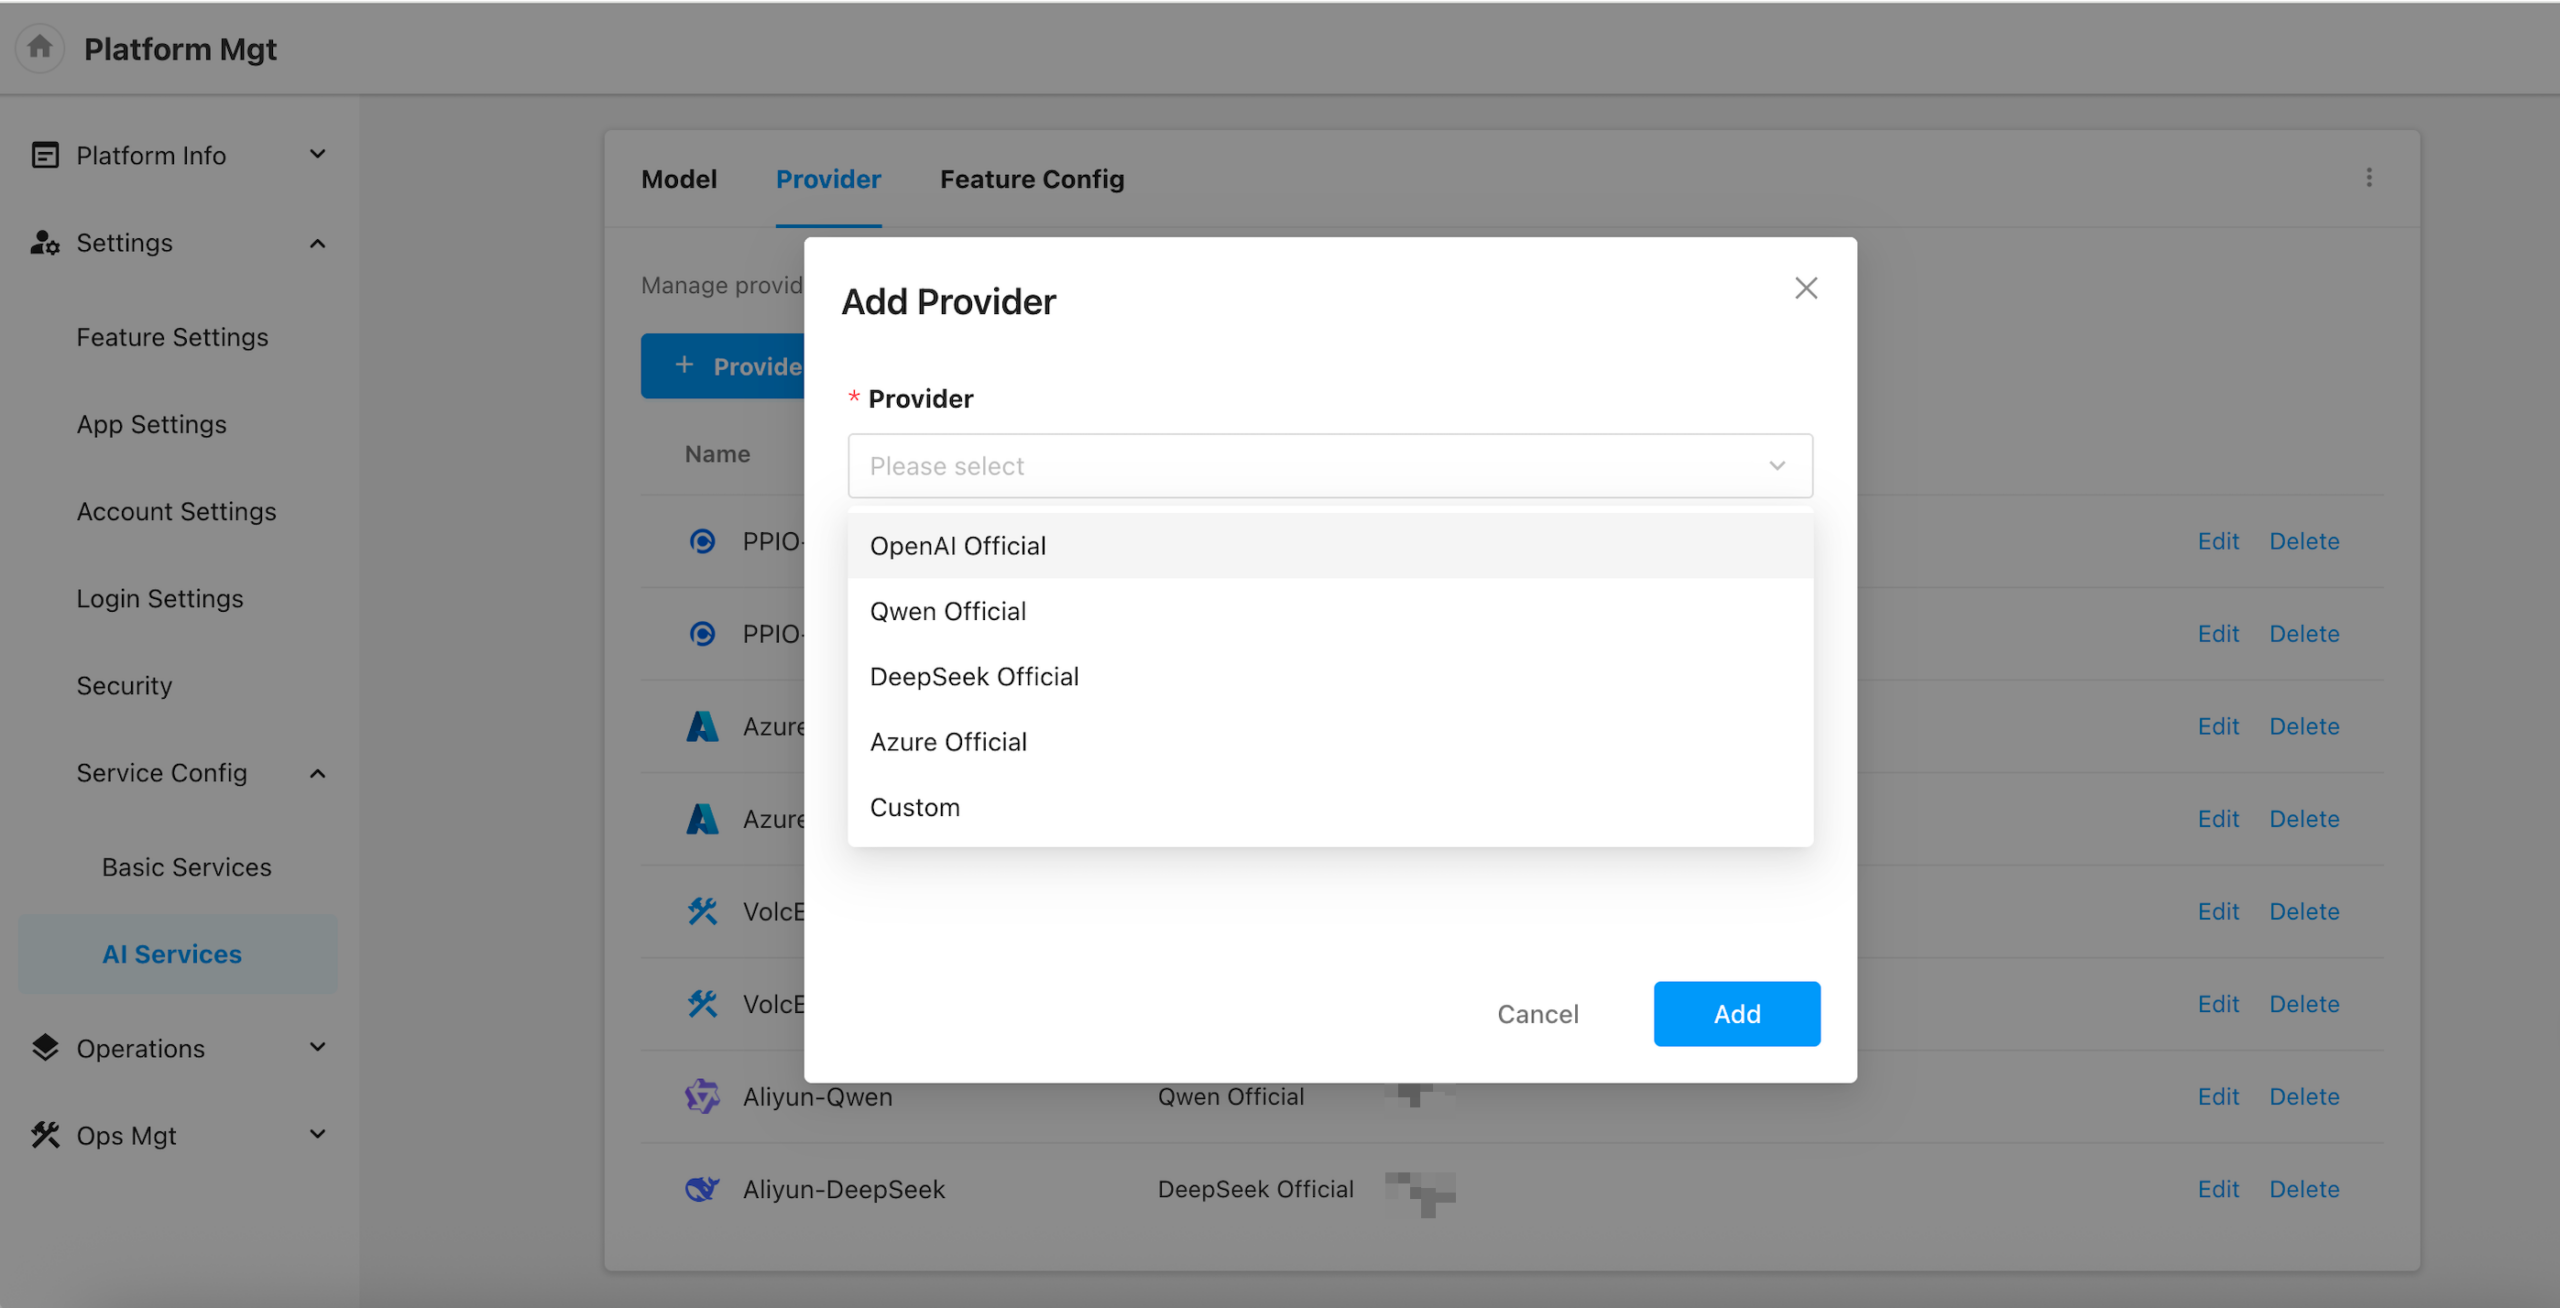
Provider
This section allows users to manage provider API endpoints and credentials (API Keys) used during model invocation.
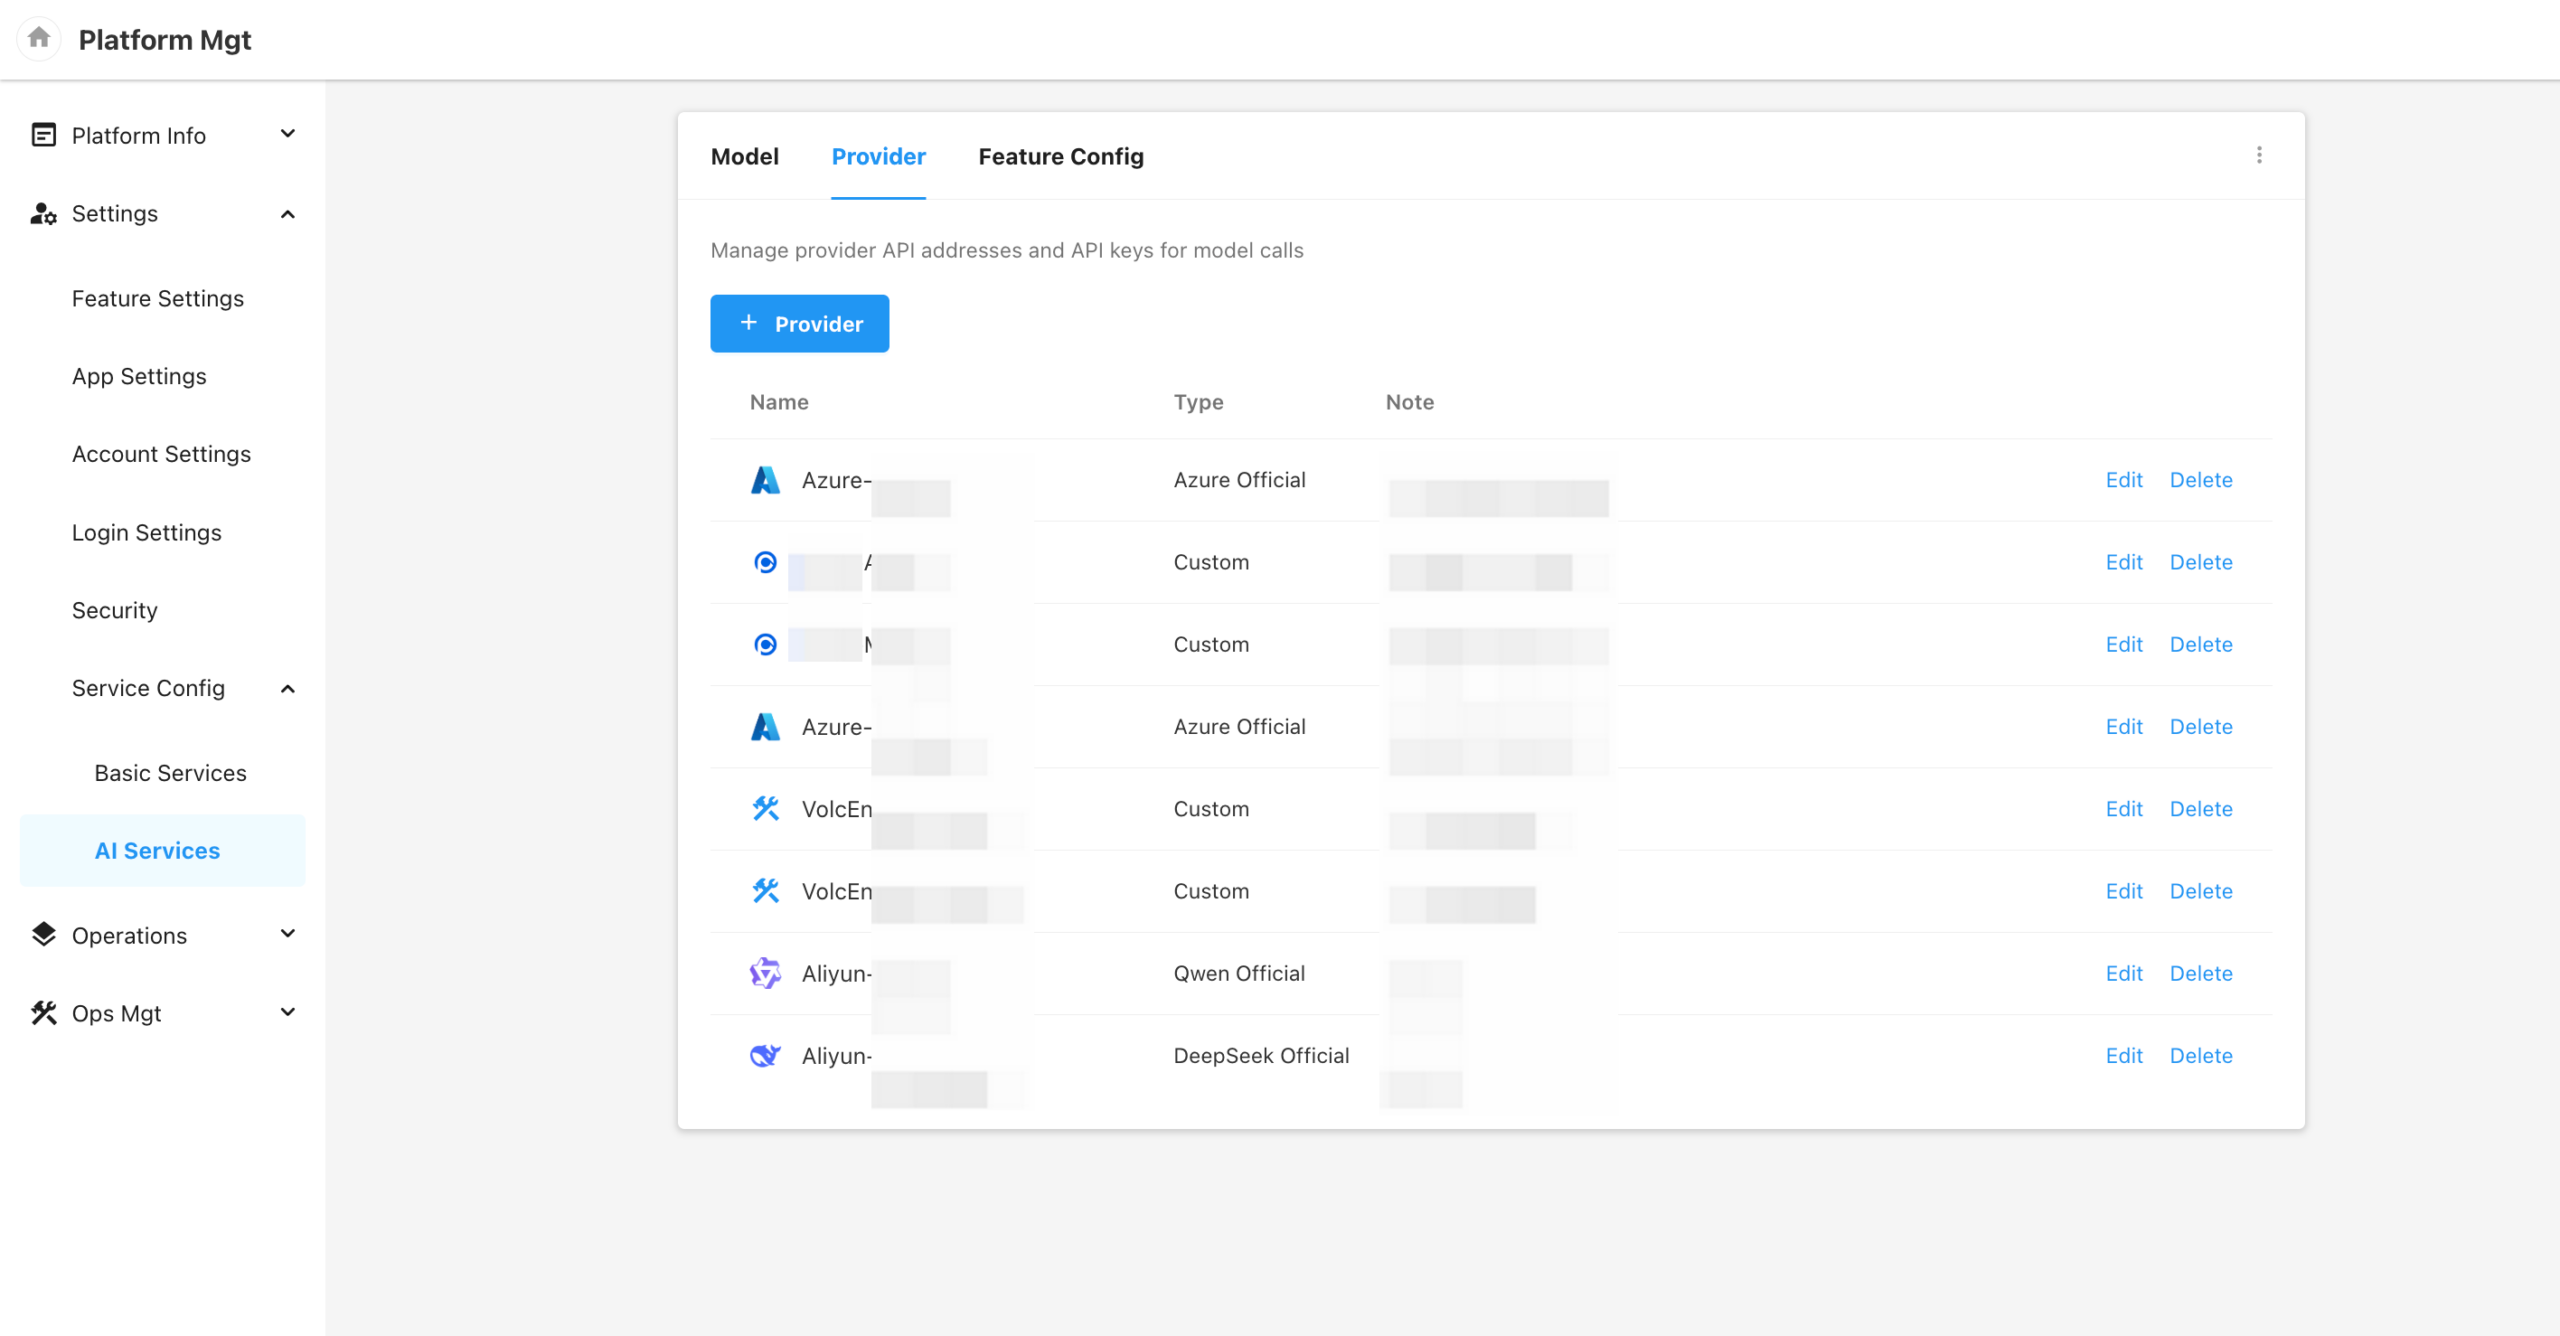
The platform supports adding both official providers and custom providers, including:
- OpenAI
- Qwen (Tongyi Qianwen)
- DeepSeek
- Azure OpenAI
- Custom Providers
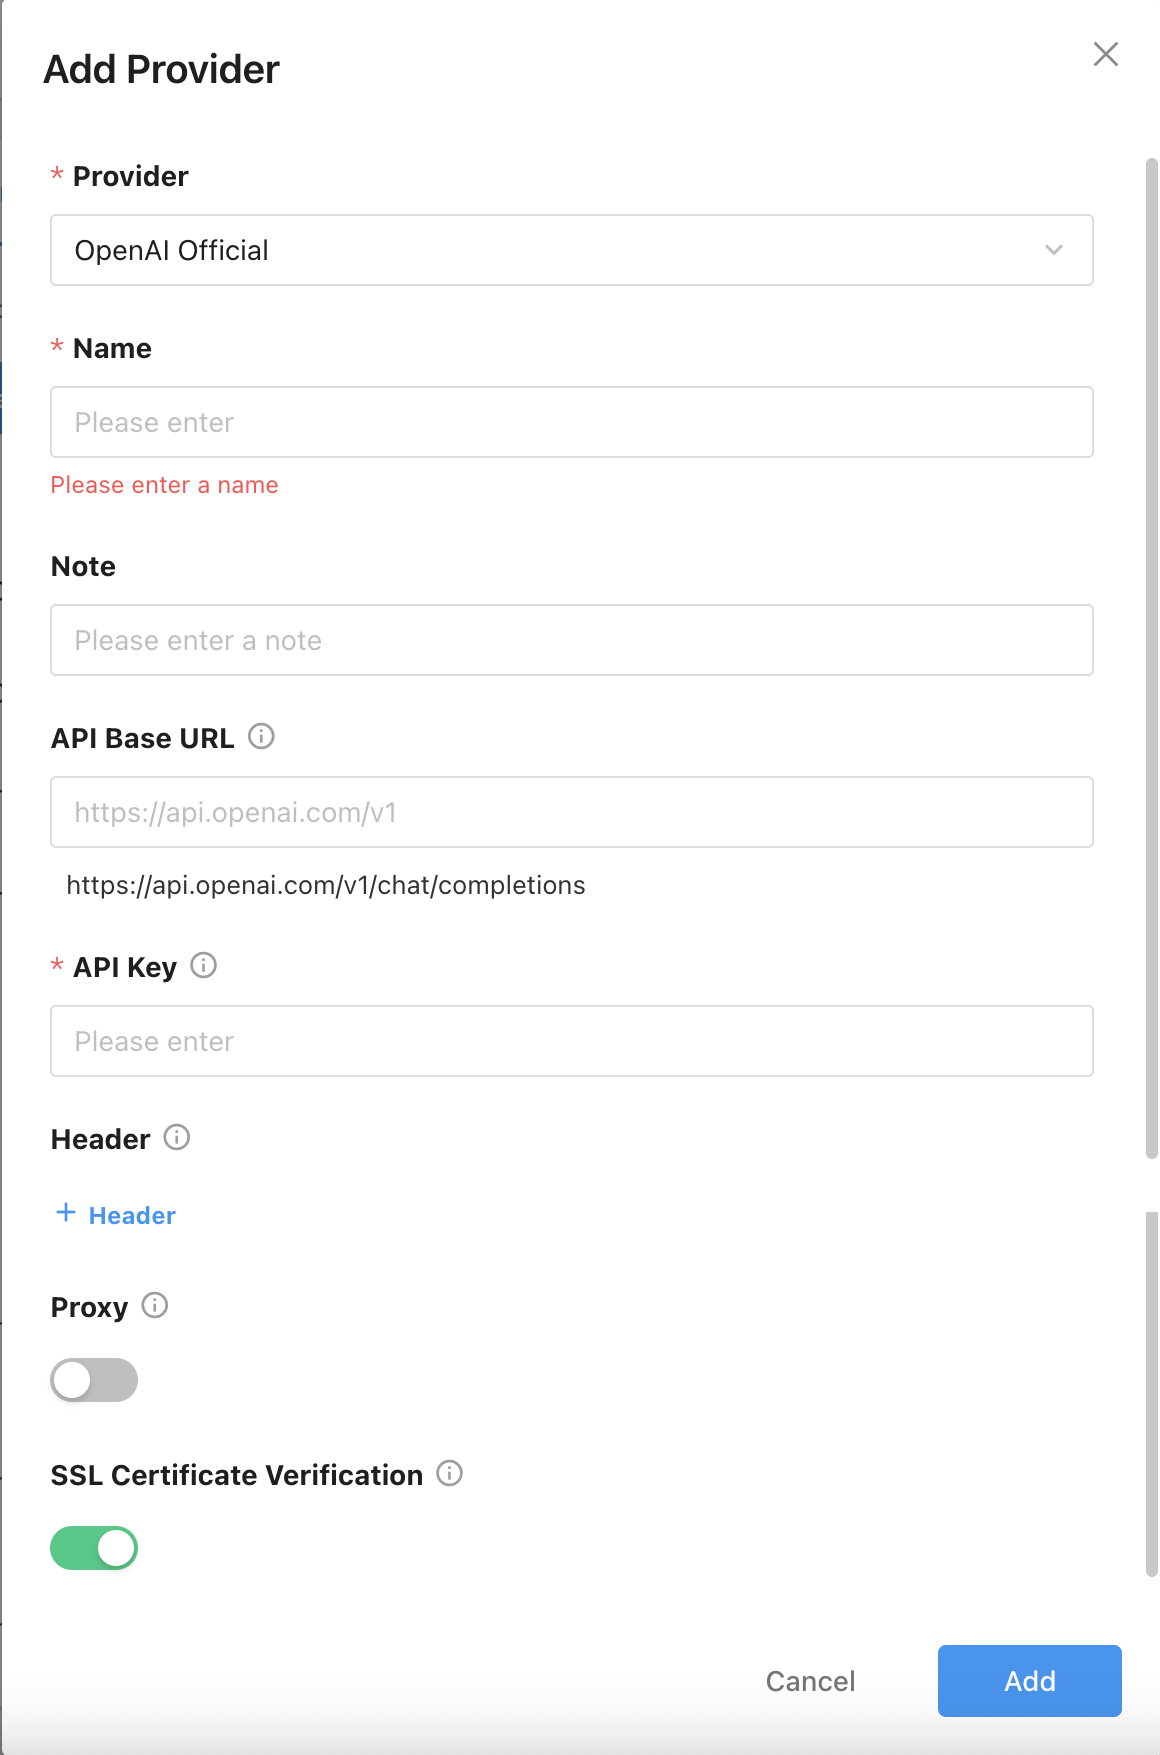
For official providers, the AI Base URL field is optional:
- If left blank, the platform will use a built-in default URL based on the provider’s API standard.
- If filled, the system will use the specified URL for requests.
Proxy Support:
- You can enable proxy forwarding.
- When enabled, requests will be sent through the server configured in
Settings → Security → API Proxy。
Additional options:
- Custom request headers can be configured per provider.
- You can also enable SSL certificate verification to ensure secure transmission.
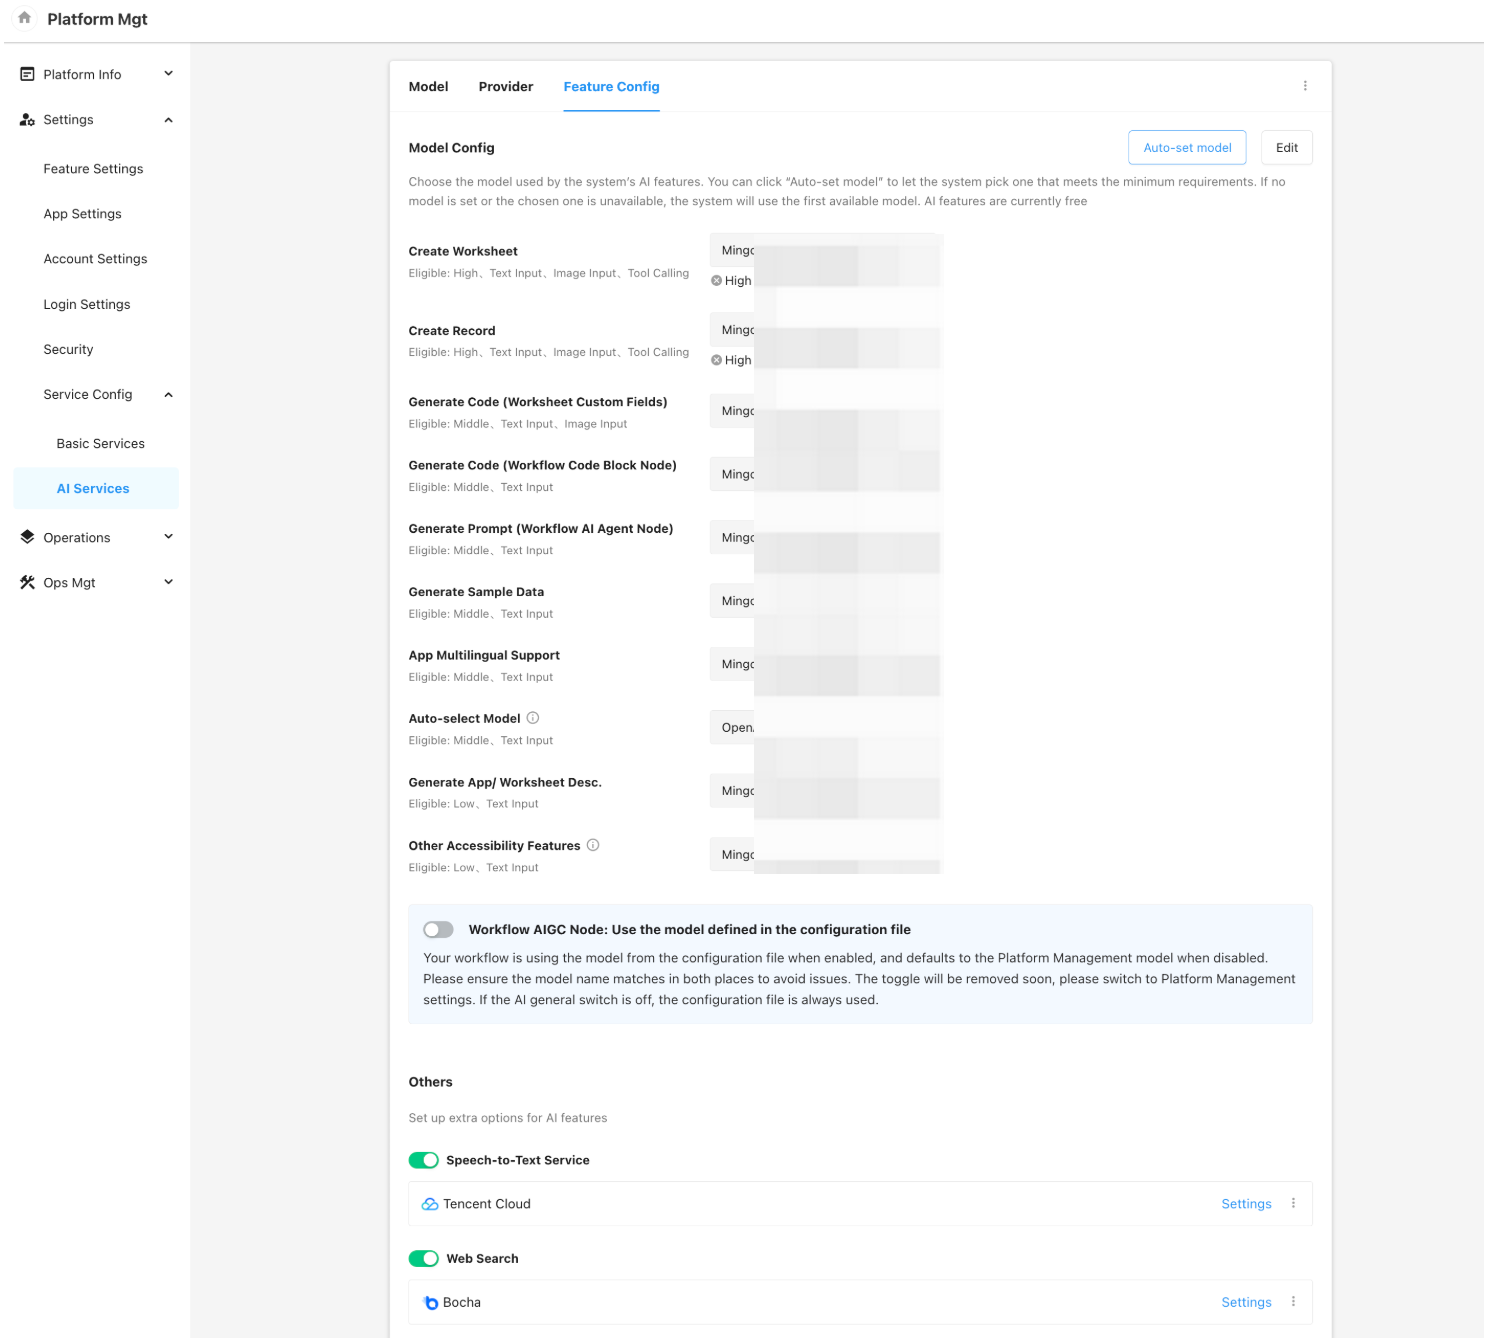
Feature Configuration
- Model Configuration: Assign AI Models to System Features
- Click “Auto-Set Model” to automatically match available models to corresponding AI features based on model parameters and system requirements. Manual adjustment is also supported.
- If a selected model does not meet the minimum requirement for a specific feature, a warning message will appear below the model input field.
- When no model is assigned or the selected model is unavailable, the system will default to using the first available model from the list to ensure service continuity.
- Note: All current system-level AI features are free of charge.
- System AI features include:
- Creating worksheets
- Creating records
- Generating code for custom fields
- Generating code for code block nodes
- Generating prompts (for AI Agent nodes)
- Generating sample data
- Multi-language translation for apps
- Auto model selection (used in AI Agent nodes for dynamic model invocation)
- Generating app or worksheet descriptions
- Other auxiliary AI features, such as:
- Auto-generating conversation titles
- Pre-recommendations during AI-assisted worksheet creation (e.g., worksheet name, icon, etc.)
- Generating initial configuration for ChatBots based on user descriptions
- Additional Configuration
- Speech-to-Text Service: Used in Mingo to support voice input recognition)
- Web Search Integration: Used in AI-assisted record creation to retrieve external data from the internet.
Handling of Historical Configurations
- After the version upgrade, model configurations previously set will not be automatically carried over to the new “AI Services – Model” section.
If no models are configured in the new AI services module, the following three features will continue to use the model defined in the legacy configuration by default:
-
- Custom fields in worksheets
- Auto code generation in code block nodes of workflows
- Multi-language translation for applications
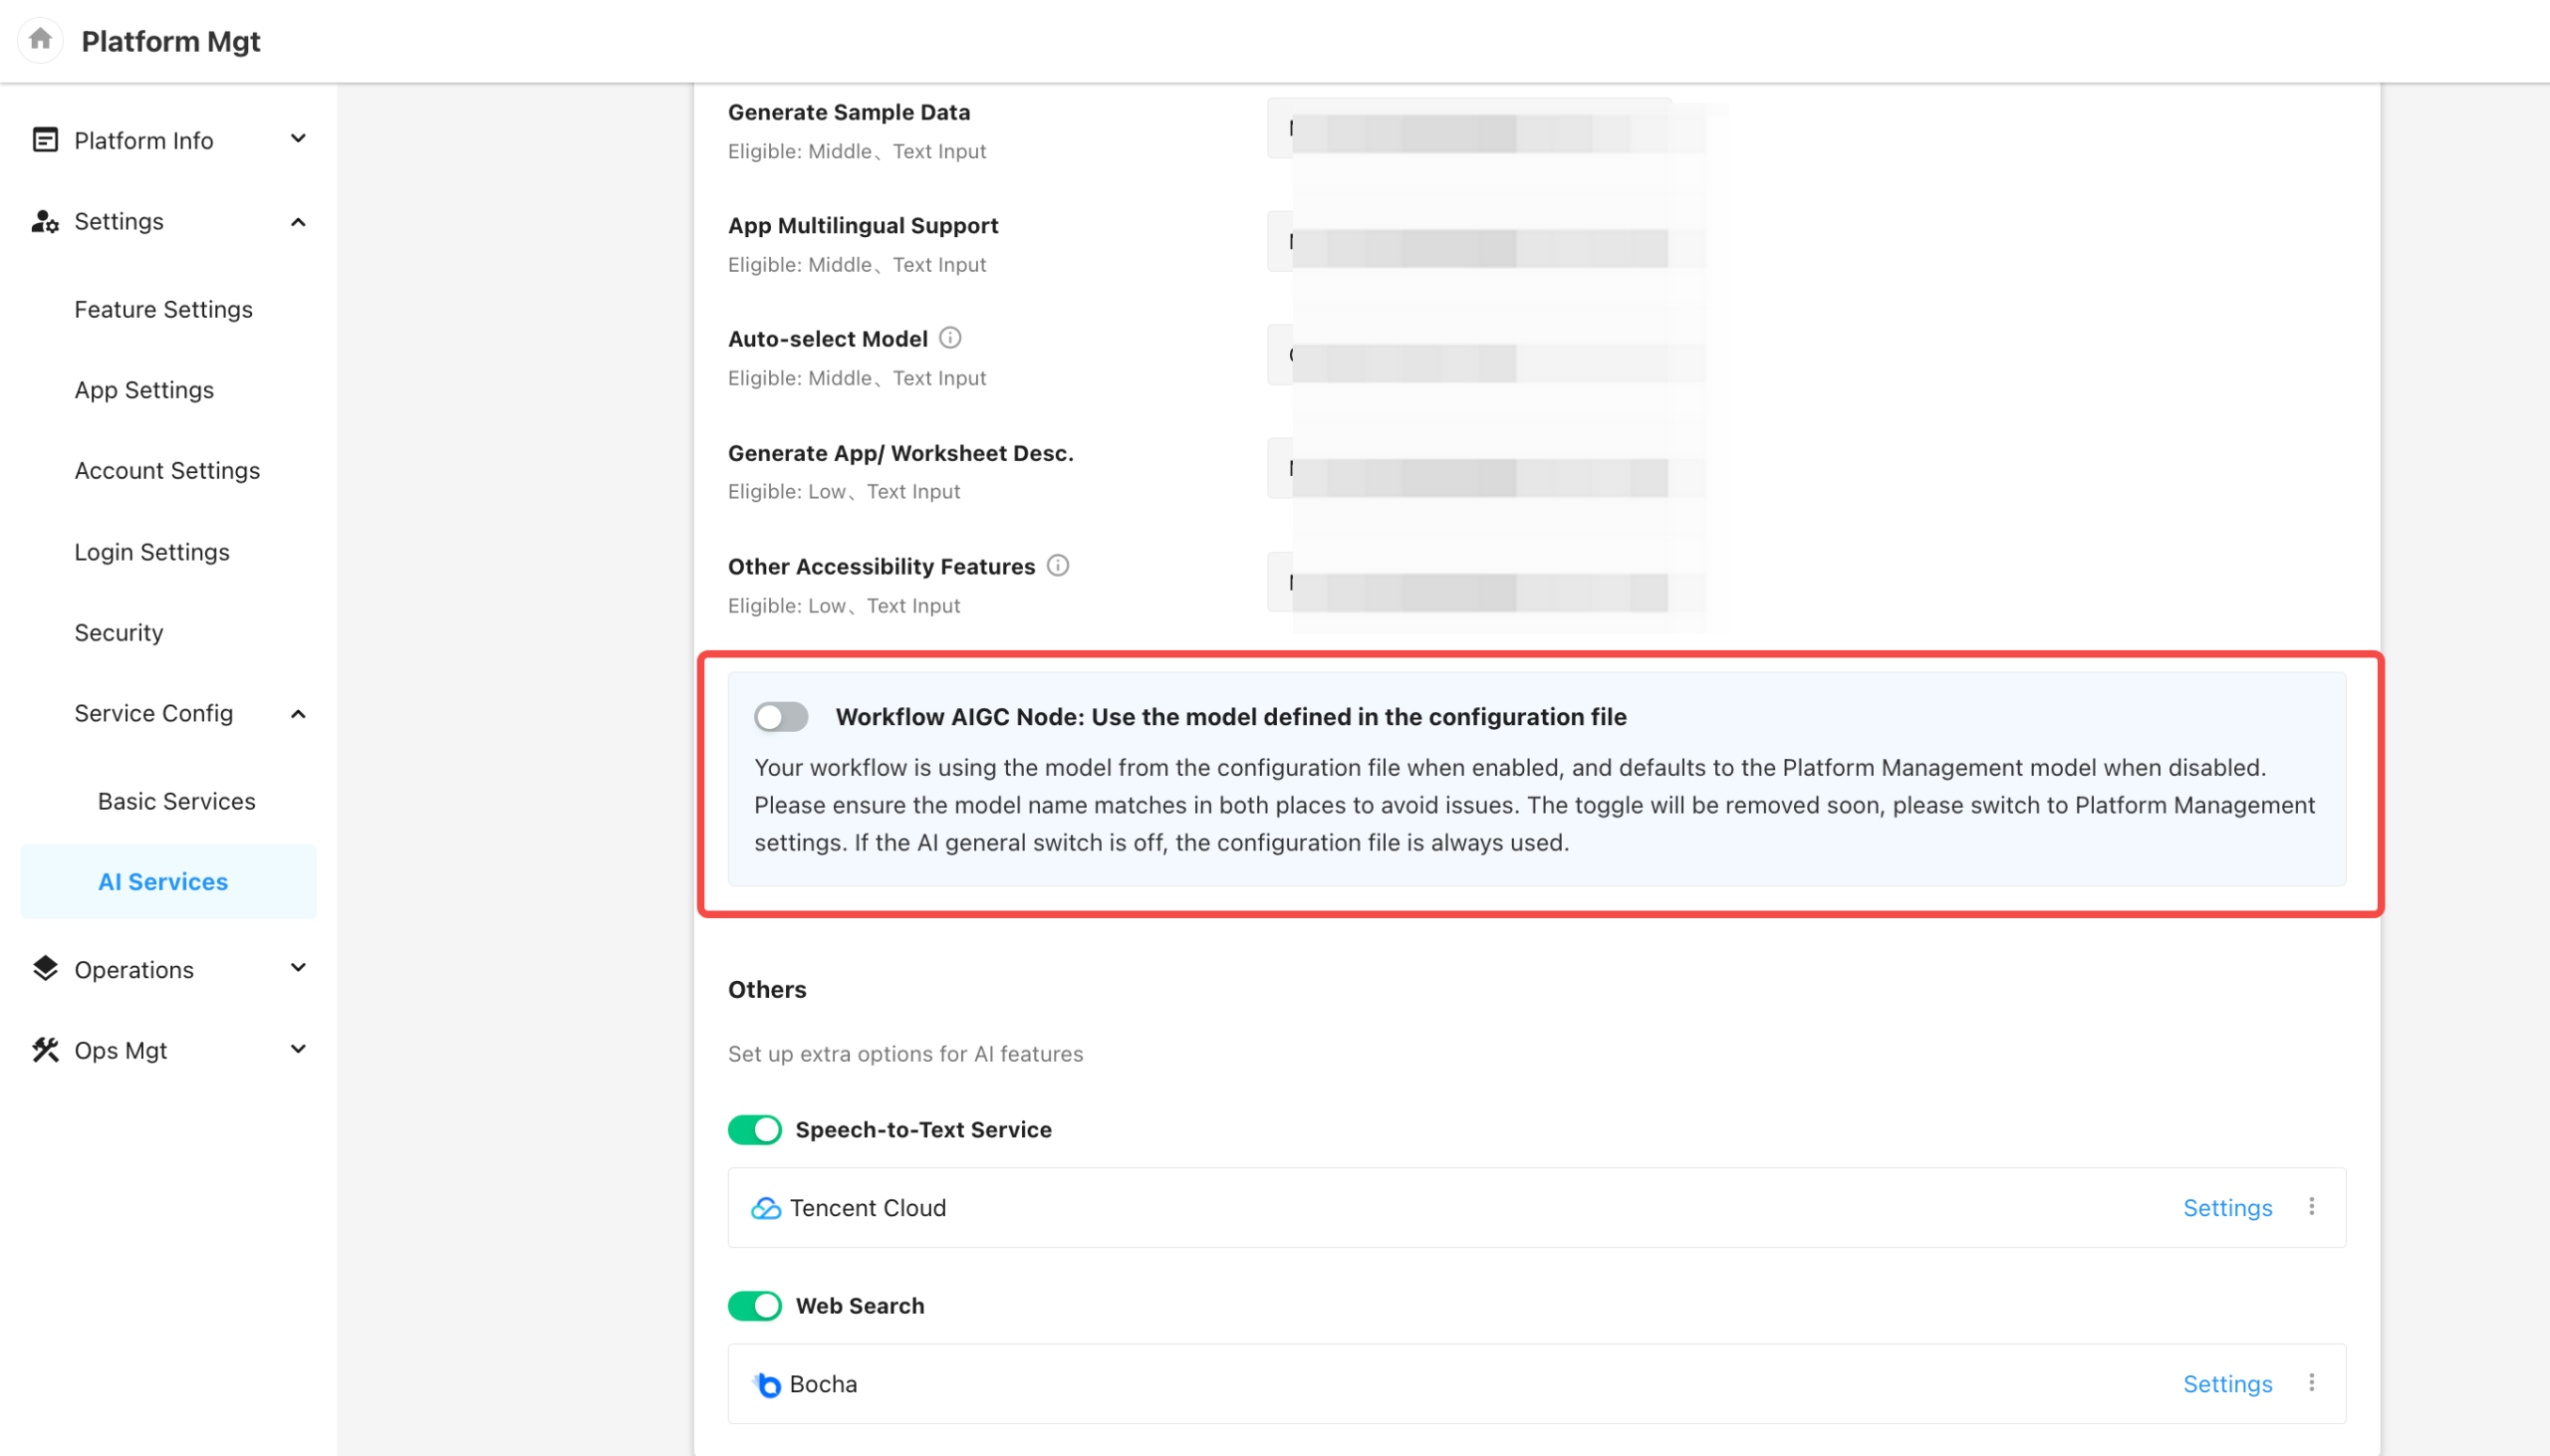
- If your configuration file already includes a model setting for AIGC nodes in workflows, the system will, after the upgrade, enable the option to use the configuration file by default (as shown in the example below).
- If this option is disabled, the AIGC node will use the model defined in the new AI Services module instead.
- To ensure existing AIGC nodes in workflows continue to function correctly, please make sure that the model name (i.e., the internal model ID in the platform) configured in the new AI services matches the model parameter in the configuration file exactly, including case sensitivity.
Application Platform Core – Service Pricing Rules Configuration
Objectives
Although the platform has integrated multiple third-party services such as SMS, email, text recognition, and AI models, it currently lacks the ability to define tenant-facing pricing strategies. This limitation prevents platform operators from setting charging standards based on cost, business strategy, or market dynamics.
To address this, a new Third-Party Service Pricing Management module has been introduced, allowing platform admins to define the pricing for various integrated services (e.g., SMS, email, AI model invocation, etc.).
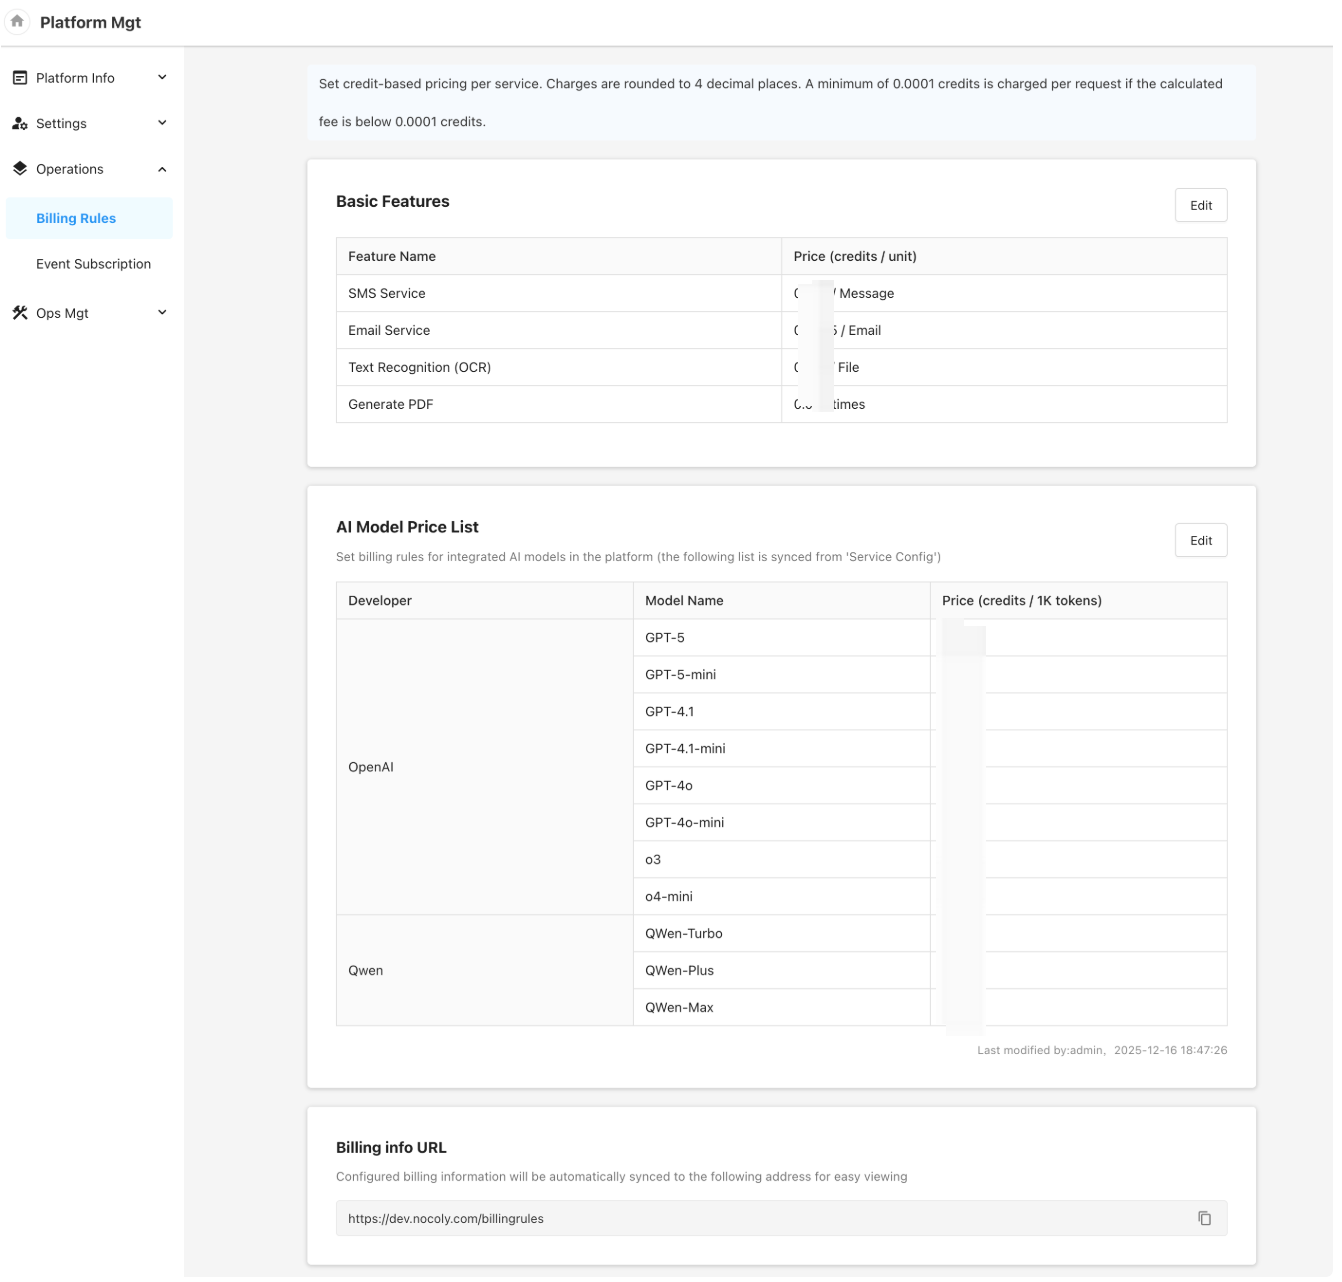
Feature Overview
A new “Billing Rules” module has been added under the “Operations” section in the Platform Management Console (Application Platform Core), enabling platform-level pricing configuration for tenant-facing third-party services.
Basic Services:
- SMS Service
- Email Service
- OCR Service (Optical Character Recognition)
- PDF Generation
AI Model Pricing:
- Pricing is based on cost per 1,000 tokens
- The price reflects the platform-defined unit price for AI models, not the provider-side pricing
- Note: Currently, AI model usage is only charged when invoked via AIGC nodes in workflows. Built-in system AI features remain free of charge.
Auto-Generated Pricing Overview Page:
- A summary page with all defined service prices is automatically generated for centralized viewing and management.